Hdd regenerator recovery of bad sectors. Programs for checking your hard drive for bad blocks (bad sectors)
We will tell you one simple and second, more advanced way to check the status of your hard drive and fix bad sectors using HDDScan and program HDD Regenerator.
The hard drive has its own resource, so it is advisable to check its condition once a year.
How to check your hard drive for errors
Previously we wrote how to check HDD for the presence of bad sectors using the program. If the program showed problems with hard drive, we will try to fix them.
What are bad blocks
In a nutshell, bad blocks (bad block) are damaged sectors on the hard drive into which information cannot be written or read. They appear over time during the operation of the hard drive or when the hard drive is hit while it is running.
How to remove bad blocks from a hard drive
First way, for advanced users who recover bad sectors using the HDD Regenerator program, read
Second way, for Dummies. We recommend when bad sectors on the hard drive to replace it. If this is not possible, we will try to slightly extend the life of your disk.
For this we need the HDDScan program. You can download it
During the scan, HDDScan will refer to bad sectors of the disk and the disk itself will mark them so that Windows system will no longer write your data there. This method doesn't offer much of a guarantee, but it is easy to use.
After downloading and unpacking, go to the folder with the program and launch it by clicking on the HDDScan file.
We see a window in which we must select the drive to be checked in Select Drive. Then click on the round button and select Surface Test from the drop-down menu( surface test).

In the window that appears, select Verify and click Add button Test. Hard test disk is running.

In order to see the progress of the test and the result, double-click on your hard drive in the Test Manager window and select the Map tab in the window that appears.

The window shows the process hard checks disk where we are interested in the Bads parameter. If after the entire check the number of Bads is not very large, 2-5 bad sectors, then your hard drive will still work for some time.
If the quantity is measured in hundreds or thousands, the disk is severely damaged and may fail at any minute.
If there are bad sectors, you need to check the disk once a week and see if the number of Bads is increasing.
Recover your hard drive using special programs. They allow you to test the hard drive and also fix minor problems. Often, this is quite enough to continue fruitful work. From the article you will learn about one of them called Victoria.
What can the utility do?
Checking hard disk Victoria HDD is completely free. The program also has many functions and is designed not only for professionals, but also for inexperienced users. So, now you will learn how to check your hard drive with Victoria.
Modes
In its work, the utility can use standard Windows tools (API) or work offline through ports. Offline mode provides more reliable data, features additional recovery tools, and allows you to test not only internal but also external drives.
What is the use of the utility?
The Victoria program allows you to:
- speed up your computer;
- ensure the stability of both programs and the operating system itself.
The following capabilities allow this:
- repairing faulty areas of the hard drive;
- replacing damaged sectors with backup ones;
- erasing bad sectors.
Is it necessary to use Victoria?
Experienced users will note that it is possible to fix bad sectors of a drive by replacing them with backup ones using the OS (operating system) itself. Correct, but for this you need to check the hard drive volume. However, this method has some disadvantages, for example, working with active section occurs exclusively in DOS mode, no detailed information, there is no possibility of choosing a method for treating the malfunction. Therefore it is better to do hard restoration disk with with the help of Victoria hdd, which is devoid of these shortcomings.
Working with the program
If you decide to use the program in question, it is best to look for the most recent version. After all, it has already corrected the errors that were in the previous ones. There is no need to install the utility. It is distributed in archival form. Unpack the resulting archive and go inside. There you will find only one executable file, vcr447.exe. To make it easier to use, make a shortcut to it on the screen.
If your PC is running Windows 7 or higher, then you must run the file only as an administrator. Right-click on the shortcut and select context menu"Run as administrator" entry and click on it.

Before the Victoria program window opens, several pop-up windows will appear in front of you one by one:
- Unknown error.
- Invalid handle.
- PortTalk driver not installed.

This warns experts that the system does not yet have a driver for working with ports. Click OK and that's it.
Let's get started
The graphical interface of the utility opens on the Standard tab. On the right side, indicate the disk that is to be scanned. Even if it is the only one, it is still necessary to point out it. Then his data will appear on the left.

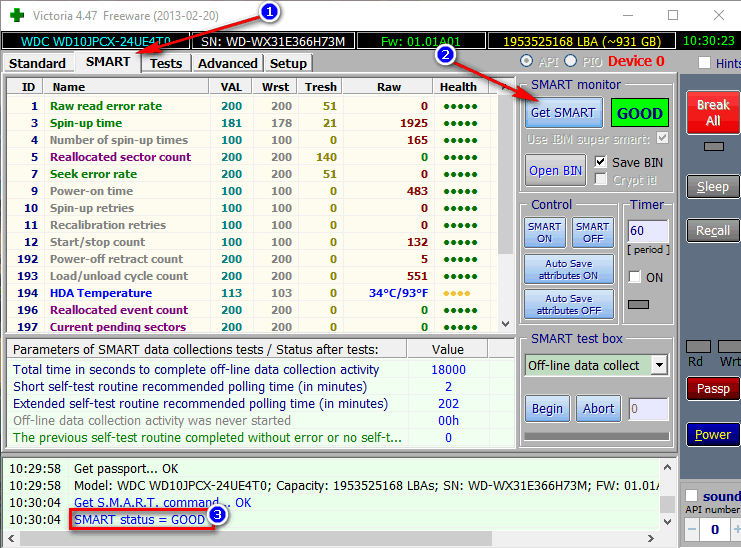
Important! It is strictly forbidden to enter any passwords. This option is for specialists only. Next, go to the Smart tab and on the right side click on Get Smart. The table will display 242 parameters of your hard drive.

The system removes this data from the disk immediately after installing it on the PC, and Victoria takes it from the system. You can look through them, but pay most attention to the fifth item, the Health column. It contains the information for which you launched the utility. What does the color of these circles mean?
- green – HDD sectors feel great;
- yellow – there are problems;
- red – parameter values are invalid.
The Raw column displays how many bad disk sectors were detected.
Test tab
Go to the Test tab. The scanning process is based on measuring the length of time that elapsed from sending a request to returning a response from each sector of the drive. When scanning a disk, the utility evaluates the sectors being scanned and sorts them by color and state (to the left of the sector colors is the maximum allowable response time in milliseconds):
- three gray – great;
- green - not bad;
- orange - satisfactory;
- blue or red – bad.

Actions according to the selected modes will be applied to the HDD sectors that you mark.
Operating modes
The utility has four operating modes:
- Ignore – check without attempting to cure bad sectors;
- Remap – replacing damaged sectors with backup ones;
- Restore – an attempt to restore damaged sectors programmatically;
- Erase - removing bad blocks from disk memory using formatting low level. You can’t just try the mode, as there is a possibility of damage to areas that may still work in the future. The first three will be enough.

Reserve sectors, what are they?
The operating system separates a reserve area on the hard drive. Most often, it is the slowest of all and is located closer to the center of the HDD. Its size is approximately 10% of the total volume. When bad sectors appear, the OS moves data from them to this backup area. True, it does not do this itself, but during the launch of disk error checks Windows tools or using external programs.
Diagnostics
If you have already selected a mode and marked the sectors for treatment, then click Start.

Attention! If after clicking Start the diagnostics do not start, then most likely you did not select your drive in the Standard tab with the mouse. You need to go back, do this and run the scan again.
The testing process can be observed on the screen. In more earlier versions Victoria tested sectors were displayed on the screen in the form of a grid.

However, such graphical display placed a significant load on the processor when large volumes hard drives. As a result of this, in latest version 4.47, the developers replaced the grid with a graph that appears within a few minutes after the start of scanning.

Visualization is disabled if you uncheck Grid.
Button meaning
After starting the test, the name of the Start button changes to Stop, which allows you to stop the process by clicking it.

If you click on the Pause button, it will change the name to Continue and the scanning will pause. Click on it and everything will pick up right where it left off.
Attention! Quit all programs that may be accessing the hard drive being tested. If they are not removed from memory, the readings will lose accuracy, and the number of orange sectors will increase significantly. This will happen due to the fact that some of them will use open source programs.
Will the life of the hard drive be extended thanks to Victoria?
You can programmatically cure up to 10% of bad sectors, as well as restore the operation of any sector on the active volume if this was the result of system failures. Physical damage Victoria does not eliminate it.
However, if the faulty sectors are restored and the remaining ones are moved to the spare area, the disk will still serve. True, it is better not to use it to install the system, but only as an additional one.
Good morning everyone!
I think that many users have encountered suspicious work hard disk: long copying/reading of files, brakes, loading up to 100%, clicking, inability to read any files, etc.
This behavior of the disk may indicate serious problems with it. In order to determine what is wrong with it, you have to resort to specialized service utilities.
In this article I want to highlight a few best utilities ah, who can view the S.M.A.R.T readings. (special hard drive self-monitoring technology), check the disk surface for the presence of bad blocks and try to restore its functionality (that is, try to reassign bad sectors to backup ones, see the link below for more details).
What is a bad block, how to check a disk using the Victoria utility (in detail for beginners, with examples and screenshots), see this article -
6 best utilities for checking a disk for bad blocks
Victoria/Victoria
Developer's website: http://hdd-911.com/
![]()
One of the best utilities for checking and treating bad blocks on your hard drive. The program performs testing, diagnostics, and treatment of the disk at a low level. In addition to HDD, Victoria supports other types of media: FDD, CD/DVD, USB/Flash/SCSI, and also “sees” drives under Windows via API and ports.
Note: I described how to work with Victoria in one of my previous articles, the link to it is provided just above.
Main features:
- support for IDE/SATA controllers;
- ability to view S.M.A.R.T. disk;
- the ability to control acoustic noise;
- tests to check the mechanics and surface of the disc;
- obtaining full technical disk information;
- ability to work under Windows and DOS;
- Supports work on laptops;
- support low level formatting HDD;
- Benchmark functions.
HDDScan
One of best programs for checking hard drives under Windows. Allows you to quickly assess the condition of the hard drive, check the drive for bad sectors, view S.M.A.R.T. attributes.
In addition, the program allows you to manage power, adjust the acoustic mode, and monitor the temperature of the drive (data can be displayed on the taskbar).

Main features:
- Support for SSD drives;
- Support HDD with interfaces: ATA/SATA, SCSI, USB, FireWire or IEEE 1394;
- Drive test in linear verification, linear reading and linear writing modes;
- Reading and analysis identification information from hard drives with ATA/SATA/USB/FireWire/SCSI interface;
- Changing the AAM, APM, PM parameters on drives with ATA/SATA/USB/FireWire interfaces (useful for those whose hard drive is very noisy during operation);
- Works in all popular Windows OS: XP, 7, 8, 10.

HDTA2
![]()
HDAT2- system utility, necessary for diagnosing and “treating” hard drives. One of the main differences between this utility and “Victoria” (presented above) is its support for a much larger type of disk (note: supported interfaces: ATA/ATAPI/SATA, SSD, SCSI and USB).
HDAT2 can operate in 2 modes:
- disk level: diagnostics and “treatment” of bad sectors on identified drives. By the way, in addition to diagnostics, you can get any information about the disk (which can only be obtained programmatically);
- file level: search, read and check records in file FAT systems 12, 16, 32. Ability to check, delete and restore records of bad sectors and flags in the FAT table.

Important!
I recommend using HDAT2 with boot disk or flash drives. Work from under Windows program It will most likely be incorrect. On the developer's website, use the version "CD/DVD Boot ISO image" - it must be correctly written to a flash drive/disk, like any other bootable media. You can read about this in one of my articles: .
MHDD
Developer's website: http://mhddsoftware.com/
MHDD is a service utility for accurate diagnostics and repair of drives (HDD). The utility allows you to work with disks at a low level, through the ports of the IDE controller. The program has enough high speed scanning and “curing” the disk from “soft”-bad sectors.
Main functions:
- accurate and very quick diagnostics hard state disk, optimal algorithm for fixing bad sectors;
- the ability to adjust the noise from the drive (AAM);
- viewing S.M.A.R.T. readings;
- error logs;
- the ability to delete all information on the disk without the possibility of restoring it;
- an attempt to warm up the drive and test it under extreme conditions;
- the ability to test several hard drives at once.
Macrorit Disk Scanner
![]()
Macrorit Disk Scanner is a good and working tool for checking your hard drive for bad sectors. By the way, I want to especially note that the utility scans the disk very quickly- 1.5-2 times faster than, say, the famous Victoria! True, it will not help “cure” the disk - it simply does not have the functionality that Victoria has.
You can scan either the entire disk or certain range sectors (useful for large disks when scanning may take too long).
The utility allows you to work with all popular types of drives: IDE, HDD, SSD, SCSI, FireWire, RAID, SD cards, etc.

Macrorit Disk Scanner main window
Generally, good alternative previous programs, especially when you need to quickly and easily find out the status of the disk.
Ashampoo HDD Control
Developer website: https://www.ashampoo.com/ru/rub/pin/0365/system-software/hdd-control-3
![]()
A multifunctional program for monitoring the status of all your drives in the system. Thanks to minute-by-minute monitoring of the status of your disks, the program will prevent the loss of information by warning you in time about any problems.
By the way, anyone who has used products from Ashampoo knows that their programs are designed so that any novice user can work with the program simply and easily. HDD Control is no exception to this rule; anyone who wants it can figure it out...

Main functions:
- monitoring the status of drives online;
- the ability to test the drive (several tests are available to get a “complete picture” of the drive’s condition);
- notification of dangerous disk conditions leading to failure or possible loss of information;
- possibility of disk defragmentation;
- support for drives with interface: IDE, ATA, hard drives connected via USB and Firewire;
- supports disks connected via RAID controllers;
- View disk information: registration number, cache size, number of partitions, etc.;
- It is possible to quickly clean the disk from junk files;
- the ability to export data on the disk status and tests performed.
PS
No matter how good the readings are after testing and diagnosing the disk, do not forget to back up important documents and files. As they say, once a year the stick shoots...
It’s better to spend 5 extra minutes on backup than to waste days and weeks of work.
Repairing bad sectors will help extend the life of your hard drive and even recover some previously lost files. However, you should remember that this is a responsible and rather risky business, since by pressing the wrong buttons, you can completely ruin your hard drive. Follow the instructions provided in this article strictly and you will be able to recover some bad sectors. Before starting work, select the software with which you will restore sectors. There are many for you to choose from convenient programs: Victoria, HDAT2, HDDregenerator.
How to recover bad sectors of a hard drive using HDAT2
Working with this utility requires the presence of a boot disk or bootable flash drive. You will learn how to write them down in another article. Must be installed on your computer Daemon program Tools or Ultra ISO.
- Download the HDAT2 program from the official website https://hdat2.com.
- You need the “CD/DVD Boot ISO” partition.
- Download the latest version that comes with ISO format, not SFX.
- Find your file in your downloads folder and open it with using Daemon Tools, or other software for mounting images.


- Take a blank disk and click on the “Burn image to disk” field.


Please note that all your further work with this utility will take place entirely in the BIOS. Read carefully the fields you click on.
- To begin, turn off your computer and enter the BIOS. Each brand of computer has its own login buttons. Try holding F12 or F7, or better yet, read about it on the Internet.
- After entering the BIOS, select the system boot method - CD/DVD, and then enter the HDAT2 command, as in the screenshot below.


- After this, a menu will appear in front of you with hard drives that are connected to your computer. If he is alone, then you should not have any problems with the choice. Click on your hard drive and press Enter.
- In the window that appears, select the line “Hidden areas menu”.


- Now test your computer for bad sectors. Even if you know their exact number, you will still have to run the test, since the program needs it to further fix the problem. Click “Powerful test READ/WRITE/READ/COMPARE”

- That's all. Click on the very first line, as shown in the screenshot, to repair your sectors. Please note that this will take quite a long time, so you can move the laptop aside and go about your business. As soon as the program finishes working with Bad sectors, do not forget to return the system boot not from CD, but from the hard drive.


How to recover bad sectors of a hard drive using HDD Regenerator
When starting to work with this utility, you can read a lengthy article about its work in order to roughly understand the structure of the program: . The advantage of the utility is that you do not have to create bootable USB flash drive or disk and log in from the BIOS. Experienced users note that this program actually corrects the problem by degaussing, rather than simply disabling bad sectors.
Download the program on the Internet, keep in mind that only its first use is free. If you want to heal bad sectors again, you will have to buy the software.
Installing the program takes just seconds.


Look carefully at the window interface:
- Left button “Bootable” USB Flash” will help you create a bootable USB flash drive for working with the program in the BIOS.
- The right “Bootable CD/DVD” creates a boot disk for the same purposes.
- The most top line allows you to work from under the Windows axis, which saves a lot of time.
Click on the top line.


Select your hard drive. The model, amount of memory and all sectors will be written on it. Just double click on it.


Please note that all windows must be closed and all processes stopped. Only then can you start working with sectors - the hard drive should be unloaded as much as possible.
Select the second item in the menu that appears – “Normal Scan (with/without repair)”. This option repairs bad sectors right in the process of scanning all sectors of hard disk. Please note that the mouse does not work in this program. You need to enter the number 2 and then press Enter.


Now you need the “Scan and repair” item to confirm your intention to fix all sectors. Enter number 1.
You can also enter the number 3 to activate the “Regenerate all sectors” item. This option carries out preventive maintenance on absolutely all sectors, even if they are not damaged. This is more suitable for experienced users who can handle it on their own. possible problems during the regeneration process.


Now you have to select the start of the scan:
- Point number 1 “Start sector 0” starts scanning and treatment from the very beginning.
- The second option “Start sector ***” continues the previous scan if it was interrupted for one reason or another.
- And the third item “Set start /end sectors manually” allows you to enter the range of sectors to check manually.
It's better to start from the very beginning by choosing the first option.


The process will start instantly, all you have to do is wait.

One of the biggest troubles for PC owners can be damaged sectors on the hard drive. Such sectors are called “broken,” and the hard disk itself with such damage is said to have begun to “crumble.”
The location of such damage directly determines the ability to turn on/off the computer. If the sectors where the operating system files are located fail, the PC will not turn on. If we're talking about about sectors where other files are located, then the user will have the opportunity to boot the machine. Depending on this feature, the method of removing the hard drive is selected.
What to do
With this type of damage, you need to open “My Computer” and select right click mice required disk. Next, from the proposed options, select “Properties”, then “Service” and “Run check”. You need to check the “Automatically correct” box. system errors" and "Check and repair bad sectors" By clicking “Start”, the user starts checking the hard drive for damage. After this, you are instructed to restart the PC.
In the second case, you should have a disk with a virtual one at hand. operating system or installation Windows disk. To start the computer, you need to insert the disk into the drive and turn on the machine normal mode. All further actions similar to the steps described in previous paragraph. When working with installation disk A menu will appear with the option to select the “Restore System” command. As a result, the hard drive will be checked for bad sectors, and any damage found will be repaired.
Special programs
You can also check and restore your hard drive using a program launched through the recovery console. The Recovery Console itself can be launched without a boot disk. To do this, press the F8 key and select safe mode, supporting command line. After the console is loaded, the partition with Windows installed on it is selected. It is necessary to ensure that the partition matches the disk after this administrator. After the appropriate prompt appears in the line, enter the disk name, route and file name. Using the “Enter” key, the user starts the recovery process.
Thus, when checking the “C” partition of the hard drive, you need to launch the System Recovery Console and issue the command chkdsk c: /f /r. It’s easy to prevent such a nuisance in the future - to do this you need to acquire special programs eg MHDD. Such