Far Manager is a free console file manager in Russian and English language(has a multilingual interface). Its functionality is similar to any other file manager, for example, Total Commander. Has a built-in editor text files like a notepad, but with syntax highlighting. It is possible to change file encoding, as well as many other useful functions.
The interface is simple, columnar, like the Norton Commander file manager from MS-DOS, the forefather of Windows.
Where to download Far Manager
Far Manager is distributed free of charge, you can download the program version on the official website: http://www.farmanager.com/download.php?l=ru. Below we will describe how to change the interface language to Russian.
Installing and configuring Far Manager
Does not require special settings or assembly. You simply download the installer and install Far Manager as regular program. However, you can always make your own adjustments. For example, by default, the font in the interface is quite small.
List of abbreviations and their meanings:
To increase it, you need to go to the properties of the shortcut on the desktop, find and increase the font (RMB( right click mouse) by the shortcut - Properties - Font)

- Selecting the font Lucida Console
- A new font size scale will appear. Choose the size according to your taste, for example, 20
As a result, the interface will become more convenient

Now you can change the interface language to Russian. To do this, open Far Manager and press F9 - Options - Languages. In the window that appears, select Russian language

In general, at this stage initial setup completed. Next, we will learn how to use this program, or rather, read and perceive the interface.
How to use Far Manager
To begin with, about the interface design of this program.
The interface consists of columns in the central area, a control panel at the bottom and an information panel at the top. The speakers in the center are two global compartments. Each compartment can have one or more columns, by default two.
A bay is a file-level system of a specific disk. To move higher in the level, you need to move the cursor using the arrows on the keyboard or the mouse to the highest position on the symbol.. and press Enter. To go to a subdirectory of the current directory, move the cursor to it and press Enter. You can also use your mouse; double-clicking on the catalog will take you to it. To change the drive, you need to use the hotkeys Alt + F1 or Alt + F2. Now in more detail about the interface and with illustrations:
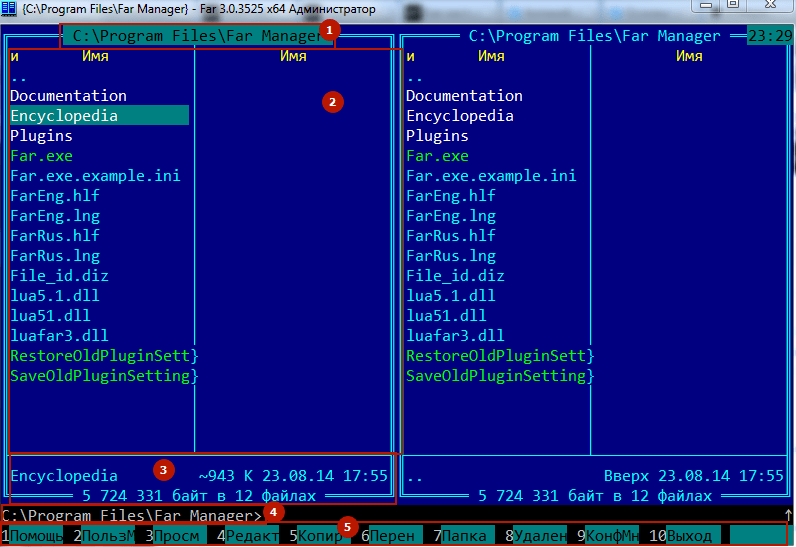
About the control panel - the numbers are indicated there. Each number means a panel index with F1-F12 on the keyboard
- F1 - help - reference for Far Manager. At least briefly study the reference book, many questions will disappear by themselves
- F2 - user menu. An unnecessary option at first
- F3 - view file contents. Catalogs show their size
- F4 - edit files. On directories, calls up a menu for changing attributes
- F5 - copy selected files and folders (directories). Selection is made using the Insert, Ins or RMB button (right mouse button). Also, you can copy files by dragging and dropping
- F6 - transfer selected files and folders (directories). Selection is made using the Insert, Ins or RMB button. Also, you can hold Shift and transfer files with LMB (left mouse button)
- F7 - create a directory (folder) in the current directory (folder)
- F8 - delete a folder or file. You can delete several files and folders at the same time by first selecting them with Insert or RMB
- F9 - mentioned this command. Calls up the options menu at the top. Study it, it may be useful
- F10 - close Far Manager
- F11 - brings up a list Far plugins Manager with the possibility of further customization, as well as some others additional functions.
- F12 - built-in screens. Far Manager allows you to use multiple copies of the file viewing and editing program. This button allows you to quickly switch between them, displaying full list open screens. Use F1 to learn more about this feature. This option is for advanced users
By the way, it is worth noting that Far Manager has the ability to control the mouse. Thus, the entire control panel below is easily controlled by LMB. Personally, I don’t use this option, because I find it more convenient and faster to use hotkey combinations, but I admit that for some people it will be more convenient to control the mouse.
Also, if you hold down Alt or Shift , additional buttons in the control panel. Thus, the hotkeys are collected, additional commands in Far Manager.
Far Manager Commands
Or, as it would be more correct to say, the hot keys on the keyboard that you most often have to use:
- Ctrl + O - show or hide the panel and console contents
- Tab , Shift + Tab move between left and right compartments
- Shift + 2 - change the number of columns in the global compartment. Instead of 2, you can use any button from 1 to 9. Default is 2
- Alt + F9 - switch from windowed mode to full screen and vice versa
- Home — move to the beginning of the list of files and subdirectories of the current directory
- End — move to the end of the list of files and subdirectories of the current directory
- PageUp - move to the top of the list of files and subdirectories of the current directory
- PageDown — move to the bottom of the list of files and subdirectories of the current directory
- Ctrl + PageUp - move to the directory 1 level higher
- Ctrl + F1, Ctrl + F2 - move to the directory 1 level higher in the left (Ctrl + F1) and right (Ctrl + F2) compartments
- Ctrl + A - shows the properties of a file or folder (directory, directory). You can immediately change and save changes. For example, you can change the file creation date

- Insert, Ins, RMB - selecting files one at a time for mass manipulation of them (transfer, copy, delete)
- Shift + PageUp, Shift + PageDown - selecting files for subsequent mass manipulation (transfer, copy, delete)
- Alt + F6 - create a symbolic link
- Shift + F1 - pack selected files and directories into an archive

- Shift + F2 - unpack the selected archive into the specified directory

- Alt + F1 , Alt + F2

A dialog box opens with suggestions for selecting a disk, as well as other options; as a rule, the list is compiled by plugins (NetBox, WinSCP, registry editor, folder for temporary files, network access, list of processes)
- Alt + F7 - search among files in the current directory

It is better to leave the file mask free *.*, then the search will take place in all files. If you need to search, for example, only among php files, that is, those with the .php extension (for example, index.php and db.php), use the *.php mask.
You can change it at your discretion.
You can also select the Insert button on the keyboard. necessary files and folders (directories), then place the cursor on one of them to search only within them.
- Alt + Insert - useful if you want to copy text from the console

While in the console, you simply press the hot keys Alt + Insert (the cursor will change its shape), then use the mouse or use the arrows and hold down Shift to select required fragment text and copy it using Enter
Plugins for Far Manager
Plugins can quite significantly expand the functionality of Far Manager, turning it from a file manager into a multifunctional processor.
A complete list of plugins can be found in Far Manager PlugRing
First of all, we need . This plugin allows you to connect to servers on Linux OS: Ubuntu, Debian, Freebsd, Centos via SCP (obsolete), SSH (SFTP), FTP, WebDav protocols.
NetBox - plugin for connecting to a remote server via SSH, FTP, WebDav
NetBox is a plugin for Far Manager, a successor to the traditions of WinSCP, which implements the client part of the SCP (Secure Copy Protocol, obsolete), SFTP (SSH) protocols File Transfer Protocol), FTP (Files Transfer Protocol) and WebDav. Designed to connect to to a remote server on Linux OS: Ubuntu, Debian, Freebsd, Centos - via , FTP or WebDav and managing it: creating, editing, copying, deleting files using the above protocols, transferring them between your computer and servers that support these protocols, in our case, servers website hosting. With its help we will interact with file system hosting, where your sites are located: upload and download files, .
How to install NetBox
Currently Far Manager comes with Netbox pre-installed, but you can Download NetBox in Plugring Far Manager.
Unpack the downloaded file into the plugins folder
(Start - Run - %ProgramFiles%\Far Manager\Plugins)
At this point, the installation of NetBox in Far Manager is complete, you just need to restart the latter.
Connecting to a remote server via SSH, FTP, WebDav using NetBox, WinSCP
Press the key combination Alt + F1 or Alt + F2, in the menu that opens, select NetBox, it is numbered 2.
Now we need to create a connection to our server. Let's say you have information for connecting via SSH:
Login: root, password: pass, server IP: 127.0.0.1, port 22
As suggested to create a new session, press Shift + F4 and enter the data:

Connect to the server. Now we can copy files from the computer to the server and back (using F5, described in more detail above), change them (F4), and also, if you have your own server, use the console to manage it.
If you need to connect via FTP or WebDav protocol, simply select the one you need from the drop-down list in the Protocol field
One of the most convenient file managers, designed to work with files and folders on disks, primarily through the keyboard. This increases speed and convenience during various operations performed with objects (copying, cutting/moving, etc.). Outwardly, he is very reminiscent of the once popular system Norton Commander, at one time, was installed on almost all machines until the advent of Windows OS. Those who are nostalgic for the “nineties” will be pleasantly surprised! Now, about everything in order and in more detail.
Russification of Far Manager
If you are not satisfied with the fact that the program offers to use the interface in English by default, activate the Russian language. Click F9, then, in the horizontal functional panel that appears at the top, click "Options", then open "Languages" and there select our language. Now, Far Manager will be completely in Russian.

Selecting disks/drives
If your machine has several installed at once hard drives, then you can select any of them to work in Far Manager by pressing a key combination Alt+F1(select disk in the left panel) or Alt+F2(select disk in the right panel). It is worth adding that Far Manager, in addition to the main hdd connected to the car, also works fully with any external drives, and even with network drives.

File operations (copy, cut/move, delete, search)
Basic operating Far window Manager consists of two windows/panels. This is done for greater convenience so that the user does not have to get confused by constantly opening different directories in the same window.
Copy, move/cut. To implement any of these file operations, to begin with, go to the right panel (key TAB) and open there the desired folder, where you ultimately want to copy/move the objects. Then, go back to left panel(using the same key TAB) and find the files in the folders you need to copy/move. Select them with buttons "Insert" or "*"
(asterisk on number pad keyboard) and press any of the buttons ( F5- "Copy" F6- "Transfer/Cut"). Don't forget to confirm the operation with the key Enter.

Deleting files/folders. To delete objects, open the corresponding folder, select (mark) all the necessary files in it and click the button F8"Delete".

Search for objects. To search for folders/files in all directories of your hard drive, use the key ALT+F7. Click it and enter desired name to search, and also (if necessary) set Extra options search.

Below in the screenshots is a more detailed list main function keys
in Far Manager.


Main function menu
The main functional menu in Far Manager is located in top horizontal panel
. Initially it is hidden. To access it, click F9, select any of the tabs and options found in them.

Additional function menu
To access additional functions for working with folders/files in Far Manager, press and hold button ALT. A list of functions will be displayed in the lower horizontal panel of the manager.

Sorting files in Far Manager
To make it more convenient to find and work with objects on the drive, you can use the object sorting function, which has many parameters. Open a folder and press and hold CTRL to select any of the functions to sort.

Working with file archives
To work with file archives, Far Manager also has special functionality. To call these additional functions, press and hold Shift. Then in horizontal menu from below, also select the desired one from the options.

Working with FTP
Far Manager supports data transfer through this protocol. To create/activate an FTP connection, click Alt+F1 or Alt+F2(depending on which panel you are in) and select the option "Netbox". If you have a ready-made connection, it will appear in the list on the panel. Hover over it and click Enter. If there is no ready connection, then click Shift+F4 to bring up connection creation settings. All you have to do is select the protocol type and enter the correct values in the required options.

Console (command) line
Far Manager also has such a function. Through console line, you can perform various operations through special software commands. For example, copying files from disk to disk: " C:\>copy test.txt d:\test.txt
", etc. But people who are knowledgeable in programming will be able to use the capabilities of the console much more widely!

Here, in principle, are all the main points for working with this file manager. As you can see, there is nothing really complicated!
What is FAR
How to register a FAR
Command Line Options Keyboard Commands
Plug-in support Overview of plug-in capabilities
Panels: File panel Folder tree Information panel Panel quick view Drag and drop files Configuring file panel viewing modes Marking files Menu: Left and right panel menu File menu Command menu Options menu File search Command history Folder search Folder comparison User menu Drive selection menu File associations Operating system commands Folder links Sorting groups File panel filter Switching between screens List of tasks System parameters Panel settings Interface settings File coloring File descriptions Viewer settings Editor settings Copy, move, rename and create links Built-in editor File masks Keyboard macros
How to use help
In the table of contents help system There are links (they function much like the hyperlinks familiar to every Internet user) that point to sections with more detailed information. To move between links you can use Tab and Shift-Tab. Pressing Enter will bring up the page corresponding to the selected link. The same result can be obtained by clicking the mouse button on the required link.
If the text does not fit completely in the help window, a scroll bar appears. In this case, the text can be moved up and down using the cursor keys.
Pressing Alt-F1 or BS takes you to the previous page.
Shift-F1 brings up help content.
Press Shift-F2 to get help on plug-ins.
To switch between full screen mode You can use F5 to display help and display text in the window.
Panel control commands
General commands
Change active Tab
Swap panels Ctrl-U
Hide/show information panel Ctrl-L
Hide/show quick view panel Ctrl-Q
Hide/show folder tree Ctrl-T
Hide/show both panels Ctrl-O
Temporarily remove both panels Ctrl-Alt-Shift
(works as long as we hold these keys)
Hide/show inactive panel Ctrl-P
Hide/show left panel Ctrl-F1
Hide/show right panel Ctrl-F2
Change the height of panels Ctrl-Up, Ctrl-Down
Change width (if empty) command line) Ctrl-Left,Ctrl-Right
Restore panel width to default Ctrl-Numpad5
Hide/Show function key bar Ctrl-B
File Panel Commands
Unmark files with the same extension as the current one Ctrl-
Invert mark including folders Ctrl-
Mark files with the same name as the current file Alt-
Unmark files with the same name as the current file Alt-
Mark all files Shift-
Uncheck all files Shift-
Restore previous mark Ctrl-M
Scroll long names and descriptions Alt-Left,Alt-Right
Set short view mode LeftCtrl-1
Set view mode to medium LeftCtrl-2
Set full view mode to LeftCtrl-3
Set Wide View Mode to LeftCtrl-4
Set detail view mode to LeftCtrl-5
Set description viewing mode to LeftCtrl-6
Set viewing mode for long descriptions LeftCtrl-7
Set file owner view mode to LeftCtrl-8
Set file link viewing mode to LeftCtrl-9
Set alternate full view mode LeftCtrl-0
Remove/show files with Hidden and System attribute Ctrl-H
Toggle output of long/short file names Ctrl-N
Hide/Show left panel Ctrl-F1
Hide/Show Right Panel Ctrl-F2
Sort active panel files by name Ctrl-F3
Sort active panel files by extension Ctrl-F4
Sort active panel files by modification time Ctrl-F5
Sort active panel files by size Ctrl-F6
Do not sort active panel files Ctrl-F7
Sort active panel files by creation time Ctrl-F8
Sort active panel files by access time Ctrl-F9
Sort active panel files by description Ctrl-F10
Sort active panel files by owner Ctrl-F11
Display sorting mode menu Ctrl-F12
Use sort by groups Shift-F11
If the active pane is a quick view pane, directory tree, or information pane, the catalog changes to the passive pane rather than the active pane.
(with empty command line)
(ignoring command line state)
(ignoring command line state)
to the Clipboard (ignoring the command line state)
Notes: 1. If the "Allow reverse sorting" option is enabled in the Panel Settings dialog, then pressing the same file sorting key again will change the sorting direction from ascending to descending and vice versa; 2. The Alt-Left and Alt-Right combinations used to scroll through long names and descriptions only work with the Left and Right keys not located on the numpad. This is because when you hold down Alt, the cursor keys on the numpad are used to enter characters through their decimal codes. 3. The Ctrl-Alt-Ins key combination works according to the following rules: * for network drives - network (UNC) name of the file object; * for local disks - full name, taking into account symbolic links. 4. The key combinations Alt-Shift-Ins and Ctrl-Alt-Ins treat the name ".." as the name of the current folder.
Quick search in panels
To position a file, you can use the operation
quick search by the first letters of the name. To do this, hold down the Alt key (or Alt-Shift) and type the name of the desired file until the cursor moves to it.
Using Ctrl-Enter, you can cycle through the panel elements in accordance with the file mask entered in the line.
In addition to regular characters, you can also use the characters "*" and "?" in the file name.
Command line
Left symbol Left,Ctrl-S
Right symbol Right,Ctrl-D
Word left Ctrl-Left
Word Right Ctrl-Right
To the beginning of the line Ctrl-Home
To the end of the line Ctrl-End
Delete Del symbol
Remove character on left BS
Delete to the end of line Ctrl-K
Delete word on left Ctrl-BS
Delete word on the right Ctrl-Del
Treat the following key combination as Ctrl-Q code
Copy to Clipboard Ctrl-Ins
Paste from Clipboard Shift-Ins
Paste commands
In quick search mode, Ctrl-Enter does not insert the file name, but cycles through the elements of the file panel.
Paste file name from passive panel Ctrl-Shift-Enter
Paste full filename from active panel Ctrl-F
Paste full file name from passive panel Ctrl-:
Paste network (UNC) file name from active panel Ctrl-Alt-F
Paste network (UNC) file name from passive Ctrl-Alt-panel:
Paste path from left panel Ctrl-[
Paste path from right panel Ctrl-]
Paste network (UNC) path from left panel Ctrl-Alt-[
Paste network (UNC) path from the right panel Ctrl-Alt-]
Paste path from active panel Ctrl-Shift-[
Paste path from passive panel Ctrl-Shift-]
Paste network (UNC) path from active panel Alt-Shift-[
Paste network (UNC) path from passive panel Alt-Shift-]
Notes: 1. If the command line is empty, Ctrl-Ins will copy the names of the files selected in the panel to the Clipboard in the same way as Ctrl-Shift-Ins (see Panel Control Commands); 2. Ctrl-End pressed at the end of the command line replaces its current contents with a command from the command history, starting with the letters already entered, if such a command exists. To move on to the next such command, you can press Ctrl-End again. 3. Most of the commands described above are valid for all edit lines, including lines in dialogs and the built-in editor. 4. Alt-Shift-Left, Alt-Shift-Right, Alt-Shift-Home and Alt-Shift-End highlight a block on the command line regardless of the state of the panels. 5. Key combinations that allow you to get the network (UNC) name of a file object work according to the following rules: * for network drives - network (UNC) name of the file object; * for local disks - full name, taking into account symbolic links.
File management and service commands
Call user menu F2
View Ctrl-Shift-F3, Numpad 5, F3
When NumPad 5 or F3 is pressed on a file, it calls the built-in, external, or associated viewer, depending on the file type and viewer settings.
Ctrl-Shift-F3 always brings up the built-in viewer, regardless of file associations.
When you press any of these keys on a folder, the sizes of the selected folders are calculated and displayed.
Editing, Unpacking Ctrl-Shift-F4, F4
F4 brings up the built-in, external, or associated editor, depending on the file type and editor settings.
Ctrl-Shift-F4 always brings up the built-in editor, regardless of file associations.
F4 and Ctrl-Shift-F4 for folders bring up a dialog for changing file attributes.
Copy F5
Copies files and folders. If you want to create a destination folder before copying, add a backslash (\) to its name.
Rename or move F6
Rename or move files and folders. If you want to create a destination folder before moving, add a backslash (\) to its name.
Creating a new F7 folder
Delete Shift-Del, Shift-F8, F8
Deleting files and folders. F8 and Shift-Del delete all selected files, Shift-F8 deletes only the file under the cursor. Shift-Del always deletes files without using the Recycle Bin. Using the Recycle Bin with the F8 and Shift-F8 commands depends on the configuration (local hard drives only).
Destroying files and folders Alt-Del
Destroys files and folders. Before deletion, the file is overwritten with zeros, truncated to zero length, and renamed to a temporary name.
Show horizontal menu F9
Quit FAR F10
Show F11 plugin commands
Change current drive in left panel Alt-F1
Change current drive in right panel Alt-F2
Built-in/external viewer Alt-F3
Calls, depending on the file type, the associated viewer or the external viewer specified in the settings if the default is internal, or internal if the default is external.
Built-in/external editor Alt-F4
Calls an associated editor depending on the file type
or an external editor specified in the settings if the default is internal, and internal if the default is external.
Print files Alt-F5
To print selected files, use the "Print Manager" plugin.
Create file and folder associations (NTFS only) Alt-F6
Using hard file links, you can have several different file names referencing the same data.
Execute file search command Alt-F7
Show command history Alt-F8
Resizing the FAR Manager window Alt-F9
In windowed mode, switching occurs from the normal to the maximum allowable size of the console window and back. In full screen mode, Alt-F9 switches the screen from 25 lines to 50 and back. See TechInfo#38 for details.
Configuring parameters for plug-in external modules Alt-Shift-F9
Execute the search folder command Alt-F10
Show browsing and editing history Alt-F11
Show folder history Alt-F12
Add files to the archive Shift-F1 Extract files from the archive Shift-F2 Execute archive management commands Shift-F3 Edit a new file Shift-F4
When creating a new file, the encoding that was set in the last opened editor is used. If the editor is opened for the first time in the current FAR session, the DOS encoding is used.
Copying a file under the cursor Shift-F5 Renaming or moving a file under the cursor Shift-F6 Deleting a file under the cursor Shift-F8 Save configuration Shift-F9
Select last executed menu item Shift-F10
Launch, change folder, enter archive Enter Launch in a separate window Shift-Enter
Shift-Enter on a folder brings up Explorer, showing the contents of the selected folder. In order to show the root folder in Explorer, you need to press Shift-Enter on the desired drive in the drive selection menu. Shift-Enter on a folder named ".." opens the current folder in Explorer.
Change folder to root Ctrl-\
Change folder, enter archive (also SFX archive) Ctrl-PgDn
If the cursor points to a folder, then the current folder is changed to the indicated one. If the cursor points to a file, then, depending on the file type, either the associated command is executed or the archive is entered.
Go to folder above Ctrl-PgUp
Ctrl-PgUp on the root folder is affected by the "Use Ctrl-PgUp to select drive" option.
Set file attributes Ctrl-A Apply command to marked files Ctrl-G
Add descriptions to tagged files Ctrl-Z
Other commands
Copying text from the Alt-Ins screen
This command allows you to select and place any area of the screen on the Clipboard. To move the cursor, use the cursor keys or press the left mouse button. To select text, use the cursor keys while holding Shift or holding down the left mouse button. Enter, Ctrl-Ins, right mouse button or double-clicking the left mouse button copies the selected text to the Clipboard, Ctrl- adds it to the current contents of the Clipboard, Esc unselects it and completes the operation.
Record keyboard macro command Ctrl-<.>
History in the dialog editing lines Ctrl-Up, Ctrl-Down
In the dialogue edit line history, you can use Enter to copy the current item to the edit line or Ins to mark the item. Marked items are not pushed out of history by new items, so you can mark frequently used lines to keep them in your history at all times.
Clearing history in Del dialog edit lines
Clearing the current unchecked history item in Shift-Del dialog edit lines
Paste the file name into the dialog under the cursor Shift-Enter
Place the cursor in dialogs on the default element PgDn
Paste the passive panel file name into the dialog Ctrl-Shift-Enter
This key combination can be used in all editing lines other than the command line, including dialogs and the built-in editor.
Ctrl-Enter in dialogs causes the default action (clicking on the default button or a similar action).
In dialogs when the current control is a checkbox (a check box or Check Box):
Enable ([x]) Gray +
Off () Gray - - change state to indeterminate ([?]) Gray * (if the switch has a three-position state)
Left-clicking outside a dialog is the same as pressing the Esc key.
Right-clicking outside a dialog is the same as pressing Enter.
Clicking the middle mouse button with the corresponding modifiers (Ctrl, Alt, Shift) in the panels is the same as pressing the Enter key. For a non-empty command line, its contents will be executed. This behavior is regulated in the settings.
In Windows 2000/XP, FAR Manager can handle the mouse wheel.
Mouse wheel support
In Windows 2000/XP, FAR Manager can handle the mouse wheel:
Scrolling a list while keeping the cursor position on the screen constant. Pressing the middle button is the same as pressing Enter (adjustable in the settings).
Editor
Scrolling text with constant cursor positioning (similar to Ctrl-Up/Ctrl-Down).
Built-in viewer, help system
Scroll all text.
Scrolling the wheel is similar to the Up/Down keys. Pressing the middle button is the same as pressing Enter. You can select items without moving the cursor.
In the dialogs, when you scroll the wheel for the edit line with history and the combo box, the list opens. Within a list, scrolling works the same as for a menu.
You can set the number of lines to scroll in panels, the editor, and the built-in viewer (see TechInfo#33).
Command Line Options
The following options can be used on the command line:
May be useful when running FAR from telnet.
At startup, FAR tries to determine the console font type
Windows and if a TrueType font is set (for example, Lucida Console), then FAR will correctly display characters with a code less than a space. The option only works under Windows NT 4 and higher.
Editing the specified file. After /e, you can additionally specify a line and position in the line, which are set after the editor is launched. For example: far /e70:2 readme.
FAR consoles. In some configurations this option
May lead to unstable operation.
Look for "core" plugins in the folder specified in
If If not specified, the "core" plugins will not be loaded. You can use environment variables when specifying the search path. For example: far /p%SystemRoot%\Profiles\%USERNAME%\FAR
Allows you to use separate settings for different users. For example: far /u guest FAR Manager will set the environment variable "FARUSER" to a value equal to
.
View the specified file. If as
If you use `-', the data will be read from stdin (standard input). For example, 'dir|far /v -' will output the output of the dir command. If you use '-', the input stream is empty (for example, you did not specify the dir command in given example), then FAR will wait forever for the input stream to complete. This is a feature of the current version of FAR.
Plugins are not detected. The /p option is ignored. It makes sense to use ONLY with a stable list of plugins. After adding, replacing or removing plugins, you must load FAR without this parameter. If there is no cache, then the list of plugins will not be loaded.
intended for developers of external modules and
In normal situations, specifying this option is not recommended.
You can specify up to two paths to directories, files, or archives on the command line. The first path is for the active panel, the second is for the passive one:
For directories and archives, FAR will show their contents;
For files, a transition to the directory with the file will occur and positioning to the specified file, if it exists.
Plug-in support
External DLL plugins can be used to create new FAR commands and support additional file systems. For example, working with archives, an FTP client, a temporary panel and network browsing are implemented using modules that emulate file systems.
All plug-ins are stored in separate folders located in the "Plugins" folder, which is located in the same folder as FAR.EXE. When a new module is detected, FAR stores information about it and subsequently loads it only when needed, so that unused modules do not require additional memory. However, if you are sure that you don't need any modules, you can remove them to save disk space.
Modules can be called either from the Disk Selection Menu or from the External Module Commands menu, activated using F11 or the corresponding Command Menu item. F4 in the "External Module Commands" menu allows you to assign hot keys to items in this menu, which makes it easier to call them later using
keyboard macros. This menu is accessible from file panels and (F11 only) from the built-in viewer and editor. When called from the viewer and editor, not all modules will be shown, but only those that are specially created to work in this mode.
You can configure plug-in parameters using the Plug-in Options command from the Options Menu.
File processing operations such as copy, move, delete, edit, or File Search can work with modules that emulate file systems if those modules provide the appropriate functionality. Searching from the current folder in the Find File command requires less functionality than searching the entire drive, so try using it if Searching the entire drive is not working correctly.
Modules have their own message and help files. You can get a list of available help by module by clicking:
Shift-F2 - in the main FAR help Shift-F1 - in the list of plugins (context-sensitive help).
If the plugin does not have a help file, then the context-sensitive help will not be called.
If the active panel displays a file system supported by the plug-in, then the "CD" command on the command line can be used to change the current folder of that file system. Unlike the "CD" command
"CHDIR" always treats the specified parameter as the name of a real folder, regardless of the file panel type.
External module parameters
You can configure plug-in options using the Plug-in Options command from the Options Menu.
You can get information about a specific module by pressing Shift-F1 - context-sensitive help for configuring the module. If the plugin does not have a help file, then the context-sensitive help will not be called.
When calling context help, FAR will try to show a topic named
Config. If there is no such topic in the plugin's help file, the main help topic for this plugin will be shown.
The F4 key in the "External Modules Parameters" list allows you to assign hot keys to items in this menu, which makes it easier to call them later using keyboard macros.
Plugin Features Overview
The FAR Manager shell has merged so closely with its plugins that it’s simply pointless to talk about it without talking about the plugins. Plugins incredibly expand the capabilities of FAR Manager, complementing and modifying them.
Without going into details and personalities, we can note only some of these possibilities:
management of printers, both connected to a PC and networked
syntax highlighting in program source codes
work with FTP servers (with support for access through various
proxy types, automatic resuming, etc.)
using regular expressions.
complex composite masks of wildcards and patterns
NNTP/SMTP/POP3/IMAP4 clients and sending messages to a pager
work with non-standard text screen sizes
recoding of texts taking into account national code tables
manipulation of cart contents
managing process priorities on a local or network PC
auto-completion of words in the editor and working with templates
editing the Windows system registry
creating and changing Windows shortcuts
all kinds of manipulations with files and text, making it comfortable
working with FIDO
encoding and decoding files in UUE format
WinAmp program management and comment modification
MP3 files
processing Quake PAK files
Working with various servers via ODBC + working with servers
ORACLE via OCI.
RAS service management
launching external programs (compilers, converters, etc.) when
editing texts in the FAR editor
Some sources of information that can be used to find specific plugins include:
Website of the FAR Development Group (FAR Group) http://www.farmanager.com
You can use the PlugRinG viewer plugin and all the latest plugins you can view and download to your disk directly from FAR.
Panels
Typically, FAR shows two panels (left and right windows) with different information. If you want to change the type of information displayed in a panel, use the panel menu or the appropriate keyboard commands.
For more information about panels, read the topics listed below:
File panel Folder tree Information panel Quick view panel Drag and drop files Marking files Configuring file panel viewing modes
Files panel
The Files panel displays the contents of the current folder. You can select files and folders and perform various file and archive operations. Panel control commands are described in the topic List of commands.
By default, the file panel uses the following viewing modes:
Brief File names are displayed in three columns.
Medium File names are displayed in two columns.
Full Displays the file name, size, date and time.
Wide Displays the file name and size.
Detailed Displays names, sizes, packed sizes,
Time of last modification, creation, access and file attributes. Full screen mode.
Descriptions File names and descriptions
Long File names, sizes and descriptions. descriptions Full screen mode.
Owners Names, sizes and owners of files. files
File links Names, sizes and number of hard links of files.
Alternate Name, size (formatted with commas) full and date of the file.
You can customize the file panel viewing modes yourself.
Packed sizes make sense for files with the "Compressed" attribute
on disks with the NTFS file system or for files inside archives. Owners and number of file associations also only apply to NTFS partitions. Some file systems may not support file creation time and file access time.
If you want to change the panel view mode, select the desired one from the panel menu. After changing the viewing mode or current disc, the type of any panel automatically changes to the file panel.
To position a file, you can use the quick search operation using the first letters of the name.
Folder tree
The folder tree panel displays the folder structure of the current drive as a tree. This allows you to quickly change the current folder, as well as perform operations on folders.
FAR stores folder structure information in a file called Tree.Far, located in the root folder of each drive. If writing to disk is not possible, then this information will be saved in the hidden Tree.Cache folder, located in the same folder as FAR.EXE.
You can use the quick search operation to position on a folder. To do this, hold down the Alt key and type the name of the desired folder until the cursor moves to it. Using Ctrl-Enter you can move to the next name corresponding to the entered string.
Information panel
The information panel contains the following data:
Network computer and user names;
The name and type of the current disk, its file system type, network name, total and free sizes, volume label and serial number;
Memory utilization level (100% means that all memory is used) total and free sizes of physical and virtual memory;
Folder description file
You can view the contents of this file in full screen mode by pressing F3 or the left mouse button. To edit or create this file, press F4 or right mouse button. You can also use many of the built-in viewer commands (search, encoding selection, etc.) to view the description file.
A list of possible folder description file names can be specified using the Folder Description Files command in the Options Menu.
Quick View Panel
The Quick View panel is used to obtain information about the selected item in the file panel or folder tree.
If the selected item is a file, its contents are displayed. For file types known to Windows, the type name is also displayed.
For folders, the Quick View panel reports the total size, total packed size, number of files and subfolders, cluster size of the current disk, actual file size, including underused cluster fragments. The total packed size is only applicable for drives with the NTFS file system.
In Windows 2000/XP, the path to the source folders is also displayed for symbolic links.
Drag and drop files
File copying and transfer operations can be performed using drag and drop. Left-click on the original file or folder, drag it to another panel, and release the mouse button.
If you want to process a group of files or folders, mark them before dragging them, left-click on the original panel, and drag the files to another panel.
You can switch between copying and dragging by right-clicking while dragging. Also, to transfer files, you can hold down the Shift key while clicking the left mouse button.
Menu
To activate the menu, you can use F9 or click the mouse button on the top line of the screen.
When activated by pressing the F9 key, the menu corresponding to the active panel is automatically selected. When a menu is active, the Tab key allows you to switch between left and right pane menus. If the Files menu is selected,
"Commands" or "Options", the Tab key switches to the passive panel menu.
The Shift-F10 combination allows you to select the last used menu item.
Descriptions of specific menus can be read in the following topics:
Left and Right Panel Menu File Menu Command Menu Options Menu
Left and Right Panel Menu
The Left and Right menus allow you to change the left and right panel options, respectively. These menus include the following items:
Brief Show files in three columns.
Medium Show files in two columns.
Full Show file name, size, date and time.
Wide Show file name and size.
Detailed Show name, size, packed size,
Modification, creation and access times and file attributes. Full screen mode.
Descriptions File name and description.
Long Descriptions File name, size, and description.
Full screen mode.
File Owners File name, size, and owner.
File links Name, size and number of hard links
Files.
Alternate Name, size (formatted using full commas), and date of the file.
Information panel Change the panel to the information panel.
Folder tree Change the panel to a folder tree.
Quick View Change the panel to the Quick View panel.
Sorting modes Show available sorting modes.
Show long Show long/short names. names
Panel On/Off Show/hide the panel.
Change disk Change the current disk.
File menu
View View files, calculate folder sizes.
Editing Editing files.
Copy Copy files and folders.
Transfer Rename or move files and folders.
Creating a Folder Creates a new folder.
Delete Delete files and folders.
Archive Add the selected files to the archive.
Unpack Unpack selected files from the archive.
File Attributes Change file attributes and time.
Apply command Apply the command to the selected files.
File Descriptions Add descriptions to the selected files.
Mark group Mark the group of files specified by the mask.
Unselect Unselect the corresponding preset
File group mask.
Invert flag Invert the current file flag.
Restore mark Restore previous mark after
File processing or group marking operations.
Some commands from this menu are also described in the topic
File management and service commands.
Command menu
File search Search in the folder tree for files that satisfy
The specified mask. This command is described in more detail in the topic Searching for a file.
Command history Show previous commands. This team
Described in more detail in the topic History of commands.
Video Mode Select the number of lines on the screen.
Search for a folder Search for a folder in the folder tree.
For more information about this command, see the Find a Folder topic.
Browsing history Show browsing and editing history
Files.
Folder history Show the history of changing folders.
Browsing history and folder change history items are moved to the end of the list after selection. You can use Shift-Enter to select an element without changing its position.
Swap panels Swap the left and right panels.
Panels On/Off Show/hide both panels.
Compare folders Compare the contents of folders.
For more information about this command, see the Compare Folders topic.
User menu Allows you to edit main or local
User's menu. To insert an item, use Ins, to delete - Del, to edit - F4.
File Associations Shows a list of file associations.
Ins can be used to insert a new association, Del to delete, and F4 to edit.
Sorting groups Allows you to edit the specified
User of the sort group.
Panel filter Allows you to control the contents of the file panel. files Additional information about this command
Contained in the File Panel Filter topic.
Commands Shows a list of available external plug-in modules.
Screen List Shows a list of open screens.
Task List Shows a list of active tasks.
Options menu
System parameters Calls up the system parameters dialog.
Panel Settings Calls up the panel settings dialog.
Interface settings Calls up the interface settings dialog.
Languages Select the main language and help language.
Parameters Configure the parameters of plug-in external modules of external modules.
Confirmations Turn confirmations on or off
For some operations.
Panel modes Configure file panel viewing modes. files
File descriptions Update modes and file description names.
Description files Names or masks of files displayed in the information panel as descriptions of folders
Folders.
Program settings Settings for the external viewer program. viewing
Editor settings Settings for external and built-in editor.
Colors Change the color of different elements
Interface or changing the entire color palette to either black and white or the default one.
File coloring Editing file coloring.
And the appearance of the screen.
Confirmations
In the Confirmations dialog, you can enable or disable confirmations for the following operations:
Overwriting destination files while copying files;
Overwriting destination files during file transfer;
Drag and drop files;
Deleting files;
Deleting folders;
Interrupting operations (pressed the Esc key);
Disabling a network device from the drive menu;
Reopening the file in the editor;
Clearing the list of edit/view history, transitions and
Executed commands;
Exit FAR.
Creating a folder
This function is used to create folders. You can use environment variables in the input line, which are converted to the value it contains before the folder is created. It is also possible to create several subfolders at a time: to do this, separate the folder names from each other with the "\" character. For example:
%USERDOMAIN%\%USERNAME%\Folder3
If the "Process multiple folder names" option is enabled, you can create multiple folders at a time. In this case, the folder names must be separated by the delimiter character ";" or ",". If this option is enabled and the folder name contains the ";" character (or ","), then it must be quoted. For example, if you enter
C:\Foo1;"E:\foo,2;";D:\foo3, then folders will be created with the names: "C:\Foo1", "E:\foo,2;" and "D:\foo3".
Search for a file
This command is designed to search for one or more files and folders in a folder tree, according to one or more comma-delimited or semicolon-delimited masks. It can also be used with file systems supported by
external modules.
Additionally, the text that should be contained in the searched files can be specified. In this case, the Match Case option can be used to perform a case-sensitive text search.
The Whole words only option will allow you to search only text that is separated from the rest of the text by a space, tab, carriage return, line feed, or standard delimiters, which by default are: !%^&*()+|():"<>?`-=\;",./.
The Using Character Table drop-down list allows you to select a specific character table used to search for text or causes FAR to use all tables available to it, if All Character Tables is selected, to search for text in files with different encodings.
To search for files in archives, you need to set the Search in archives option. At the same time, it significantly slows down the operation and does not allow searching in nested archives.
The Search folders option allows you to include in the search list folders that match the search mask. In this case, the found files counter also takes into account found folders.
The search can be performed on all drives except removable drives, on all drives except removable and network drives, in all folders, starting from the root, starting from the current folder, only in the current folder or in marked folders (in the current version of FAR, search in directories that are symbolic connections, are not made). The search scope is saved in the configuration. You can also select a search drive in the search dialog. This option exists if the Search entire disk option is selected.
During or after completing a search, you can use the cursor keys to move through the file list and the buttons to perform desired actions.
The following buttons are available during or after completing a search:
New Search Start a new search operation.
Go Abort the search, change the current folder and place
The cursor is on the selected file.
Watch View the selected file. If the search is not completed,
It will resume after viewing is complete.
Panel Create a temporary panel and fill it with the found
Files.
Stop Stop searching. Available during search.
Cancel Close the search dialog.
F3 and F4 can be used to view and edit found files. Editing and viewing are also supported for plug-in file systems. Note that saving changes in the editor using the F2 key for plug-in file systems will cause a Save to operation instead of the usual Save.
Search for a folder
This command is designed to quickly find the desired folder in the folder tree.
To select a folder, you can use the arrow keys or type the initial few characters of the folder name.
Press Enter to go to the selected folder.
Team history
Command history shows a list of previously executed commands. In addition to the cursor keys, the following keys are available:
Re-execute the Enter command
Re-execute the command in a separate window Shift-Enter
Place a command on the command line Ctrl-Enter
Clear Del command history
To go to the previous or next command directly from the command line, you can use the Ctrl-E or Ctrl-X keys
respectively.
To select a command, in addition to the cursor and Enter keys, you can use highlighted letters.
To save command history after exit, use the appropriate option from the system parameters dialog.
Notes:
1. Long commands in Windows 9x/Me before being placed in history
Viewing and editing history
File viewing and editing history shows a list of previously viewed or edited files. In addition to the cursor keys, the following keys are available:
Reopen the file for viewing Enter or editing
Place filename on command line Ctrl-Enter
Clear Del history list
Copy the contents of the current history position Ctrl-C to the Clipboard without closing the list or Ctrl-Ins
Open file in editor F4
Open file in F3 viewer
Or Numpad 5
Elements of viewing and editing history after selection are moved to the end of the list. You can use Shift-Enter to select an element without changing its position.
To save the history of viewing and editing files after exiting, use the appropriate options from the system parameters dialog.
Notes:
1. Long paths to files in Windows 9x/Me before being placed in history
Trimmed to 511 characters.
Folder change history
Folder change history shows a list of previously visited folders. In addition to the cursor keys, the following keys are available:
Go to the specified folder Enter
Place folder name on command line Ctrl-Enter
Clear Del history list
Copy the contents of the current history position Ctrl-C to the Clipboard without closing the list or Ctrl-Ins
To select an item in the history list, in addition to the cursor and Enter keys, you can use highlighted letters.
Elements of the folder change history after selection are moved to the end of the list. You can use Shift-Enter to select an element without changing its position.
To save the history of changing folders after exiting, use the appropriate option from the system parameters dialog.
Notes:
1. Long paths in Windows 9x/Me before being placed in history
Trimmed to 511 characters.
Task list
The task list shows currently active tasks. Each line of the list contains the title of the task window.
From the task list, you can switch to the task window or delete a task using the Del key. Be careful when deleting tasks. This operation is performed immediately and any unsaved information from this task will be lost. Therefore, deleting tasks should only be used when necessary, for example, if the program has stopped responding to user requests.
The task list can be called up either from the Command Menu or using Ctrl-W. In the latter case, the task list can also be called up from the viewer or editor.
Ctrl-R allows you to refresh the task list.
Compare folders
The compare folder command can only be executed when both panels on the screen are file panels. It compares the contents of the folders displayed in these panels. Files that are present in only one panel, or files whose modification date is more recent than files with the same name in another panel, become flagged.
Subfolders are not compared. To compare files, their name, date and time are used, but not their contents.
user's menu
The User Menu is designed to make frequently used operations easier. It contains user-defined commands and command sequences that can be executed using this menu. The user menu can include submenus. Special metacharacters are supported in both commands and menu command titles. Notice that the symbol!?
?<init>! can be used to enter additional parameters immediately before executing the command.</p>
<p>To edit or create a main or local user menu, use the User Menu command</p>
<p>from the Command Menu. There can only be one main user menu. The main menu is called up if there is no local menu for the current folder. The local menu can be located in any folder. You can switch between the local menu and the main menu at any time using the SHIFT-F2 keys. You can also call up the local menu from the parent folder using the BkSpace key.</p>
<p>You can add a separator to a custom menu. To do this, you need to add a new menu item (command), in which you specify “-” (minus) as the “Hot Key” and leave the “Label” field empty. You can remove such a separator only through Alt-F4</p>
<p>To execute a command from the user menu, select it using the cursor keys and press Enter. You can also use the hotkey assigned to this menu item.</p>
<p>You can delete a submenu or menu item using the Del key, insert a new submenu or menu item using Ins, and edit an existing submenu or menu item using F4. Press Alt-F4 to edit the menu as a text file.</p>
<p>Numbers, letters and function keys (F1..F12) can be used as hotkeys to access menu items. If F1 and F4 are used, their original functions are lost. In this case, Shift-F4 can be used to edit the menu.</p>
<p>When editing or creating a menu item, you need to enter a hotkey for quick access to this item, the title of the item that will be displayed in the menu and the sequence of commands to be executed if this menu item is selected.</p>
<p>When editing or creating a submenu, simply enter a hotkey and the title of the submenu.</p>
<p>Local menus are stored in FarMenu.Ini text files. The main menu is stored in the Registry by default, but it can also be kept in a file. If you create a local menu in the FAR folder, it will be used instead of the main menu stored in the Registry.</p>
<h3>File associations</h3>
<p>FAR Manager supports file associations that allow you to set various actions for launching, editing and viewing files specified by a mask.</p>
<p>You can add new associations using the File Associations command in the Command Menu.</p>
<p>You can set multiple associations for one file type and select the desired association from the menu.</p>
<p>The following actions are available in the list of associations:</p>
<ul><p>Ins - add a new association</p>
<p>F4 - change current association settings</p>
<p>Del - delete current association</p>
</ul><p>If there are no associated startup commands for this file and the Use standard types option is set</p>
<p>in System Settings, then FAR tries to use Windows associations to launch this file type.</p>
<h3>Setting up a file association</h3>
<p>FAR allows you to specify six commands associated with a specific file type, specified by a mask:</p>
<p>Enter run command Executed when Enter is pressed</p>
<p>Run command by Ctrl-PgDn Executed when Ctrl-PgDn is pressed</p>
<p>View command Executed by pressing F3</p>
<p>Alternative command Executed by pressing Alt-F3 view</p>
<p>Edit command Executed by pressing F4</p>
<p>Alternate command Executed by pressing Alt-F4 editing</p>
<p>The association can be described in the Association Description field.</p>
<p>If you don't want the panels to go dark before executing the associated command, start the command with an "@" symbol.</p>
<p>Associated commands can use special</p>
<p>metacharacters.</p><p>Notes: 1. If there are no associated startup commands for a given file and the Use standard types option in System Preferences is set, FAR attempts to use Windows associations to launch that file type. 2. The operating system commands “IF EXIST” and “IF DEFINED” allow you to make associations more “smart” - if you have assigned several associations for one type of file, then only those associations for which the conditions are met will appear in the menu.</p>
<h3>Metacharacters</h3>
<p>Associated commands, custom menus, and the Apply Command command may use special metacharacters:</p>
<p>Symbol "!" ! Long file name without extension!~ Short file name without extension!` Long file extension without name (ext) !`~ Short file extension without name (ext)!.! Long file name with extension !-! Short file name with extension !+! Similar!-!, but if the long file name is lost</p><p>After executing the command, FAR will restore it</p><p>!@! The name of the file containing the names of the marked files!$! Name of a file containing short names of marked files!& List of marked files!&~ List of marked files with short names!: Current drive!\ Current path!/ Short name of current path</p>
<p>!?<title>?<init>!</p><p>When the command is executed, this character is replaced with user input. <title>And <init>- title and source text of the edit line. It is allowed to use several such symbols in one line, for example: grep !?Search for:?! !?In:?*.*!|c:\far\far.exe -v -</p><p>!# Prefix "!#" specified before the association symbol</p><p>file, causes it (and all subsequent ones) to link to the passive panel (see note 4). For example, !#!.! indicates the name of the current file on the passive panel.</p><p>!^ Prefix "!^" specified before the association symbol</p><p>file, causes it (and all subsequent ones) to link to the active panel (see note 4). For example, !^!.! denotes the name of the current file in the active panel, and the construction!#!\!^!.! - a file on the passive panel with the same name as the name of the current file on the active panel. Notes: 1. When processing metacharacters, FAR only substitutes what they mean (file name, extension, etc.). No additional characters (for example, quotation marks or last names of the FAR developers) are substituted and you must do this yourself if necessary. For example, if the program used in associations requires the file name to be in quotes, then you would write program.exe "!.!" rather than program.exe !.!. 2. For associations!@! and!$! The following modifiers are allowed: "Q" - enclose names with spaces in quotation marks; "S" - use "/" instead of "\" in file paths; "F" - use full path; "A" - use ANSI encoding. For example, association!@AFQ! - the name of the file containing the names of the marked files with the full path in ANSI encoding; file names containing spaces will be enclosed in quotes. 3. Metacharacters!@! and!$! in the selection menu (when several associations are specified) are shown as is, the conversion occurs at the moment the command is executed. 4. The prefixes "!#" and "!^" act as association switches. The effect of these prefixes extends to the next similar prefix. For example: if exist !#!\!^!.! diff -c -p !#!\!^!.! !\!.! "If the same file exists on the passive panel as the active one under the cursor, then show the discrepancies between the file on the passive panel and the file on the active panel, regardless of the name of the current file on the passive panel"</p>
<h3>System parameters</h3>
<p>Remove the R/O attribute Remove the Read-Only attribute from CD files from files copied from a CD.</p>
<p>Delete to Recycle Bin Allows deleting files using</p><p>Recycle Bin. The deletion operation to the Recycle Bin is performed only for local hard drives.</p><p>Use the system Use the file copy functions, copy functions provided by the operating system,</p><p>Instead of internal implementation of file copying. This can be useful on NTFS because the system function (CopyFileEx) performs more efficient disk space allocation and copies extended file attributes. At the same time, if the option is enabled, the ability to cut files into parts when copying or moving will not be available.</p><p>Copy open Allows you to copy files that are open for writing by other programs.</p><p>This mode is convenient when you need to copy a file that has been open for a long time, but it can be dangerous if the file is modified at the same time as the copy.</p><p>Create Folders If the new folder name contains only uppercase and lowercase letters and this option is checked,</p><p>Then the folder will be created in capital letters.</p><p>Inactivity Time Shuts down FAR if within</p><p>There were no mouse or keyboard keystrokes for the specified interval, FAR was waiting for command line input, and there were no background editing or browsing screens.</p><p>Save history Causes command history to be saved before command completion and restored after</p><p>Launch of FAR.</p><p>Save history Causes folder history to be saved before folder completion and restored after</p><p>Launch of FAR. To view the contents of your folder history, press Alt-F12.</p><p>Save history Causes saving browsing history</p>
<p>viewing and editor and editor before completion and its</p><p>Recovery after running FAR. To view the files included in this list, press Alt-F11.</p><p>Use If this option is enabled, then pressing standard Enter types on a file whose type is known to Windows files and is not in the file associations</p><p>FAR, a Windows program designed to handle this type of file will be launched.</p><p>Automatic When selecting CDROM from the disc selection menu</p>
<p>mount CDROM FAR will push in the open CD drive tray.</p><p>Disable this option if automatic mounting of CD drives does not work correctly (this may occur due to errors in the drivers of some CD drives)</p><p>Path to Specify the full path where FAR will search for personal plugins "personal" plugins in addition</p><p>To the "basic". You can use environment variables when specifying the search path.</p><p>Auto-Save If this option is enabled, FAR will automatically save the configuration.</p><p>The current folders of both panels will also be saved.</p>
<h3>Panel Settings</h3>
<p>Show hidden Allows the display of files with attributes and system files Hidden and System. This mode is also</p><p>Can be toggled with Ctrl-H.</p><p>File colorization Allows file colorization</p>
<p>Auto change folder If this option is enabled, then moving</p><p>The cursor on the folder tree will cause a folder change in another panel. If this option is disabled, you must press Enter to change folders from the folder tree.</p><p>Folder tagging Allows folders to be tagged using</p><p>Gray + and Gray *. Otherwise, these commands only work on files.</p><p>Sort names Apply sorting mode by folder extension by extension not only to files, but also to folders. At</p><p>With the option enabled, sorting by extension works the same as in FAR 1.65. If the option is disabled, then in the sorting mode by extension, folders will be sorted in the same way as in the sorting mode by name.</p><p>Allow reverse If this option is enabled and the current file panel sort sort mode is re-selected,</p><p>This will set the reverse sorting mode.</p><p>Disable The mechanism for automatically updating the panel, auto-updating when the state of the panel file system changes... will be disabled if the number of file</p><p>Objects will exceed the specified value.</p><p>The automatic file system tracking mechanism only works for FAT/FAT32/NTFS file systems. A parameter value equal to zero corresponds to the “automatic update is always enabled” state. To force a panel refresh, use Ctrl-R.</p>
<p>Show headers Allows the display of file panel column headers.</p>
<p>Show line Allows display of the status line in the file panel.</p>
<p>Show summary Allows display of summary information information in the bottom line of the file panel.</p>
<p>Show free Allows display of free space on the current disk.</p>
<p>Show bar Allows the scroll bar to be shown in the scroll bar in the file panes and folder tree pane.</p>
<p>Show quantity Allows display of the number of background screens. background screens</p>
<p>Show letter Show the current sort mode of the sort mode in the upper left corner of the panel.</p>
<h3>Interface settings</h3>
<p>Clock in panels Show clock in the upper right corner</p><p>Screen.</p><p>Clock Show the clock while editing when editing and viewing files. and viewing</p>
<p>Mouse Use mouse.</p>
<p>In panels, the middle mouse button. Pressing the middle mouse button in panels is equal to Enter, which is equivalent to pressing the Enter key.</p>
<p>Show Ruler Show the function key assignments of the keys on the bottom line of the screen. This option</p><p>Can also be switched using Ctrl-B.</p><p>Always show menu Show menu at the top of the screen, even</p><p>When it is inactive.</p><p>Saving your screen Launching the screen saver</p><p>After a specified period of inactivity in minutes.</p><p>History in lines Store history in dialog input lines of some FAR dialogs. List previously</p><p>The entered lines can be called up using the mouse or Ctrl-Up and Ctrl-Down. If you do not want to keep this history, for example, for security reasons, turn this option off.</p><p>Permanent blocks Do not deselect when moving in the cursor input lines in input lines in dialogs,</p><p>On the command line and in folder history.</p><p>Set Format Change the format of the FAR command line. command line You can use the following variables:</p><p>$p - current path $n - current drive letter $g - symbol > $ - $ symbol</p><p>Use Right Set this option if you are experiencing Alt as AltGr problems using combinations</p><p>Right Alt to enter characters in Windows 9x, or disable it if you prefer to use Right Alt for quick searches. This option is only relevant when running under Windows 9x, and is ignored under Windows NT.</p><p>Show general Show the general indicator while the copy indicator is in progress during a copy operation. This</p><p>May require additional time before copying begins to calculate the total file size.</p><p>Show information Display average speed information about copying time, copying time and</p><p>Approximate time until the end of the operation in the copy dialog.</p><p>Since this function takes time to collect statistics, on small files with the “general copy indicator” turned off</p>
<p>you may not see anything.</p>
<p>Autocompletion Enables the use of autocompletion in input lines on input lines that have</p><p>History or in combined lists. When the option is disabled, you can use the Ctrl-End key combination to auto-complete lines. The auto-completion operation does not work while recording and running a macro.</p><p>Use Ctrl-PgUp Key combination Ctrl-PgUp in the root folder for selecting a disk:</p>
<ol><p>for local drives will bring up a menu</p>
</ol><p>disk selection;</p>
<ol><p>for network drives will call the plugin</p>
</ol><p>Network (if there is a plugin) or menu</p><p>Select drives (if the Network plugin is missing).</p><p>Built-in viewer</p>
<p>Viewer Commands</p>
<p>Left Symbol to the left Right Symbol to the right Up Line up Down Line down Ctrl-Left 20 characters left Ctrl-Right 20 characters right PgUp Page up PgDn Page down Ctrl-Shift-Left To the beginning of lines on the screen Ctrl-Shift-Right To the end of lines on the screen Home, Ctrl-Home To the beginning of the file End, Ctrl-End To the end of the file</p>
<p>F1 Help F2 Line break (on, off) Shift-F2 Line break type (by letter, by word) F4 Switch text/hex mode Alt-F5 Print file (using plugin</p><p>"Print Manager".</p><p>F6 Switch to editor</p>
<p>F7 Search Shift-F7, Space Continue search Alt-F7 Continue search in reverse direction F8 Switch text viewing mode DOS/Windows Shift-F8 Select custom character table</p><p>(see notes)</p><p>Alt-F8 Change current position</p>
<p>Alt-F9 Resizing the FAR Manager window Alt-Shift-F9 Opening the viewer settings dialog NumPad5,F3,F10,Esc Exit Ctrl-F10 Position to the current file without exiting. F11 Call the menu "Commands of external modules"</p>
<p>Go to next file - Go to previous file Ctrl-O Show custom screen Ctrl-Alt-Shift Temporarily show custom screen</p><p>Ctrl-B Hide/Show functional line</p><p>Keys</p><p>Ctrl-S Hide/Show scrollbar Alt-BS, Ctrl-Z Return to previous position RightCtrl-0..9 Set bookmark 0..9 in current position Ctrl-Shift-0..9 Set bookmark 0..9 in current position position LeftCtrl-0..9 Go to bookmark position 0..9</p>
<p>Ctrl-Ins, Ctrl-C Copy selection from search result</p><p>Text to Clipboard.</p><p>Ctrl-U Reset the resulting selection</p><p>Search. Notes: 1. Custom symbol tables are located in the "Addons\Tables" folder of the FAR folder in the form of .reg files. Before using any of the tables, you need to install it: to do this, simply press Shift-Enter on the corresponding file. 2. To call up the search dialog, you can also simply start entering the text to be searched. 3. The file opens in a viewer with permission for a third-party process to delete it. If such a deletion occurs, then the file will actually be deleted from the directory only after the viewer is closed, and it will not be available for processing from any process - this is a property of MS Windows. 4. In the current version of FAR, there is a limit on the maximum number of columns in the viewer - there cannot be more than 2048. If the file has a line longer than this number, it will occupy not one line on the screen, but several, even if the mode is disabled line breaks. 5. FAR searches for the first occurrence of the substring (F7) from the beginning of the visible area of the viewer screen.</p>
<h3>Change current position</h3>
<p>This dialog allows you to change the position in the built-in viewer</p>
<p>You can enter the value as a decimal offset, percent, or hexadecimal value.</p>
<p>You can also specify a relative value - just indicate the + or - sign before the number</p>
<p>Hexadecimal values are entered in one of the following forms:</p><p>0xNNNN, NNNNh, $NNNN</p><p>The decimal offset is specified in the form NNNNd.</p>
<p>50% Go to the middle of the file (50%) -10% Go 10% back. If you had 50%, it will become 40% 0x100 Go to offset 0x100 (256) +0x300 Go 0x300 (768) bytes forward</p><p>If you explicitly specified a percent sign "%", or a hexadecimal form ("0x", "h", "$"), or a decimal form ("d"), then the marked radio buttons are ignored</p>
<h3>Search in the viewer</h3>
<p>The following modes and options are available to you for searching in the viewer:</p>
<p>Search text</p><p>Search for an arbitrary test typed in the Search line. In this mode, the following options are available: Match case - the search will take into account the case of the entered characters Whole words only - when searching, only the whole word will be searched</p><p>Search hexadecimal code</p><p>Search for a fragment corresponding to hexadecimal codes typed in the Search line.</p><p>Reverse search</p><p>Change the search to reverse - search from the end of the file to the beginning.</p><p>Built-in editor</p>
<p>Cursor Commands</p>
<p>Left Symbol to the left Ctrl-S Symbol to the left, but the cursor will not be</p><p>Move to previous line when reaching start of line</p><p>Right Symbol to the right Up Line up Down Line down Ctrl-Left Word left Ctrl-Right Word right Ctrl-Up Scroll the screen up Ctrl-Down Scroll the screen down PgUp Page up PgDn Page down Home To the beginning of the line End To the end of the line Ctrl-Home To the beginning file Ctrl-End To the end of the file Ctrl-N To the beginning of the screen Ctrl-E To the end of the screen</p>
<p>Removal</p>
<p>Del Delete a character (can also delete a block,</p><p>Depending on Editor Settings)</p><p>BS Delete a character on the left Ctrl-Y Delete a line Ctrl-K, Alt-D Delete to the end of a line Ctrl-BS Delete a word on the left Ctrl-T, Ctrl-Del Delete a word on the right</p>
<p>Block Operations</p>
<p>Shift-Cursor keys Mark a block Ctrl-Shift-Keyboard cursor Mark a block Alt-gray keyboard cursor Mark a vertical block Alt-Shift-Keyboard cursor Mark a vertical block Ctrl-Alt-gray keys Mark a vertical block Ctrl-A Mark all text Ctrl -U Unselect a block Shift-Ins, Ctrl-V Copy a block from the Clipboard Shift-Del, Ctrl-X Move a block to the Clipboard Ctrl-Ins, Ctrl-C Copy a block to the Clipboard Ctrl- <Gray +>Add block to Clipboard Ctrl-D Delete block Ctrl-P Copy block to current cursor position</p><p>Ctrl-M Move block to current cursor position</p><p>(only in permanent block mode)</p><p>Alt-U Move block left Alt-I Move block right</p>
<p>Alt-F5 Print file/selected block</p><p>(using the "Print Manager" plugin).</p><p>F6 Switch to viewer F7 Search Ctrl-F7 Replace Shift-F7 Continue search/replace F8 Switch between DOS/Windows text Shift-F8 Select custom character table</p><p>(see notes)</p><p>Alt-F8 Go to the specified line and position Alt-F9 Resize the FAR Manager window Alt-Shift-F9 Open the editor settings dialog</p>
<p>F10, Esc Exit Shift-F10 Save and Exit Ctrl-F10 Position to current file</p><p>No way out.</p><p>F11 Call the menu "Commands of external modules" Alt-BS, Ctrl-Z Cancel the action Ctrl-L Prohibit modification of the edited</p><p>Text</p><p>Ctrl-O Show custom screen Ctrl-Alt-Shift Temporarily show custom screen</p><p>(works as long as we hold these keys)</p><p>Ctrl-Q Consider next combination</p><p>Keys as character code</p><p>RightCtrl-0..9 Set bookmark 0..9 at the current position Ctrl-Shift-0..9 Set bookmark 0..9 at the current position LeftCtrl-0..9 Go to bookmark position 0..9 Shift-Enter Paste to the cursor position the name of the current</p><p>File on the panel.</p><p>Ctrl-Shift-Enter Insert the current name at the cursor position</p><p>File on the passive panel.</p><p>Ctrl-F Insert full name at cursor position</p><p>Editable file.</p><p>Notes:</p>
<p>1. Custom symbol tables are located in the folder</p><p>"Addons\Tables" FAR folders in the form of .reg files. Before using any of the tables, you need to install it: to do this, simply press Shift-Enter on the corresponding file.</p><p>2. Alt-U/Alt-I shift the current line if the block is not selected.</p>
<p>3. Alt-code of the symbol on the additional keyboard inserts into</p><p>The edited string is a character with the specified code, and no conversion to the current editor encoding is performed.</p><p>4. If you drag a file name from Explorer into the editor</p><p>FAR, then it is inserted into the current line only in OEM encoding (DOS), the current editor encoding is not taken into account. This feature will be changed in future versions of FAR.</p><p>5. If the block is not selected, then Ctrl-Ins/Ctrl-C mark the current</p><p>Line as a block and copy it to the Clipboard.</p>
<p>You can also specify the format for representing the newline character:</p>
<p>Original format Do not change newlines.</p>
<p>In DOS/Windows format (CR LF) Two characters will be used as a line feed sequence - carriage return and line feed (CR LF), accepted in DOS/Windows.</p>
<p>In UNIX format (LF)</p>
<p>The UNIX line feed (LF) character will be used as the line feed sequence.</p>
<p>In MAC (CR) format, the MAC carriage return (CR) character will be used as the line feed sequence.</p>
<p>Go to the specified position</p>
<p>In this dialog you can specify the row and column to go to.</p>
<p>You can enter two numbers - a row and a column. Number separator - one of the set of characters: ",.:;" or space.</p>
<p>If you enter ",Column", the editor will jump to the specified column in the current line.</p>
<p>There is also the possibility of switching over percentages. Enter 50% and you will go exactly to the middle of the text.</p>
<p>Reopening a file in the editor</p>
<p>FAR Manager tracks all attempts to re-open already edited files in the editor. The reopening rules are as follows:</p>
<p>1. If the file has not been modified, then with the “Reopening the file in the editor” option disabled in the confirmation dialog, the transition to editing the current file occurs without additional prompts.</p>
<p>2. If the file has been modified or the "Reopen the file in the editor" option is enabled, then there are three options:</p>
<p>Current - Continue editing the same file.</p>
<p>New copy - The file will be opened for editing in a new one</p><p>Editor's copies. In this case, be careful: the contents of the file on disk will correspond to which copy of the editor this file was last saved in.</p><p>Overload - Current changes are not saved to the editor</p><p>The previous contents of the file are loaded (since the last save).</p><p>Warning: The path to the file being edited does not exist</p>
<p>When opening a new file in the editor, you specified the name of a non-existent folder. Before saving the file, FAR will create such a folder, provided that you specified the correct path (for example, a path starting with a non-existent drive letter would be incorrect) and that you have sufficient permissions to create the folder.</p>
<p>Warning: The file has been modified by an external program</p><p>The modification date/time or the size of the edited file on disk is not</p><p>match those that FAR remembered the last time it accessed this file. This means that another program, another user (or even yourself in another editor window) has changed the contents of a file on disk.</p><p>entered by an external program will be lost.</p>
<p>Disc selection menu</p>
<p>This menu allows you to change the current panel drive, disconnect from a network drive, or open a new plug-in panel.</p>
<p>Select the menu item with the corresponding drive letter to change the current drive, or the item with the module name to create a new module panel. If the panel is not a file panel, its type will be changed to a file panel.</p>
<p>The Del key can be used to:</p>
<p>Disconnecting from a network drive.</p>
<p>Removing SUBST disk.</p>
<p>Removing discs from CD-ROMs and removable drives. On Windows</p><p>NT/2000/XP requires administrator rights to remove a disk from a ZIP drive. You can close the CD-ROM using the Ins key.</p><p>Ctrl-1 - Ctrl-8 switch the display of various information:</p>
<p>Ctrl-1 - disk type; Ctrl-2 - network name</p><p>(and the path associated with the SUBST disk under NT);</p><p>Ctrl-3 - disk label; Ctrl-4 - file system; Ctrl-5 - total and free disk space; Ctrl-6 - display parameters of removable disks; Ctrl-7 - display plug-in names; Ctrl-8 - display CD parameters.</p>
<p>Disc selection menu settings are saved in the FAR configuration.</p>
<p>When the "Use Ctrl-PgUp to select a disk" option is enabled, the Ctrl-PgUp key combination is similar to the Esc key - refuse to select the disk and close the menu.</p>
<p>Shift-Enter brings up Explorer showing the root of the specified drive (works only for drives).</p>
<p>Ctrl-R allows you to refresh the drive selection menu.</p>
<p>Disabling a network device</p>
<p>You can disconnect a network device from the Drive selection menu using the Del key.</p>
<p>Option [x] Restore at login is available for changes only for network devices that are permanently connected.</p>
<p>Confirmation can be disabled in the "Confirmations" dialog</p>
<p>File coloring</p>
<p>For a more convenient and visual presentation of files and folders on panels, FAR Manager provides the ability to color highlight file objects. File objects can be combined according to various criteria (file masks, file attributes) into groups and assigned their own colors.</p>
<p>File colorization can be enabled or disabled in the panel settings dialog (item "Options|File Colorization").</p>
<p>You can change the parameters of any coloring group from the "Options" menu (the "File Coloring" item).</p>
<p>List of file coloring groups</p>
<p>The file coloring group menu allows you to manipulate the list. The following keyboard shortcuts are available:</p>
<p>Ins - Add a new coloring group</p>
<p>F5 - Duplicate current group</p>
<p>Del - Delete current group</p>
<p>Enter or F4 - Change parameters of the current coloring group</p>
<p>Ctrl-R - Restore predefined coloring groups</p><p>Files.</p><p>Ctrl-Up - Move the group up.</p>
<p>Ctrl-Down - Move the group down.</p>
<p>Coloring groups are analyzed from beginning to end. If a file is found to belong to a group, then membership in other groups is not checked.</p>
<p>Editing file coloring</p>
<p>The Edit File Coloring dialog allows you to change the parameters of the file coloring group. Each group definition includes:</p>
<ol><p>one or more file masks;</p>
</ol><ol><p>inclusion attributes;</p>
</ol><ol><p>exception attributes;</p>
</ol><p>and the marked name under the cursor. If you want to use</p><p>Default color, set color to "Black on Black";</p><ol><p>optionally any symbol can be specified to indicate</p>
</ol><p>belonging to a group of files. It can be used</p><p>Both together with color highlighting and instead of it.</p><p>If you turn off the "Match with mask(s)" option, then file masks will be excluded from the analysis, and the comparison will be carried out only by attributes.</p>
<p>A file belongs to a coloring group if:</p>
<ol><p>mask analysis is enabled and its name matches at least</p>
</ol><p>one mask (if mask analysis is disabled, the file name is not</p><p>Matter);</p><ol><p>it has all the attributes of inclusion;</p>
</ol><ol><p>it has no exclusion attributes.</p>
</ol><p>The Compressed, Encrypted, and Symbolic Link attributes are used only on NTFS drives. Moreover, the attributes "Encrypted"</p>
<p>and "Symbolic link" is used only in Windows 2000/XP.</p>
<p>Viewer settings</p>
<p>In this dialog you can change the parameters of the external and built-in viewer.</p>
<p>External viewer</p>
<p>Run with F3 Launch external viewer</p><p>By F3.</p><p>Run by Alt-F3 Launch external viewer</p><p>By Alt-F3.</p><p>View command Command to launch an external program</p><p>View. Use special characters to specify the name of the file you are viewing. If you don't want the panels to go dark before starting the viewer, start the command with an "@" symbol.</p><p>Built-in viewer</p>
<p>Save Position Save and restore file position in recently viewed files.</p><p>This option also causes the symbol table used when viewing the file to be saved, if this table was manually set by the user, as well as the file viewing mode (hexadecimal or normal).</p><p>Auto-detection If you are using multiple symbol table tables, you can enable this option to</p><p>Auto-detection of the table of the file being viewed.</p><p>Tabs.</p><p>Show Bar Show the scroll bar in the internal scrolling viewer. This option can also</p><p>Switch by pressing Ctrl-S in the viewing window.</p><p>Show arrows If text is shifted to the left or text remains to the right of the shift, the viewport will</p><p>Show arrows on the side to indicate this.</p><p>If an external viewer is assigned to the F3 key, it will only launch if the associated</p>
<p>There is no viewer for this file type.</p>
<p>Changed settings do not affect previously opened embedded viewer windows.</p>
<p>The settings dialog can also be called up from the viewer by pressing Alt-Shift-F9. The changes will take effect immediately, but will only apply to the current session.</p>
<p>Editor settings</p>
<p>In this dialog you can change the default settings of the external and built-in editors.</p>
<p>External editor</p>
<p>Launch with F4 Launch external editor with F4.</p>
<p>Launch with Alt-F4 Launch external editor with Alt-F4.</p>
<p>Command Command to launch the external editor. edit To specify the name of the file being viewed</p><p>Use special characters. If you don't want the panels to go dark before starting the editor, start the command with the "@" symbol.</p><p>Built-in editor</p>
<p>Spaces instead of Replace the Tab character with the number of spaces corresponding to the tab.</p>
<p>Permanent blocks Do not remove block mark when moving</p><p>Cursor.</p><p>Del removes blocks If there is a marked block, Del will</p><p>Delete this block, not the character under the cursor.</p><p>Auto-indent Enables auto-indent as you type.</p><p>Text.</p><p>Save Position Save and restore file position in recently edited files.</p><p>This option also causes the symbol table used to edit the file to be saved if this table was manually set by the user.</p><p>Save bookmarks Save and restore bookmarks to</p><p>Current positions in recently viewed files saved using RightCtrl-0..9 or Ctrl-Shift-0..9</p><p>Auto-detection If you are using multiple symbol table tables, you can enable this option</p><p>To autodetect the table of the edited file.</p><p>Tab size Number of spaces when displaying a character</p><p>Tabs.</p><p>Cursor out of bounds Allow the cursor to move outside of the string line.</p>
<p>Block When you open a file for editing, editing a file with the “read-only” attribute, a file with the R/O attribute, the editor also goes into prohibit mode</p><p>Modifies the contents of the file as if you pressed Ctrl-L.</p><p>Warn when Before opening a file for editing, opening a file with a read-only attribute using the R/O attribute will display a warning message.</p>
<p>If an external editor is assigned to the F4 key, it will only be launched if there is no associated editor for that file type.</p>
<p>Changed settings do not affect previously opened editor windows.</p>
<p>The settings dialog can also be called up from the editor by pressing Alt-Shift-F9. The changes will take effect immediately, but will only apply to the current session.</p>
<p>Auto-detection of symbol table</p>
<p>If you use several character tables and have installed a table with the distribution of character frequencies for your language (for example, for the Russian language the table "Addons\Tables\Russian\Dist.Rus.reg" should be installed), then FAR will try to select the most suitable for viewing/editing suitable character code table. Note that correct detection is not guaranteed, especially for small or atypical text files.</p>
<p>You can find some symbol tables in the "Addons\Tables" folder of the FAR distribution.</p>
<p>Setting file attributes</p>
<p>This command allows you to change the attributes and time of both individual files and groups of files and folders. If you don't need to process files in subfolders, deselect the Process subfolders option.</p>
<p>File attributes</p>
<p>For selected objects (files and folders), control switches have 3 states:</p><p>[x] - the attribute is set for all objects (set for all) - the attribute is reset for all objects (reset for all) [?] - the attribute is not for all objects (do not change this attribute)</p><p>If the selected objects have the same attributes, then the control switches will be 2-position - set/reset. The exception is the case when folders are found among the selected objects - in this case, all control switches will be 3-position.</p>
<p>If the state of the control switches at the time of execution of the attribute setting command has not changed (compared to the initial state), then the specified attribute will not change.</p>
<p>If there are no folders among the selected objects, the "Process subfolders" option will not be available.</p>
<p>The Compressed and Encrypted attributes can only be changed on NTFS drives. Moreover, the Encrypted attribute is used only in Windows 2000/XP. Both attributes are mutually exclusive, i.e. You can only set one of them.</p>
<p>For symbolic links, the dialog displays information about the original folder (NTFS/Windows 2000/XP only).</p>
<p>date and time</p>
<p>Three different file times are supported:</p>
<p>Last modification time (Modification);</p>
<p>File creation time (Creation);</p>
<p>Last access time.</p>
<p>For drives with the FAT file system, the hours, minutes, and seconds of the last access time are always zero.</p>
<p>If you do not want to change the file time, leave the corresponding field blank. You can click the Blank button to clear all date and time fields and then change a specific part of the date and time, such as just the month or just the minutes. The remaining field values remain unchanged.</p>
<p>The Current button allows you to fill the file's time fields with the current time.</p>
<p>The Original button fills the file time fields with the original values. Available for a single file object.</p>
<p>For symbolic links (supported only in NTFS/Windows 2000/XP), the date and time are not set.</p>
<p>Folder links allow you to quickly access frequently used folders. To create a link to the current folder, press Ctrl-Shift-0..9. After this, to go to the folder written in the link, just press RightCtrl-0..9. If RightCtrl-0..9 is pressed on an edit line, then the link path will be inserted into that line.</p>
<p>In edit mode (F4) you cannot link to the plugin panel.</p>
<p>File panel filter</p>
<p>Using a filter, you can define a set of file types that will be shown in the file panel.</p>
<p>The filter menu consists of two parts. At the top there are custom filters. Using the Ins, Del and F4 keys you can add, delete and edit them. Each custom filter includes an optional title and file mask, or multiple file masks separated by commas or semicolons.</p>
<p>At the bottom of the filter menu are masks of all files currently contained in the active file panel.</p>
<p>The spacebar, "+" and "-" keys can be used to select filter menu items. Items selected with a space or "+" are marked with a "+" symbol. If such elements are present, then only files that satisfy them will be shown. Items selected with "-" are marked with a "-" symbol and all matching files will be excluded from the Files panel.</p>
<p>The marking of custom filters is saved in the configuration.</p>
<p>When a filter is used in a panel, it is indicated by a "*" after the sort mode letter in the top left corner of the panel.</p>
<p>File descriptions</p>
<p>Descriptions can be used to associate text information with a file. Descriptions of files in the current folder are stored in this folder in a special file - a list of descriptions. It contains at the beginning of each line the name of the file being described, and the description text separated from it by spaces.</p>
<p>Descriptions can be viewed in the corresponding viewing modes of the file panel. By default, these modes are Descriptions and Long Descriptions.</p>
<p>Command Description Files (Ctrl-Z) from the File Menu</p>
<p>is intended for adding descriptions to selected files.</p>
<p>Description list names can be changed in the File Descriptions dialog from the Options Menu menu. In this dialog you can also set the mode for updating local descriptions. Updating can be disabled completely, allowed only if the current view mode of the file panel shows descriptions, or always allowed. By default, FAR sets the "Hidden" attribute on created description lists, but you can disable this by turning off the "Set the "Hidden" attribute on new description lists" option in the same dialog. Also here you can specify a position to align new descriptions in the descriptions list.</p>
<p>If the file with descriptions has the Read-Only attribute, then FAR does not update the descriptions and, after renaming/deleting file object operations, an error message will be displayed. When the option is enabled</p>
<p>Update definitions file with read-only attribute FAR will attempt to update definitions correctly.</p>
<p>If enabled in the configuration, FAR updates file descriptions when files are copied, moved, or deleted. But if the command also processes some files in subfolders, then the descriptions for these files are not updated.</p>
<p>Configuring file panel viewing modes</p>
<p>The file panel can display information using 10 predefined modes: short, medium, full, wide, detailed, descriptions, long descriptions, file owners, file links, alternative full. Usually this is enough, but, nevertheless, if desired, you can change the parameters of these modes or even completely replace them with new ones.</p>
<p>File Panel Modes command from the Options Menu menu</p>
<p>allows you to change viewing mode settings. First, she asks you to select the desired mode from the list. In this list, mode 0 corresponds to the view mode invoked by LeftCtrl-0 (alternate full), mode 1 corresponds to the short mode (LeftCtrl-1), mode 2 corresponds to the middle mode (LeftCtrl-2), and so on. After selecting a mode, a dialog appears in which you can change the following parameters:</p>
<p>Column Types - Column types are encoded using one or more letters separated by commas. The following column types are allowed:</p>
<p>N - file name</p><p>Where: M - show flag characters O - show names without paths (intended mainly for plugins) R - align names right These characters can be combined, for example NMR</p><p>S - file size</p><p>P - packed file size</p><p>Where: C - format file size with commas T - use 1000 instead of 1024 as a divisor if the column width is not wide enough to show the full file size</p><p>D - file modification date T - file modification time</p>
<p>DM - date and time of file modification DC - date and time of file creation DA - date and time of last access to the file</p><p>Where: B is the short (Unix-style) file time format; M - use of text month names;</p><p>A - file attributes Z - file description O - file owner LN - number of hard links</p>
<p>If the column type description contains more than one file name column, the file pane will be displayed in a multi-column form.</p>
<p>File attributes have the following designations:</p><p>A - Archive R - Read Only H - Hidden S - System C or E - Compressed or Encrypted L - Reparse point</p><p>Column width - allows you to change the width of the panel columns. If width is 0, then the default value is used. If the width of the column with name, description or owner is 0, it will be calculated automatically, depending on the width of the panel. To work properly with different screen widths, it is highly recommended that each view mode have at least one column with an automatically calculated width.</p>
<p>To use the 12-hour time format, you need to increase the standard width of the file time column or the file time and date column by one. When zoomed in further, these columns will also show seconds and milliseconds.</p>
<p>To display the year in 4-character format, you need to increase the width of the date column by 2.</p>
<p>Status line column types and Status line column width - similar to “Column types” and “Column width”, but for the panel status line.</p>
<p>Full screen mode - show the panel in full screen instead of half the screen.</p>
<p>Align file extensions - show file extensions aligned.</p>
<p>Align folder extensions - show folder extensions aligned.</p>
<p>Show folders in capital letters - show all folder names in upper case, regardless of actual case.</p>
<p>Show files in lowercase - show all file names in lowercase, regardless of actual case.</p>
<p>Show file names from uppercase letters in lowercase - show all file names that contain only uppercase letters in lowercase letters. By default this option is enabled, but if you want to always see the real case of the file name, turn it off as well</p>
<p>Show folders in uppercase letters and Show files in lowercase letters. All these options only affect the way files are displayed; FAR always uses real case to process them.</p>
<p>Use case-sensitive sorting - use case-sensitive sorting for file names.</p>
<p>Sort groups</p>
<p>Sorting groups can be used in the file panel in conjunction with sorting by name or extension. They are activated by pressing Shift-F11 and allow you to set file sorting rules that complement the existing ones.</p>
<p>Each sort group consists of one or more comma-separated file masks. If the position of one sort group in the general list of groups is higher than that of another group, then when sorting in ascending order, all files belonging to this group will be higher than those belonging to the other group.</p>
<p>The Sort Groups command from the Command Menu allows you to delete, create, and edit sort groups using the Del, Ins, and F4 keys. Groups located above the menu separator belong to the beginning of the file panel, and all files included in these groups will be located above files that are not included in them. Groups below the menu separator belong to the end of the file panel, and all files included in these groups will be located below files that are not included in them.</p>
<p>File masks</p>
<p>File masks are often used in FAR commands to select individual files and folders or groups of them. Masks can include the usual characters allowed in file names, "*" and "?", as well as special expressions:</p>
<p>* any number of characters;</p>
<p>Any character;</p>
<p>Any character in square brackets.</p><p>Both individual characters and their ranges are allowed.</p><p>For example, the files ftp.exe, fc.exe and f.ext can be selected using the f*.ex? mask, the *co* mask will select both color.ini and edit.com, the *.txt mask can select config.txt , demo.txt, faq.txt and tips.txt.</p>
<p>Many FAR commands allow you to specify multiple masks separated by commas or semicolons. For example, to select all documents, you can enter *.doc,*.txt,*.wri in the Mark Group command.</p>
<p>It is allowed to enclose any of the masks (but not the entire list) in quotation marks. For example, this should be done when the mask contains one of the delimiter characters (comma or semicolon), so that such a mask does not get confused with the list.</p>
<p>In some situations (file search,</p>
<p>file panel filter, file tagging, file associations, sorting groups and file coloring) you can use exclusion masks. An exclusion mask is one or more file masks that must not match the names of the required files; it is separated from the main mask by the "|" character.</p>
<p>Examples of using exclusion masks: 1. *.cpp All files with the cpp extension. 2. *.*|*.bak,*.tmp All files except files with the bak and tmp extensions. 3. *.*| Error - the special character | was entered, but the exception mask itself was not specified. 4. *.*|*.bak|*.tmp Error - special character | cannot occur more than once. 5. |*.bak Treated like *|*.bak</p>
<p>Separated by a comma (or semicolon), file masks are listed, and with the help of "|" inclusion masks are separated from exclusion masks.</p>
<p>File tagging</p>
<p>To handle File Panel files and folders, they can be selected in several different ways. Ins marks the file under the cursor and moves the cursor down, Shift-Cursor keys allow you to move the cursor in different directions.</p>
<p>Gray + and Gray - select or unmark a group using one or more comma separated</p>
<p>file masks. Gray * inverts the current mark. The Restore Mark command (Ctrl-M) restores the previously selected group.</p>
<p>Ctrl- <Gray +>and Ctrl- <Gray → выбирают или снимают пометку
со всех файлов с тем же расширением, что и у файла под курсором.</p>
<p>Alt- <Gray +>and Alt- <Gray → выбирают или снимают пометку
со всех файлов с тем же именем, что и у файла под курсором.</p>
<p>Ctrl- <Gray *>inverts the current markup, including folders. If the Mark Folders option in the Panel Settings dialog</p>
<p>enabled, it works the same as Gray*.</p>
<p>Shift- <Gray +>and Shift- <Gray → выбирают или снимают пометку
со всех файлов.</p>
<p>If no file is selected, only the file under the cursor will be processed.</p>
<p>Copy, move, rename and create links</p>
<p>The following commands can be used to copy, move, and rename files and folders:</p>
<p>Copy selected files F5</p>
<p>Copy file under cursor regardless of Shift-F5 mark</p>
<p>Rename or move selected files F6</p>
<p>Rename or move a file under the cursor Shift-F6, regardless of the mark</p>
<p>Create file and folder associations Alt-F6</p>
<p>If the "Process multiple file names" option is enabled, then the input line can indicate either one target for copying or moving, or several. In the latter case, the targets must be separated by the delimiter character ";" or ",". If the target contains the symbol ";" in its name (or ","), then this target must be enclosed in quotation marks.</p>
<p>If you want to create a destination folder before copying, add a backslash to its name. Also in the copy dialog, you can press F10 to select a folder from the tree of the active file panel or Alt-F10 to select from the tree of the passive file panel.</p>
<p>Shift-F10 allows you to open the tree taking into account the path contained in the input line (if several paths are listed there, then only the first of them is taken into account). If the "Process multiple file names" option is enabled, the selected folder is added to the contents of the input line separated by a semicolon.</p>
<p>The ability to copy, move, and rename files for plug-ins depends on the functionality of the specific plug-in.</p>
<p>If the file being copied to already exists, it can be overwritten, skipped, or the contents of the copied file can be appended to the end.</p>
<p>If the disk to which files are copied or transferred becomes full during the operation, you can either cancel the operation or replace the disk and select "Split", after which the copied file will be divided between the disks. This feature is only available if the "Use system copy function" option in the System Options dialog is turned off.</p>
<p>The Copy Permissions option can only be used for the NTFS file system and allows you to copy file permission information.</p>
<p>The New/Updated Files Only option will allow you to copy/overwrite new and updated files without question. Updated means a file whose modification date and time is greater than the modification date and time of the target file.</p>
<p>Option "Use system copy function" from the dialog</p>
<p>System options enable the use of the Windows CopyFileEx function (or CopyFile if CopyFileEx is not available) instead of the internal file copy implementation. This can be useful on NTFS because CopyFileEx performs more efficient disk space allocation and copies extended file attributes.</p>
<p>When migrating files, FAR considers Windows 2000/XP symbolic links to determine whether the operation should be a copy-and-delete operation or a direct transfer (within the same physical drive).</p>
<p>FAR treats a copy attempt to con in the same way as a copy to nul or to \\.\nul - that is, the file is read from disk, but not written anywhere.</p>
<p>A move to nul, \\.\nul, or con operation does not delete files.</p>
<p>The "Copy permissions" and "Only new/updated files" options only apply to the current copy session.</p>
<p>Hard and symbolic connections</p>
<p>On NTFS partitions, you can also create hard (HardLink) links for files and symbolic (SymLink) links for folders using the Alt-F6 command.</p>
<p>Hard links are used for files. Symbolic links - for folders and drives.</p>
<p>Hard connections</p>
<p>A HardLink is just another entry in the folder for a given file.</p>
<p>When a hard link is created, the file itself is not physically copied, but only appears under another name or in yet another location, and its old name and location remain intact. From this point on, the hard link is indistinguishable from the original entry in the folder. The only difference is that a hard link does not create a short file name, so it is not visible from DOS programs.</p>
<p>When the file size or date changes, all corresponding folder entries are updated automatically. When you delete a file, it is not physically deleted until all hard links pointing to it are deleted. The order in which they are removed does not matter. When you delete a hard link to the recycle bin, the number of links in the file is retained.</p>
<p>FAR can create hard links, display the number of hard links for each file in a separate column (by default, this is the last column in the 9th panel mode), and also sort files by the number of hard links.</p>
<p>Hard links are supported in NTFS starting with NT 4.0. You can only create hard links on the same drive as the source file.</p>
<p>Symbolic connections</p>
<p>NTFS since version 5.0 (Windows 2000/XP) supports symbolic links (SymLink). Symbolic folder connections in Windows 2000/XP are known as "directory junctions" - a technology that allows you to map any local folder to any other local folder. For example, if the D:\SYMLINK folder points to C:\WINNT\SYSTEM32 as its target, then a program that accesses D:\SYMLINK\DRIVERS will actually access C:\WINNT\SYSTEM32\DRIVERS.</p>
<p>FAR can create symbolic links only on local disks whose file system supports this feature (Windows 2000/XP/NTFS 5.0). Unlike hard links, symbolic links do not have to point to the same drive.</p>
<p>You cannot directly make symbolic links to CD-ROM folders, but you can get around this limitation by mounting a CD-ROM disk to a folder on an NTFS partition.</p>
<p>Error: copying/transferring "to itself"</p>
<p>You cannot copy/transfer a file or folder “to itself”.</p>
<p>This error also occurs in Windows 2000/XP if there are two folders, one of which is a symbolic link to the other.</p>
<p>Warning: Source file contains more than one data stream</p>
<p>The source file contains more than one data stream, or the destination file system does not support multithreading of file objects.</p>
<p>Streams are a feature of the NTFS file system that allows you to associate additional information with a file (for example, information about its author, title, keywords, etc., as well as any other data). This information is stored with the file and is not visible in any way when using programs that do not support streams. Specifically, streams are used by Windows Explorer in Windows 2000/XP to store additional file properties. FAT/FAT32 file systems do not support streams.</p>
<p>In order to copy the entire file object (with all streams), enable the "Use system copy function" option in the system settings dialog.</p>
<p>If you copy a multi-threaded file object to a non-NTFS volume, you will also lose data - only the main thread will be copied.</p>
<p>If a folder has multiple data streams, additional streams will only be copied when you use the Transfer function (F6).</p>
<p>Error: plugin not loaded</p>
<p>This error appears in cases where:</p>
<p>1. For normal operation of the DLL module, dynamic</p><p>A library that is missing on your system.</p><p>2. For some reason, the module returned information about</p><p>No further downloading allowed.</p><p>3. The plugin DLL module is corrupted.</p>
<p>Switch between screens</p>
<p>FAR allows you to open multiple copies of the built-in viewer and editor. Use Ctrl-Tab, Ctrl-Shift-Tab or F12 to switch between panels and screens with these copies. Ctrl-Tab</p>
<p>switches to the next screen, Ctrl-Shift-Tab to the previous one, F12 displays a list of all available screens.</p>
<p>The number of background editing and viewing screens is displayed in the upper left corner of the left pane. You can disable the display of the number of screens using the Panel Settings dialog.</p>
<p>Apply command</p>
<p>Using the Apply command item from the File Menu, you can apply a command to each marked file. The file name must use the same characters as in File Associations.</p>
<p>For example, "type!.!" will display all marked files in turn, and the command "rar32 m!.!.rar!.!" will transfer all marked files to RAR archives of the same name. The command "explorer /select,!.!" will launch Explorer and place the cursor on the current file or folder.</p>
<p>See also "Operating system commands"</p>
<p>Operating system commands</p>
<p>FAR Manager independently processes the following operating system commands:</p>
<p>Cleaning the screen.</p>
<p>Change the current disk to the specified "disk" in the panel.</p>
<p>CD path or CHDIR path</p>
<p>Change the current path on the panel to the specified "path". If a drive name is specified, the drive is also changed. If the active panel displays a file system supported by the plug-in, then the "CD" command on the command line can be used to change the current folder of that file system. Unlike "CD", the "CHDIR" command always treats the specified parameter as the name of a real folder, regardless of the type of file panel.</p>
<p>Display or change the current code page number. "nnn" is the code page number. CHCP without a parameter will show the current code page number.</p>
<p>SET variable=</p>
<p>Set the environment variable "variable" to the value "string". If "string" is not specified, then the "variable" environment variable will be removed. Some</p>
<p>FAR Manager sets environment variables independently at startup.</p>
<p>IF EXIST filename command</p>
<p>Execute "command" if "filename" exists. The prefix "NOT" indicates the opposite condition, i.e. execute command "command" if</p>
<p>"filename" does NOT exist.</p>
<p>IF DEFINED variable command</p>
<p>The command is similar to IF EXIST, but checks for the existence of the "variable" environment variable. If the environment variable "variable" exists, then the command "command" will be executed.</p>
<p>"IF" commands can be nested, for example the "command" command</p>
<p>if exist file1 if not exist file2 if defined variable command</p>
<p>will only be executed if file "file1" exists and file "file2" does not exist and the environment variable "variable" is defined.</p>
<p>Notes:</p>
<p>1. If the command syntax differs from those indicated, then</p><p>FAR Manager transfers control to the operating system command processor.</p><p>2. The listed commands work in:</p>
<ol><p>Command line</p>
</ol><ol><p>Apply command</p>
<p>user's menu</p>
<p>File associations</p>
</ol><p>Environment Variables</p>
<p>Once launched, FAR Manager sets the following environment variables that are available to child processes:</p>
<p>FARUSER is the username specified in the /u parameter</p><p>Command line.</p><p>FARLANG is the name of the current interface language.</p>
<p>Keyboard macros</p>
<p>Keyboard macros can be used to override standard FAR keys or key combinations, or to create new keyboard commands.</p>
<p>To set a macro command, press Ctrl-<.>(Ctrl and period key), the desired key sequence, again Ctrl-<.>and the key or key combination to which this macro will be assigned. While a macro is being recorded, an "R" symbol appears in the upper left corner of the screen.</p>
<p>To remove a macro and return a key to its original function, press Ctrl- twice<.>and then the key to which the macro is assigned.</p>
<p>In addition to the standard FAR key combinations, you can assign macro commands to Ctrl-Shift-<буква>, Ctrl-Alt-<буква>and Alt-Shift-<буква>.</p>
<p>FAR supports several independent sets of macros: shell, viewer, editor, and some other types of macros. Sets of macro commands are saved using the "Save parameters" command</p>
<p>from the Options Menu.</p>
<p>To set additional parameters for a macro, start or end its recording using Ctrl-Shift-. instead of Ctrl-. and select the desired options in the dialog that appears.</p>
<p>Some key combinations (particularly Enter, Esc, F1, Ctrl-F5) cannot be entered directly because they have special functions. To assign a macro to one of these key combinations, select it from the drop-down list.</p>
<p>Macro parameters</p>
<p>To set additional parameters for a macro, start or end its recording using Ctrl-Shift-. instead of Ctrl-. and select the desired options in the dialog that appears:</p>
<p>Allow output to screen during execution</p>
<p>If you disable this option, FAR Manager disables screen redrawing during macro execution. All changes will be reflected after the macro is completed.</p>
<p>Execute after launching FAR</p>
<p>Allows you to execute a macro immediately after launching FAR Manager.</p>
<p>Conditions for executing a macro:</p>
<p>Empty command line</p><p>[x] - execute only if the command line is empty - execute only if the command line is not empty [?] - ignore the command line state</p><p>On the plugin panel</p><p>[x] - execute only if the current panel is a plugin panel - execute only for a file panel [?] - ignore panel type</p><p>Run on folders</p><p>[x] - execute only if there is a folder under the cursor in the panel - execute only if there is a file in the panel under the cursor [?] - execute for folders and files</p><p>Block/files marked</p><p>[x] - execute only if there are marked files/folders on the panel or a block is selected in the editor - execute if there are no marked files/folders or block in the editor [?] - ignore the state of the block/file mark</p>
<p>I'm sure that many people use some kind of file manager, and most probably use one of the most popular - <a href="https://gtavrl.ru/en/2-chto-otobrazhaet-total-commander-total-commander-osnovnye-funkcii-i-nastroiki-gruppovoe/">Total Commander</a>. For those who don’t know what a file manager is, I’ll tell you in a nutshell. A file manager is a program that provides a convenient and multifunctional interface for working with the entire file system and the files themselves, respectively. Basically, file managers are designed to speed up work with the following frequently performed actions: creating, editing, deleting, searching for files, renaming, copying, moving, opening/playing/viewing, changing attributes and properties, assigning rights, etc. Others In other words, file managers are not only convenient for daily work, but also significantly save the cost of unnecessary mouse clicks. There are file managers that have a large number of additional functions built in, which are not always needed by every user. Therefore, I was looking for one that would have the bare minimum of functionality by default, but at the same time I needed the ability to add additional modules (plugins) with which I could increase the functionality. And the most basic search criterion was a simple and minimal interface that would not distract from work, but contained everything that was most necessary and frequently used. Of course, almost all file managers met similar criteria, and most of them contain a number of settings with which you can customize both the interface and functionality. There are both paid and free ones, the choice is quite large. I chose for myself <b>Far Manager</b>, which is what we will actually talk about today.</p>
<p><b>Far Manager</b> is a free console file manager for Windows OS. <br><br>U <b>Far Manager</b> There is a fairly large abundance of plugins, using which you can, firstly, increase the capabilities of the program, and secondly, make this file manager more convenient for yourself.</p>
<p>As I said just above, there are a large number of file managers with quite different interfaces. But the most convenient one, in my opinion, is a file manager designed in the form of two columns, which allows you to carry out various operations with files much faster. Accordingly chosen by me <b>Far Manager</b> contains two columns in its interface.</p>
<p>Of course, the Windows command line is quite weak compared to the one in UNIX systems, but it still exists. And a file manager <b>Far Manager</b> supports working with the command line, which allows you not to switch between two windows, but to interact with files and the command line. I mainly use the command line in Windows when developing some software, and I very often had to use <b>Far</b> not only as a file manager, but also as a convenient tool for working with the command line. But now I have found for myself, which has a very convenient tool for working with the command line, and <b>Far Manager</b> Now I use it exclusively when working with directories, files and archives.</p>
<p>IN <b>Far</b> there is quite good support for working with <b>FTP</b>. But for some reason I got so accustomed to my work that support <b>FTP in Far Manager</b> I practically don’t use it, although everything is done quite conveniently and simply.</p>
<p>The capabilities of the FAR file manager can be described endlessly, since there are a number of plugins that significantly increase the capabilities of the program. I just talked about some of the program’s functions that I often use; everything else can be added as needed, and the fact that it comes by default with the basic functions of the file manager is a big plus, since each user will collect from <b>Far Manager</b> just the way he needs it.</p>
<h2>Installing FAR Manager</h2>
<p>In order to install the file manager, you need to download it from the official website, where several versions are available for download <b>Far Manager</b>, namely:</p>
<ul><li>for x86 versions v2.0 and v1.75 - archive (not installation file), msi (installation file)</li>
<li>for x64 versions v2.0 and v1.75 - archive (not installation file), msi (installation file)</li>
</ul><p>In my case I will download the version <b>v2.0 for x86, msi installation file</b>. In order to download exactly the version that you need, you need to follow the following link - http://www.farmanager.com/download.php. I downloaded Far Manager from the following link - http://www.farmanager.com/files/Far20b1807.x86.20110203.msi. <br>Now I need to run the downloaded file, I have the file name <b>http://www.farmanager.com/files/Far20b1807.x86.20110203.msi</b>.<br>After launching the installation file, a welcome window will appear in which you need to click the button <b>Next</b> to continue.</p>
<p><img src='https://i1.wp.com/uamedwed.com/wp-content/uploads/2011/02/far-manager-fajlovyj-menedzher-2.jpg' align="center" width="100%" loading=lazy loading=lazy></p>
<p>The next window prompts you to read the license text, in which you need to check the box <b>I accept the terms in the License Agreement</b>(I accept the terms of the license agreement) if you agree with all the terms of the license. Then you need to press <b>Next</b> to continue.</p>
<p><img src='https://i2.wp.com/uamedwed.com/wp-content/uploads/2011/02/far-manager-fajlovyj-menedzher-3.jpg' align="center" width="100%" loading=lazy loading=lazy></p>
<p>The next window offers installation both for the current user and for all users of the system:</p>
<ul><li><b>Install just for you (Admin)</b>(Install only for current user) <br>Far Manager 2 will be installed in a per-user folder and be available just for your user account. You do not need local Administrator privileges. (Far Manager 2 will be installed in the current user's folder and will be available only for this user's account. You do not need to have administrator rights.) - In this case, the program is installed in the directory <b>Documents and Settings</b>, namely to the user's folder.</li>
<li><b>Install for all users of this machine</b>(Install for all users on this computer) <br>Far Manager 2 will be installed in a per-machine folder by default and be available for all users. You can change the default installation folder. You must have local Administrator privileges. (Far Manager 2 will be installed for all users on the system. You can change the default installation folder. You must have administrator privileges.) - In this case, the program is installed in the directory <b>Program Files</b>.</li>
</ul><p>Then you need to press <b>Next</b> to continue.</p>
<p><img src='https://i2.wp.com/uamedwed.com/wp-content/uploads/2011/02/far-manager-fajlovyj-menedzher-4.jpg' align="center" width="100%" loading=lazy loading=lazy></p>
<p>In the next window you can change the installation location of the program <b>Far Manager</b>. Then you need to press <b>Next</b> to continue.</p>
<p><img src='https://i1.wp.com/uamedwed.com/wp-content/uploads/2011/02/far-manager-fajlovyj-menedzher-5.jpg' align="center" width="100%" loading=lazy loading=lazy></p>
<p>In the next window, you can select various add-ons and settings that will be installed with Far Manager. If you have marked some additions and then want to return all the default values, you need to click the button <b>Reset</b>. I decided to select all items for testing.</p>
<p><img src='https://i2.wp.com/uamedwed.com/wp-content/uploads/2011/02/far-manager-fajlovyj-menedzher-6.jpg' align="center" width="100%" loading=lazy loading=lazy></p>
<p>For each element, an additional menu is available, in which you can select each element individually( <b>Will be installed on locale hard drive</b>— Will be installed on the hard drive) and the whole group( <b>Entire feature will be installed on locale hard drive</b>— The entire component will be installed on the hard drive), and the third element( <b>Entire feature will be unavailable</b>— The component will not be installed on the hard drive).</p>
<p><img src='https://i2.wp.com/uamedwed.com/wp-content/uploads/2011/02/far-manager-fajlovyj-menedzher-7.jpg' align="center" height="80" width="311" loading=lazy loading=lazy></p>
<p>Then you need to press <b>Next</b> to continue. And the following window will appear where you can select <b>Install</b> for installation or <b>Back</b> to go back.</p>
<p><img src='https://i1.wp.com/uamedwed.com/wp-content/uploads/2011/02/far-manager-fajlovyj-menedzher-8.jpg' align="center" width="100%" loading=lazy loading=lazy></p>
<p>After pressing the button <b>Install</b> The following window will appear where the installation process will take place <b>Far Manager</b> and all selected components. Installation will take no more than two minutes.</p>
<p><img src='https://i0.wp.com/uamedwed.com/wp-content/uploads/2011/02/far-manager-fajlovyj-menedzher-9.jpg' align="center" width="100%" loading=lazy loading=lazy></p>
<p>In the last window you can check the box <b>Launch Far Manager 2 new</b>(Launch Far Manager 2). Then you need to press the button <b>Finish</b> to complete the installation.</p>
<p><img src='https://i1.wp.com/uamedwed.com/wp-content/uploads/2011/02/far-manager-fajlovyj-menedzher-10.jpg' align="center" width="100%" loading=lazy loading=lazy></p>
<p>That's it for installation <b>Far Manager</b> finished after pressing the button <b>Finish</b> The main menu of the program will appear.</p>
<p><img src='https://i2.wp.com/uamedwed.com/wp-content/uploads/2011/02/far-manager-fajlovyj-menedzher-11.jpg' align="center" width="100%" loading=lazy loading=lazy></p>
<h2>Registering an earlier version of Far Manager</h2>
<p>Earlier <b>Far Manager</b> it was necessary to register in order for all the functionality of the program to be available. And if you have an old version installed <b>Far Manager</b>, then the following instructions are just for you: <br>I will quote paragraph 2 of the contents of the file “ <b>License.xUSSR.txt</b>«:</p>
<blockquote><p>2. Citizens of countries of the former USSR have the right to use this version of the FAR for non-commercial purposes free of charge.</p>
</blockquote>
<p>I will say that this file manager is absolutely free, reading the same file it becomes clear how to register FAR, namely, point 3:</p>
<blockquote><p>3. To unlock the functions of the registered version of the specified <br>categories of persons when registering after running ‘far -r’ must be entered in <br>as username: <br><b>xUSSR registration</b><br>in this case, the registration code must be entered in small <br>in Russian letters the current day of the week.</p>
</blockquote>
<p>And so what should we do about this: <br>launch <b>FAR</b> we write - <b>far -r</b>, after which the window will be removed, and as shown in the bottom screenshot, enter:</p>
<p><img src='https://i2.wp.com/uamedwed.com/wp-content/uploads/2011/02/far-manager-fajlovyj-menedzher-12.jpg' align="center" width="100%" loading=lazy loading=lazy></p>
<p>Registration name - <b>xUSSR registration</b><br>Registration code - <b>Tuesday</b>(here we write the current day of the week) <br>Well, that's all for registration of the file manager, good luck! <br>If you downloaded one of the latest versions of the file manager <b>Far</b>, then you do not need to register it.</p>
<h2>Russification of Far Manager</h2>
<p>By default, the program will speak to us in English. Everything here is much simpler than with the Russification of most programs. If you did everything according to the above instructions, then the Russian language is already installed in the Far Manager program, you just need to enable it, and for this you need to do the following:</p>
<ul><li>in the open program window, click on the button <b>F9</b>(launch the Far main menu)</li>
<li>go to menu <b>Options</b></li>
<li>click on the menu sub-item <b>Languages</b></li>
</ul><p><img src='https://i1.wp.com/uamedwed.com/wp-content/uploads/2011/02/far-manager-fajlovyj-menedzher-13.jpg' align="center" width="100%" loading=lazy loading=lazy></p>
<p>After which a window will open in which you can select a language for the Menu, and there are several languages to choose from, namely:</p>
<ul><li>Chez(Czech)</li>
<li>English</li>
<li>German</li>
<li>Hugarion(Hungarian)</li>
<li>Polish</li>
<li><b>Russian(Russian)</b></li>
<li>Spanish</li>
</ul><p>We choose the one that you need, in my case it is Russian.</p>
<p><img src='https://i1.wp.com/uamedwed.com/wp-content/uploads/2011/02/far-manager-fajlovyj-menedzher-14.jpg' align="center" width="100%" loading=lazy loading=lazy></p>
<p>After selecting the Menu language, the following window will appear in which you need to select the Help language; there are slightly fewer languages here, namely:</p>
<ul><li>English</li>
<li>Hugarion(Hungarian)</li>
<li><b>Russian(Russian)</b></li>
</ul><p>But the one I need is still on the list - Russian.</p>
<p><img src='https://i2.wp.com/uamedwed.com/wp-content/uploads/2011/02/far-manager-fajlovyj-menedzher-15.jpg' align="center" width="100%" loading=lazy loading=lazy></p>
<p>After all these steps, you should have a file manager installed on your computer <b>Far Manager</b>, speaking Russian.</p>
<h2>Using FAR Manager</h2>
<p>The default program window contains two panels in which you can open different directories and files. In each of the panels you can use both the keyboard and the mouse, but file managers, in my opinion, are created to speed up the process of working with directories and files from the keyboard. Of course, this not only speeds up the work process, but also increases convenience significantly. <br>In order to sort files in any of the panels, you need to hold down the key <b>Ctrl</b> on the keyboard, after which a menu will be displayed at the bottom in which each item corresponds to a key <b>from F1 to F10 and up to F12</b> in full screen mode:</p>
<ul><li><b>F1</b>— show/hide left panel</li>
<li><b>F2</b>— show/hide right panel</li>
<li><b>F3</b>- sort by file name</li>
<li><b>F4</b>- sort by extension</li>
<li><b>F5</b>— sort by recording time</li>
<li><b>F6</b>- sort by size</li>
<li><b>F7</b>- do not sort</li>
<li><b>F8</b>— sort by creation time</li>
<li><b>F9</b>— sort by access time</li>
<li><b>F10</b>— sort by description</li>
<li><b>F11</b>— sort by file owner</li>
<li><b>F12</b>— launch the sorting menu</li>
</ul><p><img src='https://i2.wp.com/uamedwed.com/wp-content/uploads/2011/02/far-manager-fajlovyj-menedzher-16.jpg' align="center" width="100%" loading=lazy loading=lazy></p>
<p> <b>Alt</b>, which is mainly designed to work with files and directories, namely:</p>
<ul><li><b>F1</b>— open the current drive in the left panel</li>
<li><b>F2</b>— open the current drive in the right pane</li>
<li><b>F3</b>— here you can open the file for viewing both in an external program and in the file manager itself</li>
<li><b>F4</b>— here you can open the file for editing both in an external program and in the file manager itself</li>
<li><b>F5</b>— printing files</li>
<li><b>F6</b>— here you can create a link (shortcut) to a file or folder</li>
<li><b>F7</b>- file search</li>
<li><b>F8</b>— display command history</li>
<li><b>F9</b>— resizing the program window</li>
<li><b>F10</b>- search for folder</li>
<li><b>F11</b>— display browsing and editing history</li>
<li><b>F12</b>— display folder history</li>
</ul><p><img src='https://i2.wp.com/uamedwed.com/wp-content/uploads/2011/02/far-manager-fajlovyj-menedzher-17.jpg' align="center" width="100%" loading=lazy loading=lazy></p>
<p>You can also open an additional menu by holding the button <b>Shift</b>, which is mainly intended for working with files and archives, namely:</p>
<ul><li><b>F1</b>— add files to the archive</li>
<li><b>F2</b>— extract files from the archive</li>
<li><b>F3</b>— execute archive management commands</li>
<li><b>F4</b>- edit new file</li>
<li><b>F5</b>— copy the file under the cursor</li>
<li><b>F6</b>— renaming or moving a file under the cursor</li>
<li><b>F7</b>- absent</li>
<li><b>F8</b>— deleting the file under the cursor</li>
<li><b>F9</b>- save configuration</li>
<li><b>F10</b>— select the last executed menu item</li>
<li><b>F11</b>— use sorting by groups</li>
<li><b>F12</b>— show tagged files first</li>
</ul><p><img src='https://i1.wp.com/uamedwed.com/wp-content/uploads/2011/02/far-manager-fajlovyj-menedzher-18.jpg' align="center" width="100%" loading=lazy loading=lazy></p>
<p>The next menu is launched by pressing the key <b>F9</b> on keyboard. It contains the following points:</p>
<ul><li><b>Left</b>— basic operations that relate to the left panel</li>
<li><b>Files</b>— basic operations with files</li>
<li><b>Teams</b>- various commands</li>
<li><b>Options</b>— here are the basic settings for the program</li>
<li><b>Right</b>— basic operations that relate to the right panel</li>
</ul><p>I tried to reveal some of the small capabilities of the program, but the most important assistant in learning this file manager is one of the items in the bottom menu, namely - <b>Help</b>, which can be launched by pressing a key <b>F1</b> on keyboard. <br>As I said earlier, a large number of additional plugins are available in Far Manager, but at the moment I only use one plugin - <b>Noisy Player</b>. I wrote about this useful and interesting plugin not long ago, namely: it allows you to play music files on your computer. <br>All other plugins can be downloaded from the official website of the program.</p>
<h2>Links</h2>
<ul><li>http://www.farmanager.com/ - official website of the program</li>
<li>http://plugring.farmanager.com/ - plugin directory</li>
</ul><p>Happy using!</p>
<p>FAR Manager is a console file manager for operating systems of the Microsoft Windows family. It allows you to conveniently perform operations on files located locally on your computer, as well as on files on remote computers.</p>
<p>You can download FAR Manager for free on the project support website. We recommend downloading the file with the extension .msi - a standard installer for Windows.</p>
<h2>Interface</h2>
<p>By default, the FAR Manager interface consists of two panels, which display a list of files and directories.</p>
<p>You can move between directories using the arrow keys and the <b>"Enter"</b>. At the bottom of the application window there is a list of operation prompts corresponding to the function keys ( <b>F1</b> - <b>F12</b>, and they are with the key pressed <b>"Alt"</b>). Switching between panels occurs by pressing the "Tab" key. Also, many actions are available using the mouse.</p>
<h2>Russian interface language</h2>
<p>For ease of use, it makes sense to set the Russian language for the FAR Manager interface. For this:</p>
<br><img src='https://i0.wp.com/help.sprinthost.ru/img/support/howto/services/ftp/far_02.png' width="100%" loading=lazy loading=lazy><h2>FTP server connection settings</h2>
<p>Let the left panel of FAR Manager open the directory with the files of your website that you want to host. In the right panel we will work with files on the FTP server. To open the FTP panel, click <b>Alt+F2</b>, select <b>"NetBox"</b> and press the key <b>"Enter"</b>.</p>
<p> <br><img src='https://i0.wp.com/help.sprinthost.ru/img/support/howto/services/ftp/far_04.png' width="100%" loading=lazy loading=lazy></p>
<p>A list of your existing FTP connections will open in the right pane.</p>
<p>To create a new connection, click <b>Shift+F4</b>. A dialog box will open in which you need to specify connection parameters.</p>
<ul><li>Select FTP protocol. To do this, use the mouse or keyboard shortcut <b>Ctrl+↓</b>.</li>
<li>In the “Server name” line, enter the registered domain or IP address of your account. You can get its value through the Hosting Control Panel in the “Account” → “IP Addresses” section.</li>
<li>In the “User” line - the user name (username).</li>
<li>In the “Password” line - the password for your connection (however, we recommend leaving this field empty and entering the password when prompted later).</li>
</ul><p>After specifying the connection parameters, click the “Yes” button.</p>
<p><b>Attention:</b> We do not recommend saving passwords in the FTP connection settings. This can harm the security of your site, since passwords stored in popular programs are often stolen when your computer is infected with viruses. Instead, enter your password manually before each connection.</p>
<p> <br><img src='https://i2.wp.com/help.sprinthost.ru/img/support/howto/services/ftp/far_05.png' width="100%" loading=lazy loading=lazy></p>
<p>You can assign any unique name to the session.</p>
<p> <br><img src='https://i0.wp.com/help.sprinthost.ru/img/support/howto/services/ftp/far_06.png' width="100%" loading=lazy loading=lazy></p>
<p>After saving the settings, the created connection will appear in the list on the right side of the FTP panel.</p>
<p>To establish a connection and start working with FTP through FAR Manager, mark the line with the cursor and press the "Enter" key. The root directory of your account on the server will open in the right window.</p>
<p> <br><img src='https://i0.wp.com/help.sprinthost.ru/img/support/howto/services/ftp/far_07.png' width="100%" loading=lazy loading=lazy></p>
<h2>Uploading files to the server</h2>
<p>Go to the root directory of your new site and delete the default index.php file. To delete, mark the file with the cursor, click <b>F8</b> and confirm the action.</p>
<p> <br><img src='https://i2.wp.com/help.sprinthost.ru/img/support/howto/services/ftp/far_08.png' width="100%" loading=lazy loading=lazy></p>
<p>To upload your website files to the server, go to the left panel by pressing <b>Tab</b>, and select the files that need to be uploaded to the server: select the file with the cursor, press the key <b>Insert</b>- the file will be highlighted in color. Label all files and folders on your site this way.</p><p>To start copying, press the key <b>F5</b>.</p>
<p> <br><img src='https://i1.wp.com/help.sprinthost.ru/img/support/howto/services/ftp/far_09.png' width="100%" loading=lazy loading=lazy></p>
<p>Confirm your intention to start copying by pressing the key <b>Enter</b>.</p>
<p> <br><img src='https://i1.wp.com/help.sprinthost.ru/img/support/howto/services/ftp/far_10.png' width="100%" loading=lazy loading=lazy></p>
<p>In the dialog box that appears, ensure that the copy options are selected correctly and press <b>Enter</b>.</p><p>Once the copying is complete, you will see the files that you downloaded from your local computer appear in the right window. Now you can continue working with FAR Manager according to your existing tasks.</p>
<script>document.write("<img style='display:none;' src='//counter.yadro.ru/hit;artfast_after?t44.1;r"+
escape(document.referrer)+((typeof(screen)=="undefined")?"":
";s"+screen.width+"*"+screen.height+"*"+(screen.colorDepth?
screen.colorDepth:screen.pixelDepth))+";u"+escape(document.URL)+";h"+escape(document.title.substring(0,150))+
";"+Math.random()+
"border='0' width='1' height='1' loading=lazy loading=lazy>");</script>
</div><div class="clear"></div>
<script type="text/javascript">
document.getElementById('hc_full_comments').innerHTML = '';
</script><br /><br /><noindex><p align="center"><center>
<div id="meta_news_block1111" style="text-align: center;"></div></center>
</p>
<br /><br />
<p align="center">
</p>
</noindex>
</div>
</div>
<div id="sidebar">
<div class="clear"></div><br />
<h2 class="front" style="margin:15px 0 5px 0">Popular articles</h2>
<div class="tabcont">
<ol>
<li><a href="https://gtavrl.ru/en/ustanovka-proshivki-android-5-0-lollipop-obnovlenie-android-kak-obnovitsya-do/">Installing android 5 firmware</a></li>
<li><a href="https://gtavrl.ru/en/formula-svyazi-ciklicheskoi-chastoty-i-perioda-kolebanii-chastota-period/">Frequency, period, cyclic frequency, amplitude, phase of oscillation</a></li>
<li><a href="https://gtavrl.ru/en/panamskii-kanal---svyaz-dvuh-okeanov-i-podvig-chelovechestva-kak/">The Panama Canal is a connection between two oceans and a feat of humanity</a></li>
<li><a href="https://gtavrl.ru/en/instagram-vydaet-oshibku-seti-neizvestnaya-oshibka-seti-pri-vhode-v/">Unknown network error when logging into Instagram - what to do</a></li>
<li><a href="https://gtavrl.ru/en/nazvanie-chisel-nazvaniya-bolshih-chisel-cifry-po-poryadku-ot-1/">Names of large numbers Numbers in order from 1</a></li>
</ol>
</div>
<h2 class="front" style="margin:15px 0 5px 0">Latest articles</h2>
<div class="tabcont">
<ol>
<li><a href="https://gtavrl.ru/en/protokol-peredachi-dannyh-po-rs-485-fizicheskie-interfeisy-rs485-i-rs422-chto/">Physical interfaces RS485 and RS422</a></li>
<li><a href="https://gtavrl.ru/en/kak-vernut-ramku-na-90-gradusov-kak-mozhno-perevernut-ekran/">How can you flip your monitor screen to its original position?</a></li>
<li><a href="https://gtavrl.ru/en/reiting-luchshih-kitaiskih-smartfonov-po-sootnosheniyu-cena-kachestvo-reiting/">Rating of the best Chinese smartphones in terms of price-quality ratio The best Chinese phone</a></li>
<li><a href="https://gtavrl.ru/en/kak-perevesti-dengi-s-mts-na-mts-s-telefona-na-telefon-bez-komissii-kak/">How to transfer money from a phone to an MTS phone - description, methods Transferring funds between MTS numbers</a></li>
<li><a href="https://gtavrl.ru/en/ustanovka-televizionnyh-antenn-kak-podklyuchit-antennyi-kabel-k/">How to connect the antenna cable to the power supply TV cable connection to the connector</a></li>
<li><a href="https://gtavrl.ru/en/kak-obnovit-aifon-do-poslednei-versii-ios-ne-skachivayutsya/">Applications cannot be downloaded from Play Market without WI-FI</a></li>
<li><a href="https://gtavrl.ru/en/ustanavlivaem-novye-shrifty-v-ms-word-zagruzka-i-ustanovka-polzovatelskih/">Download and install custom fonts for Office How to download beautiful fonts for word</a></li>
</ol>
</div>
<div class="widget" id="ajdg_grpwidgets-3">
<div class="g g-9">
<div class="g-single a-27">
<script>
jQuery(function() {
window.onscroll = function() {
height_scroll = jQuery(document).scrollTop();
height = jQuery(document).height();
height50 = height / 2;
if (height_scroll >= height50) {
jQuery("#site-code-block-22").fadeIn(1200);
document.getElementById('site-code-block-22').style.display = 'block';
jQuery("#site-code-block-23").fadeOut(1200);
document.getElementById('site-code-block-23').style.display = 'none';
} else {
jQuery("#site-code-block-22").fadeOut(1200);
document.getElementById('site-code-block-22').style.display = 'none';
document.getElementById('site-code-block-23').style.display = 'block';
jQuery("#site-code-block-23").fadeIn(1200);
}
};
});
</script>
<div class="site-code-block prma-count" data-rel="cb_23" id="site-code-block-23" style="">
</div>
<div class="site-code-block prma-count" data-rel="cb_22" id="site-code-block-22" style="">
</div>
</div>
</div>
</div>
<div class="clear"></div>
<br />
<center>
<div style="color: #333333; font-size: 11px;">
</div>
</center>
<div class="clear"></div>
</div>
<div class="clear"></div>
</div>
</div>
</div>
<br /><br />
<div id="footeri">
<div id="footer">
<div class="footer-sec">
<h6>Sections</h6>
<ul>
<li><a href="https://gtavrl.ru/en/category/youtube/">Youtube</a></li>
<li><a href="https://gtavrl.ru/en/category/facebook/">Facebook</a></li>
<li><a href="https://gtavrl.ru/en/category/twitter/">Twitter</a></li>
<li><a href="https://gtavrl.ru/en/category/tips/">Adviсe</a></li>
<li><a href="https://gtavrl.ru/en/category/useful-tips/">Useful tips</a></li>
<br />
</ul>
</div>
<div class="footer-sec">
<h6>Pages</h6>
<ul>
<li><a href="">about the project</a></li>
<noindex>
<li><a href="" >RSS news</a></li>
</noindex>
</ul><br /><br /><br />
<h6>Special projects</h6>
<ul>
<li><a href="https://gtavrl.ru/en/feedback/">Connect with us</a></li>
</ul>
</div>
<div id="footer-top">
<h6>Contacts</h6>
<ul>
<li><a href="">Advertising on the website</a></li>
<li><a href="https://gtavrl.ru/en/feedback/">Contacts</a></li>
</div>
<div class="clear"></div>
</div></div>
<div id="bottom"><div class="foot_col1">2024 <a href="https://gtavrl.ru/en/">gtavrl.ru</a>.
</div>
<script type="text/javascript">var addthis_config = { "data_track_addressbar":true,"pubid": "ra-58b68bb0f1371607"} ;addthis_config.data_track_addressbar = false;addthis_config.data_track_clickback = false;</script>
<script type='text/javascript'>
var flag_hide = 0;
function hide_direct() {
flag_hide = 1;
jQuery('#rek_mob_fixed').slideToggle( 'slow' );
var date = new Date();
var expires_hour = 21600000;
date.setTime(date.getTime()+expires_hour);
showSocial();
Cookies.set('advp_show_me', '1', { expires: date, path: '/'} );
} ;
jQuery(function(f){
var element = f('#rek_mob_fixed');
element.delay(8000);
f(window).scroll(function(){ if (flag_hide == 0){
var offset_element_for_hide = jQuery('#before_footer').val();
if (offset_element_for_hide != null) {
offset_element_for_hide = jQuery('#before_footer');
offset_element_for_hide = jQuery(offset_element_for_hide).offset().top - jQuery(window).height();
} else {
offset_element_for_hide = jQuery(document).height();
}
//Если рекламный блок более 1000px по ширине, устанавливай фикс. ширину 1000px
if (jQuery('#rek_mob_fixed_block').actual('width') >1000) {
jQuery('#rek_mob_fixed_block').css({ 'max-width':'1000px'} );
}
if(f(this).scrollTop() > 500){
element.fadeIn(0);
}
if(f(this).scrollTop() < 500 || f(this).scrollTop() > offset_element_for_hide ){
element.fadeOut(0)
}
if(f(this).scrollTop() + f(this).height() >= f(document).height() && flag_hide == 0 && jQuery('#rek_mob_fixed').is(':visible'))
{
jQuery('#rek_mob_fixed').slideToggle(100);
}
}
} );
} );
function showSocial(){
if(flag_hide == 1 )
jQuery('#footer-share').slideToggle('slow');
}
</script><div id="wondergridgallerylightbox_options" data-skinsfoldername="skins/default/" data-jsfolder="/wp-content/plugins/modesco-wonderplugin-gridgallery/engine/" style="display:none;"></div>
<script type='text/javascript' src='https://gtavrl.ru/wp-content/plugins/contact-form-7/includes/js/scripts.js?ver=4.9.2'></script>
<script type='text/javascript' src='https://gtavrl.ru/wp-content/plugins/modesco-monica/script.min.js?ver=4.9.1'></script>
<script type='text/javascript'>
/* <![CDATA[ */
var tocplus = { "visibility_show":"\u043f\u043e\u043a\u0430\u0437\u0430\u0442\u044c","visibility_hide":"\u0441\u043a\u0440\u044b\u0442\u044c","width":"100%"} ;
/* ]]> */
</script>
<script type='text/javascript' src='https://gtavrl.ru/wp-content/plugins/modesco-table-of-contents-plus/front.js?ver=1404'></script>
<script type='text/javascript' src='https://gtavrl.ru/wp-content/plugins/page-links-to/js/new-tab.min.js?ver=2.9.8'></script>
<script type='text/javascript'>
var q2w3_sidebar_options = new Array();
q2w3_sidebar_options[0] = { "sidebar" : "ads-sidebar", "margin_top" : 10, "margin_bottom" : 50, "stop_id" : "before_footer", "screen_max_width" : 0, "screen_max_height" : 0, "width_inherit" : false, "refresh_interval" : 1500, "window_load_hook" : false, "disable_mo_api" : false, "widgets" : ['ajdg_grpwidgets-3'] } ;
</script>
<script type='text/javascript' src='https://gtavrl.ru/wp-content/plugins/q2w3-fixed-widget/js/q2w3-fixed-widget.min.js?ver=5.0.4'></script>
<script type='text/javascript' src='https://gtavrl.ru/wp-content/plugins/youtube-embed-plus/scripts/fitvids.min.js?ver=4.9.1'></script>
<script type='text/javascript' src='/wp-includes/js/wp-embed.min.js?ver=4.9.1'></script>
<script type="text/javascript">
var _hcwp = _hcwp || [];
var _hcobj = { widget_id : 29264, widget : "Bloggerstream",selector: '.hc_counter_comments',platform:"wordpress", } ;
_hcwp.push(_hcobj);
(function() {
if("HC_LOAD_INIT" in window)return;
HC_LOAD_INIT = true;
var lang = "ru";
var hcc = document.createElement("script"); hcc.type = "text/javascript"; hcc.async = true;
hcc.src = ("https:" == document.location.protocol ? "https" : "http")+"://w.hypercomments.com/widget/hc/29264/"+lang+"/widget.js";
var s = document.getElementsByTagName("script")[0]; s.parentNode.insertBefore(hcc, s.nextSibling);
} )();
</script>
</body>
</div>
</body>
</html>