What you can do with powershell. Windows powershell ise what is it, power shell
Hi all! Today a short note on the topic, how to open powershell as administrator. Let me remind you that PowerShell is a powerful programming and administration language from Microsoft; every year it acquires an increasing number of cmdlets and functionality. Essentially, it is a replacement for the Windows Command Prompt. Below we will consider methods that allow you to open and configure it.
.
Methods for opening a PowerShell snap-in
Powershell is developing very well and with the release of Windows 10 it has already received version 5, but our topic is different. So how to open powershell? Everything is simple if in Windows XP, then nothing. Since it is delivered separately, in all subsequent releases it comes as a built-in component. The most universal way to open powershell is to click
Win+R and enter powershell

By pressing enter, the PowerShell console will launch, the only problem is that it will not open as administrator. And as a result, many commands will not be executed; below we will see how to do this on behalf of the administrator.

How to run windows powershell as administrator in Windows 8.1 and Windows 7
You can open Windows Powershell through Start. In Windows 8.1, Windows 2012 R2, go to System Tools - Windows and right-click and select Run as administrator.

In Windows 7 and Windows 2008 R2 it looks like this Start > Accessories > Windows PowerShell

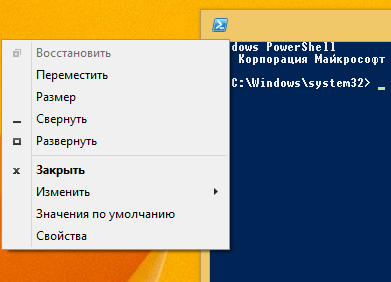
You can also create a shortcut in the task item and right-click on it and select the appropriate item

It would be convenient if PowerShell always opened as administrator, let's implement it. This is done the same way in all versions of Windows. Opening the control panel


Right-click on it and select Properties. You can immediately see the path to the file where it is located in the system.

Click the "Advanced" button. You will see additional properties. where you need to check the box Run as administrator.

Everything is very simple. I am sure that now you will not have a question about how to open Windows Powershell. Another useful thing is to change the font in the powershell window.
How to Open PowerShell from the Start Button Context Menu in Windows 10
Microsoft is increasingly focusing on its powerful language (PowerShell) from the command line, and this is logical, since its capabilities for managing operating systems of the Windows family are almost limitless, if not more than in the graphical interface. Starting with version 1709 of Windows 10, in the context menu, PowerShell replaced the usual cmd. Right-click on the start button in Windows 10 and from the context menu, select the appropriate item:
- Windows PowerShell
- Windows PowerShell (administrator) is exactly the mode with maximum rights in Windows 10.

Launch Windows PowerShell using Search in Windows 10
In Windows 10 and older versions, you can find the PowerShell shell using a regular search; there is a special section for this. Click next to the Start button, the magnifying glass icon. In the search form that opens, enter the word PowerShell. You will search for all options, among which you will find the shell. If you right-click on it, you can open it as an administrator.

Launching Windows PowerShell from the Start menu in Windows 10
To open PowerShell from the Start menu, open it and find the Windows PowerShell item, it will be in the form of a folder, open it and run the appropriate version.

If you right-click, you can run the Vershel shell as an administrator with administrator rights.

Additional and generic shell launch methods
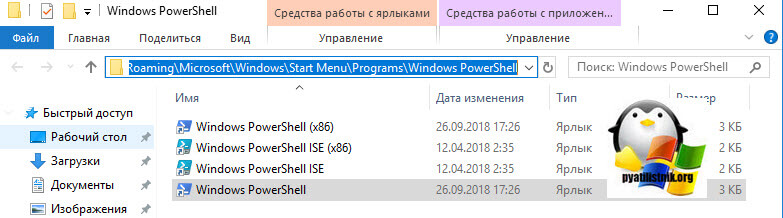
There are also very specific methods for opening a shell with a powerful language from Microsoft. The most clumsy one is to simply find the executable file and run it directly from its location on the system. Let's go to your Windows 10 along the following path:
C:\Users\username\AppData\Roaming\Microsoft\Windows\Start Menu\Programs\Windows PowerShell
As a result, you will see a folder with shortcuts that are present in the Start menu, you can launch them.
You can also run the original executable file, which is located along the path:
C:\Windows\System32\WindowsPowerShell\v1.0
And by right-clicking on it, you can download it as an administrator, with maximum rights.

You can also launch Windows PowerShell from the command line window; to do this, simply enter the magic word in it and press Enter.

Well, let me also remind you of the method for launching a new task from the “Task Manager” snap-in. Open "Task Manager", select menu item "File - Run new task"

In the window that appears, enter PowerShell.

Well, the last method known to me is to launch PowerShell through Windows 10 Explorer, to do this, open Explorer, select the menu item “File - launch Windows PowerShell”, there will be both modes.

The responsible administrator always has two accounts, the first one has the minimum rights of an ordinary user for everyday tasks. The second one already has the necessary administrative privileges, from which he configures servers and everything related. Windows operating systems have functionality that allows you, while in the session of one user, to launch an application on behalf of another, who has more advanced rights. So, in a regular user session, the system administrator launches PowerShell on behalf of a user with different rights and calmly manages what he wants.
To run PowerShell as another user, you need to hold down the SHIFT button, then right-click on the PowerShell icon and select "Run as another user" from the context menu.


Enter the login and password for the account you need. As a result, the shell will work in the context of another user.

You can also launch a new PowerShell window from the current user window, but with new rights, to do this, enter the command:
start powershell -credential ""
In the account request window, indicate the login and password for the account that has the rights you need for your further work.

What is PowerShell ISE
You've probably noticed that the PowerShell ISE shortcut is everywhere, and you'd like to know what it is. In a nutshell, this is a special shell in which you can write scripts and scenarios in PowerShell, using all the variety of cmdlets that Microsoft offers you.
One of the convenient methods for launching PowerShell, if used very often, is to assign a hotkey combination to it, which, when pressed, launches the shell. It's done, it's very simple. Open the window properties PowerShell, on the " tab Label"find item" Quick call", by default it has the status no.

Select it and press the Shift or Ctrl, or CTRL+SHIFT key, as a result of which you will substitute the construction for the future combination and also press any key from the letter range, in my example it turned out CTRL + SHFT + C. This is the combination I will call your PowerShell. Save the settings. I also note that you can easily cancel it or change it to another.

I'm trying to enter the shortcut combination CTRL + SHFT + C, as I see everything works great.

Launching a shell from ISE
Until recently, I usually opened ISE from the usual PowerShell shell, and not vice versa, but what a surprise I was that in my “File” I found the item “Run PowerShell.exe” and there is even a keyboard shortcut Ctrl+Shift+P.

Powershell changing the font is very simple, go to the Font tab in the properties, where you can set the size from 5 to 72.

You can also get to properties from the utility window itself, click on the icon in the upper left corner and select properties
Here the font settings are slightly different, and as they change, the size of the console also changes.

On the Colors tab, you can set the font color in Powershell and the window itself. By making it black, for example, like the command line.

I also advise that if you are an active console user, set the buffer size not to 50 commands, but at least to 100.

A considerable part of the tasks associated with maintaining local computer networks involves performing routine operations, the manual implementation of which may require considerable time. It is likely that solutions to automate administrative tasks that could improve productivity arose almost immediately with the advent of the system administrator profession.
The most common means of “saving time and getting rid of headaches” has become the recording and sequential batch execution of necessary operations - execution of scripts or scripts in the operating system command interpreter.
Attempts to improve the state of affairs in the field of managing and administering Windows using the command interface did not lead to the adaptation of a scripting language alien to the system or the creation of a super utility that runs in DOS, but to the emergence PowerShell– new command shell.
As part of MS-DOS and Windows 9x, such an interpreter, allowing processing of batch files (bat-files), was command.com, subsequently (since the release of Windows NT) replaced cmd.exe. Later, Windows Script Host appeared.
Attempts to improve the state of affairs in the field of managing and administering Windows using the command interface did not lead to the adaptation of a scripting language alien to the system or the creation of a super utility that runs in DOS, but to the emergence Windows PowerShell– new command shell. According to some reports, its appearance is associated with the use of the .NET platform when creating a command interface for WMI. Currently, PowerShell is a standalone application that can be installed on any system using the platform .Net 2.0(Windows XP, Vista, Server 2003). Starting with Server 2008, PowerShell will be a built-in component of Windows systems. If you don't have Server 2008, you'll first need to download it to get started with PowerShell (you may also need to install .NET).Windows Script Host(WSH; originally called Windows Scripting Host) - one of the elements of Microsoft Windows, it began to be shipped as part of the operating system starting with Windows 98. Allows you to run scripts written using scripting languages VBScript/JScript and, as an addition, some others. Scripts executed in WSH provide much more functionality than using command (bat- and cmd-) files. Execution is possible in a graphical environment (wscript.exe) or in the console (cscript.exe).
However, the process of writing and executing scripts in Windows OS is not as developed as, for example, in UNIX systems. One of the reasons for this is the graphical interface of the Windows OS itself, which apparently made it so popular among ordinary, non-corporate users. The ability to control some elements of the Windows environment using a graphical interface cannot always be achieved using system utilities executed on the command line. On the other hand, the capabilities of some system programs supplied with Windows are not always presented in the GUI. In addition, interpreters in Windows have a rather limited set of commands “hardwired” into the shell itself. Windows Script Host is not integrated with the command line and in itself poses a potential danger - it is used by a fairly large number of malware.
Acquaintance
When you launch PowerShell, you will not initially notice any differences between it and cmd.exe (except that the default background color of the PowerShell window is blue). Moreover, you will soon discover that copy/paste operations in PowerShell are implemented just as badly as cmd.exe. But the first impression of the similarity of these shells, let’s say, does not entirely correspond to reality.
The fact that PowerShell is based on the .NET Framework is its main difference from previous Windows command shells. PowerShell is completely object oriented. The result of running a command in PowerShell is not some “text itself,” but a .NET platform object. This object represents the data itself and has a set of properties and methods inherent to it.
Internal commands (more precisely, command structures) for working with objects in PowerShell are called cmdlets. A special uniform name was invented for them in the form of an action-goal combination. For example, the “set” action is used to receive data, “get” to receive, “out” to output, etc. The target is the type of object to which the action will be applied. Cmdlets can be thought of as mini-programs that run in PowerShell. To increase functionality, you can create your own cmdlets or install third-party cmdlets. In addition to cmdlets, PowerShell allows you to run functions, external scripts (stored in files with the ps1 extension), and external executables.
PowerShell includes a fairly extensive help system. To get started with it, you can run the Get-Help command.
To obtain detailed help for a cmdlet or basic information section, you must specify its name as a command parameter.
Options
Strictly speaking, in the spirit of consistent naming in PowerShell, all parameter names passed to a cmdlet must follow the "-" character. However, for ease of writing, the names of some parameters can be omitted. For example, to access help for the Get-Content cmdlet instead of specifying the full
PowerShell:
Get-Help –name Get-Content
you can enter the command
PowerShell:
Get-Help Get-Content
The parameter may have any value (in the example just given, the value of the name parameter was Get-Content) or may not have any value. In this case, it is analogous to a switch for some functionality of the command. For example, if you want to get complete information about the Get-Content cmdlet, enter
PowerShell:
Get-Help Get-Content –Detailed
ConveyorPowerShell implements a mechanism for transferring data from one process to another or outputting it to a file. Since, as noted above, PowerShell operates not with text, but with objects, when redirecting, the element of information exchange is the object, along with its structure. This feature allows you to operate with objects - select them according to a given filter, sort, group them, etc. To organize such a conveyor (the term is used in the documentation in English pipeline- pipeline or channel) the vertical bar sign is used in the text of the script. When such a sign is encountered, the interpreter passes objects from one cmdlet to the other as input parameters.
As an example of a pipeline and the ability to access the properties of objects transferred along it, we present the following situation. To check whether any suspicious programs are running on the computer, we want to get a list of all running processes, get the paths and names of the files that launch them, and also look at the creation date of such files. In addition, we will sort such a list by creation date in descending order and select the 10 most “recent” of them. Let's also add the time of the last modification of the file to the output information. We will exclude processes with the names "System" and "Idle" from consideration, since they do not contain paths to files.
As they say, a well-formulated question is already half the solution. Take a look:
When entering code, you can always break the line by placing a `` after a space at the hyphen. You can even just press the Enter key without finishing the line. In this case, PowerShell will change the prompt to >>, letting the user know that the interpreter considers the code incomplete and is waiting for the user to finish typing.
Like many other scripting languages, PowerShell allows you to use variables. The variable is denoted by the "$" sign. In the case of transferring an object through a pipeline, the $_ variable points to the transferred object itself.
Let's look at the actions of the code "step by step". First, we get the list of processes using the Get-Process cmdlet. This data is passed along the pipeline further and filtered according to the conditions specified in where-Object (we discard processes with the names "System" and "Idle").
The next element of the pipeline, Get-Item, returns the attributes of the selected objects. All that remains is to sort them (time of creation in descending order) and select the values that interest us (names of the folder and executable file, time of creation and last modification of the file). The last parameter, -first 10, specifies that only the first 10 elements from the list of objects will be displayed. Let's try to execute in the Server 2008 environment:
Enlarge image
Wonderful, just what we need. However, when I tried to run the same code in Windows XP or Server 2003, I discovered that it didn't look as smooth there:
Enlarge image
When viewing execution results
PowerShell:
Get-Process | Select Path
It turned out that PowerShell interprets the paths of two processes - winlogon and csrss - in Windows XP and Server 2003 as \??\C:\WINDOWS\system32\. For an explanation of this behavior, I turned to Vasily Gusev, a PowerShell specialist. He explained that these processes do not use Win32API, and such a different response to them in XP/Vista from the .NET side is likely due to the difference in the platforms of these operating systems.
Having decided that using error handling mechanisms (in terms of bypassing an “unclear” path and suppressing the error message output) or excluding winlogon and csrss processes from the list in this case is not suitable (perhaps they are infected, and we no longer show the date of their modification in the results we'll see), the commands were changed as follows:
PowerShell:
Get-Process | ForEach-Object ( if ($_.Path -ne $NULL) ( Get-Item ($_.Path -replace "\\\?\?\\", "") ) ) | Sort CreationTime -desc | Select FullName, Name, CreationTime, LastWriteTime -first 10
And the reader can get some insight into the use of conditions and regular expressions in PowerShell.
Small explanations to the code.
- The second stage of the pipeline uses the ForEach-Object cmdlet to perform a specified operation on each object in the set passed to its input.
- As stated above, the current object on which the operation is being performed is represented by the variable $_.
- The specified operation here is a condition of the form if ( condition){code to be executed if the condition is true}.
- Just like in cmd.exe, comparison operators do not use characters like< или >, and abbreviations - in this case it is “not equal”: -ne.
- So, if the process path contains any value (in the case of "System" and "Idle" there is simply no path), using the replace function all the "\??\" characters in the path will be removed (perhaps, in more detail we will touch on the issue of regular we won’t use expressions for now)
- and the Get-Item cmdlet will provide access to the properties of the current process.
Enlarge image
Getting information about objects
Perhaps the reader has already had a question - how, generally speaking, can you find out what information can be obtained as a result of executing a particular command? What actions can be performed with the received data? For example, in the above case, how would we know that we would be able to get the creation date of the file? One simple way to analyze the object returned by a command is to pass that object as input to the Get-Member cmdlet. This cmdlet displays information about the type of an object and all its elements. As a rule, objects have a large number of different properties and the result of Get-Member can be very voluminous text that is not very convenient to view. In this case, you can either divide the information into parts or filter it. An example of obtaining information about an object returned by the Get-Process cmdlet, which can be viewed page by page:
PowerShell:
Get-Process | Get-Member | Out-Host-Paging
When the page is full, the user can choose one of the options - display another page, display another line, or stop displaying data.
Data filtering is performed using the MemberType parameter, which determines what type of information should be displayed. For example, the command
PowerShell:
Get-Process | Get-Member -MemberType Properties
will display only the properties of the object, and
PowerShell:
Get-Process | Get-Member -MemberType Methods
Only his methods. Another way to view the properties of an object is to assign an object to a variable, then type the name of the variable in the console, put a period and press the Tab key. With each keystroke, PowerShell will iterate and substitute the object's methods and properties. Iteration in the opposite direction is possible using the key combination Shift+Tab.
Safety
As already noted, the use of VBScript/JScript scripts poses a potential danger to the system - to execute them, simply click on the icon with the mouse. The danger is even greater if the user is logged in with an account that is a member of the Administrators group. In PowerShell, a script with the ps1 extension cannot be executed using the mouse - on the system such a file will be opened not in the command shell, but in Notepad. To run the script, you need to launch PowerShell itself, enter the file name and press Enter.
In the new shell, substitution of commands is also impossible. The essence of this technique used by attackers is as follows. Typically, a non-administrator user has some folders with write and execute permissions on files. A typical example is the C:\Documents and Settings\username folder. The malware creates an executable file in such a folder with a name that matches the name of the shell command or the name of the executable system program. For example, I created ipconfig.vbs in “my” documents folder, which displays a simple message. Now, if, having launched cmd.exe, and being in my folder, I try to execute the Windows ipconfig command, I will get this result:
Enlarge image
To complete the illustration, you can place the executable file in the documents folder, renamed in our case to ipconfig.exe. Then, even when called with an extension, the file will be launched from the current folder, and not from \system32. This trick will not work with PowerShell - to call a script whose path does not coincide with the paths specified in the %Path system variable, you must explicitly specify its location. Even if the script is located in the folder that is the current one for the shell, you must specify the path in the following form: .\file_name. A period with a backslash points the interpreter to the current folder.
Another security mechanism is the script execution policy. Initially, the shell is configured so that even if the script is called correctly, its execution will be prohibited, and the user will receive a corresponding message. The execution policy can be switched to one of four modes:
- Restricted- default setting, running any scripts is prohibited
- AllSigned- scripts that have a digital signature from a trusted publisher are allowed to run; User-created scripts must also be certified by a certificate authority
- RemoteSigned- scripts are allowed to run if they are not trusted but created by a local user; scripts downloaded from the Internet that do not have a signature will not be executed
- Unrestricted- allowed to run any scripts
Also, among the tools that help improve security when working with PowerShell, I would include command parameters from the “what happens if...” category. There are two of them - whatif and confirm. The first allows you to determine what action will be performed and with what object, but the action itself will not be implemented. Something like a simulation. The second one will ask the user for confirmation before performing the action, and if the answer is yes, actually run the required command. That is, this type of insurance.
I will give perhaps the most striking and fun example of using these parameters. If the user tries to execute the command
PowerShell:
Get-Process | Stop-Process
then after a few seconds a blue screen with STOP will await him. PowerShell, as follows from the text of the command, will sequentially begin to “kill” all processes running in the system, which will lead to its critical stop. If you run
PowerShell:
Get-Process | Stop-Process -whatif
nothing bad will happen - PowerShell will simply show what it would do if the command were executed without the -whatif switch:
Enlarge image
Nicknames
The shell has a built-in mechanism for command aliases. On the one hand, aliases are used to simplify command entry. Typically, in this case, the abbreviated name of the cmdlet is used as the alias (for example, gc for Get-Content or fl for Format-List). On the other hand, this mechanism ensures compatibility of interfaces of different command interpreters. For example, having experience with cmd.exe, you are used to displaying the contents of a folder using the dir command. Running this command in PowerShell will produce the same result, although the shell will actually run the Get-ChildItem cmdlet instead of the dir alias. A list of all available aliases can be obtained using the Get-Alias command. The user can create their own aliases using the Set-Alias command.
PowerShell drives
Just as Windows deals with data using the file system, PowerShell works with data stores represented as disks. The physical disks of the system are not the only type of storage built into the shell with which interaction is ensured. The user can work with the registry, built-in and environment variables, and certificate stores in the same way as with regular drives, folders, and files. Implementing this interaction and providing abstractions that allow the user to apply the same commands and methods to different data stores is done providers- .NET programs.
The list of providers currently available to the shell can be obtained with the Get-PSProvider command. Initially, PowerShell contains the following "drives" - aliases (Alias), environment variables (Env), physical system drives (C, D, etc.), functions, system registry, internal variables (Variable) and certificate store.
Here is an example of reading the contents of the registry hive HKLM\Software\Microsoft
Enlarge image
As you can see, the same commands were used as to obtain information about the file system. But the structure of the data obtained is naturally different. In addition to the name and properties, the subsection number (SKC) and record number (VC) are displayed for each element. Using PowerShell, a user can view registry information and add, delete, and modify keys. Let me give you something like a cheat sheet for working with registry elements:
Enlarge image
And code for an example of performing various manipulations with registry keys and their parameters:
PowerShell:
# Create a new subsection with the name valks in the branch HKEY_CURRENT_USER\Software New-Item -path HKCU:\Software\valks # Add a new string parameter to the created section with the name Param1 and the value StringValue New-ItemProperty -path HKCU:\Software\valks -name Param1 -propertyType String -value StringValue # Create a SubFolder subsection New-Item -path HKCU:\Software\valks\SubFolder # Add another parameter - Param2 of type DWord and value 12 New-ItemProperty -path HKCU:\Software\valks -name Param2 -propertyType DWord -value 12 # Get a list of all parameters Get-ItemProperty HKCU:\Software\valks # Get the value of the Param2 parameter Get-ItemProperty HKCU:\Software\valks | Format-list Param2 # Or we can read the section into the variable $key $key = Get-ItemProperty HKCU:\Software\valks # And output the value of the desired parameter Write-Host "Value of the Param2 parameter: " $key.Param2 # Change the value of the Param2 parameter to 193 Set-ItemProperty HKCU:\Software\valks -name Param2 -value 193 # Change the name of the parameter Param1 to Parameter1 Rename-ItemProperty -path HKCU:\Software\valks -name Param1 -newname Param1 # Delete Parameter1 Remove-ItemProperty HKCU:\Software \valks -name Parameter1 # Delete the entire subsection valks Remove-Item HKCU:\Software\valks
Here is another small example in the form of a function that searches for programs that automatically load when the system starts. The search scope is defined by an array that includes some known startup points in the registry. The code contains comments, I hope they will explain the essence of the work.
PowerShell:
Function GetAutoexec ($hives) ( # If the function is not given an input array of registry keys, # use this: $hives = "HKCU:\Software\Microsoft\Windows\CurrentVersion\Run", ` "HKLM:\SOFTWARE\Microsoft\Windows\ CurrentVersion\Run", ` "HKLM:\SOFTWARE\Microsoft\Windows\CurrentVersion\policies\Explorer\Run" # Output the title and move the line Write-Host "Startup list`n" # We begin to iterate through the array elements - registry branches Foreach ($ hive in $hives)( # Display the name of the branch in green Write-Host "Branch $hive" -ForegroundColor Green # Check whether the branch exists in the registry if (Test-Path $hive)( # Get the next registry key $param = Get- Item $hive # for each key... foreach ($p in $param)( # ...get a list of its parameters foreach ($key in $p.getvalueNames())( # display the name of the parameter and its value "Loading $ key from " + $p.GetValue($key) ) ) ) # wrap the Write-Host line "`n" ) ) # call the GetAutoexec function itself
The user can create their own disks using existing providers. Here is an example of creating a PowerShell drive named Win, the contents of which will be the root folder C:\Windows:
PowerShell:
New-PSDrive -Name Win –PSProvider FileSystem -Root "C:\Windows"
Once the PowerShell drive is created, you can access it just like a regular system drive.
Enlarge image
However, you should be aware that when you end your PowerShell session, it will be automatically deleted. So are aliases, functions and variables created by the user during the session. In order to save these changes, you need to create a PowerShell profile.
PowerShell Profiles
A profile is a file with the extension ps1. In fact, this is the same script executed by the shell when it starts. Profiles in the shell are not created automatically - they must be created by the user independently. The created profiles will be loaded every time PowerShell is launched if the execution policy allows loading configuration files. Up to four different profiles can be processed. The location of the files in the order in which they were downloaded:
- %windir%\system32\WindowsPowerShell\v1.0\profile.ps1 - profile that applies to all users and shells
- %windir%\system32\WindowsPowerShell\v1.0\ Microsoft.PowerShell_profile.ps1 - profile that applies to all PowerShell users only
- %UserProfile%\My Documents\WindowsPowerShell\profile.ps1 - applies to the current user in all shells
- %UserProfile%\My Documents\WindowsPowerShell\Microsoft.PowerShell_profile.ps1 - applies to the current user only in PowerShell
The path to the profile of the current PowerShell-only user is stored in the $profile built-in variable. To create it, run the command
WMI objects are quite native to PowerShell. Just run the command
And here is a small example of polling all computers on a local network with an address of 192.168.1.0 and a subnet mask of 255.255.255.0:
PowerShell:
1..254| ForEach-Object -Process ( Get-WmiObject -Class Win32_PingStatus -Filter ("Address="192.168.1." + $_ + """) -ComputerName . ) | Select-Object -Property Address,ResponseTime,StatusCode
In the first element of the pipeline, an array of numbers from 1 to 254 is generated. At the second stage, each number from the array is substituted into an IP address that will be pinged using WMI tools. The results will be displayed in a table with three columns - host address, response time and response status. If the host responds, the status code "0" is returned.
Working with COM Objects
The .NET platform has built-in tools that allow it to work with COM components. This feature allows you to control the operation of various COM-enabled applications. As an example, we will show a function for automating work with Internet Explorer. We will open IE and go to WindowsFAQ.ru. If a string is passed as a function parameter, we will look for it using the search engine of the site itself; if the parameter is missing, we will look for the word windows. Here is the code with comments:
PowerShell:
# Declare the function, set the default parameter - windows function WinfaqSearch ($str = "windows") ( # Create a COM object - Internet Explorer $ie = New-Object -Comobject InternetExplorer.application # Specify the browser's navigation address $ie.Navigate( "http://windowsfaq.ru") # Make the running IE instance visible $ie.Visible = $True # Just in case, wait for the page to load for 5 seconds Start-Sleep 5 # Get the text of the web page $doc=$ie.document # We look for the search form input field on the page $text = $doc.getElementById("mod_search_searchword") # We enter the desired value into it $text.value = $str # We get the form itself that is responsible for the search $forms = @($ie.Document .forms | where ($_.action -match "index.php\?option=com_search&Itemid=5")) # Send a request to it $forms.Submit() # Ask if the IE instance should be closed if (($resp = Read-Host "Close Internet Explorer? [Y]Yes/[N]No") -eq "y")( if ($ie.Visible -eq $true)( $ie.Quit() ) Remove-Variable ie ) )
ConclusionOf course, it is impossible to describe all the features of PowerShell in one article. In addition, Microsoft continues to work on improving it - the second version should support managing remote computers directly from the shell itself. Other innovations are expected. Considering that PowerShell will be a component of the new operating systems, there is no doubt that the scope of its use in Microsoft products will only expand.
The author expresses gratitude to Vasily Gusev for the assistance provided in preparing the article.
In this article we will look at such technology from Microsoft as Windows PowerShell, we will talk about what PowerShell is, what cmdlets and a pipeline are, how to write scripts and modules, and also touch on other equally important and useful features of Windows PowerShell.
What contributed to the emergence of Windows PowerShell?
Before PowerShell, there were ( and there are) the following tools for automation and administration of services: Windows command line and Windows Script Host. But these technologies have disadvantages.
The Windows command line also has the ability to perform some administrative tasks and the ability to record an algorithm of actions, saving it as a script (bat file), while you can use certain programming elements, for example, use variables, conditional constructs, and even something like cycles.
Most software products have a console interface, i.e. we can control the program using the command line, while saving resources due to the absence of the cost of running a graphical interface. Microsoft even releases editions without a graphical interface for the Windows Server server operating system ( Server Core, Windows Server 2016 even has Nano Server), but all this is not enough, since the command line capabilities are limited, i.e. We won’t be able to write some complex logic to automate something, and even if we can, it will take time and knowledge.
Also, a disadvantage of the command line is that to fully manage the server we use various console utilities of software products, and therefore using the command line for administration is actually difficult, from the point of view of the fact that all these utilities have different syntax, parameters, methods of use and in order to perform typical tasks, i.e. everyday, you have to keep all this in memory, and to perform atypical tasks you have to first read the help or documentation.
Windows Script Host technology allows you to perform all administrative tasks as the command line, including their automation by writing WSH scripts, but here we can already use full-fledged programming languages ( VBScript and JScript), i.e. complex logic and algorithms can be implemented. In addition, with the help of WSH we manage software products through an object interface, in other words, Windows Script Host is much more “ cooler» than the command line. But this technology also did not become the ideal tool for administering and automating this administration for system administrators, since Windows Script Host required knowledge of the above programming languages, which is actually superfluous for system administrators. Administrators only need a simple administration tool with the ability to program some actions, and they do not want to delve into the object models of software products in the VBScript and JScript programming languages.
As a result, Microsoft needed to develop an administration tool for system administrators that would 100 percent satisfy all the needs of system administrators, both in terms of administration and automation capabilities, and in terms of convenience and ease of use, thus Windows PowerShell appeared.
What is Windows PowerShell?
Windows PowerShell is a Windows scripting language and command shell designed for administering and configuring Windows operating systems. PowerShell is built on top of the CRL framework and the .NET Framework, and unlike the command line, which accepts and returns text, Windows PowerShell works with objects. Each object in PowerShell has properties and methods that you can use to manipulate those objects.
In Windows PowerShell, Microsoft developed the concept of cmdlets ( cmdlets), which is a command naming system " Verb-Noun" This system allows system administrators to quickly master and simplify work with PowerShell.
With Windows PowerShell you can:
- Access the file system;
- Manage the registry;
- Manage services;
- Manage processes;
- Configure the operating system;
- Install software;
- Install server roles and components;
- Administer and configure server roles and components;
- Write and use scripts to automate management and administration;
- Perform other system administrator tasks.
Windows PowerShell contains many commonly used utilities and commands that you can run from the command line, such as ipconfig, ping, and others. This was done in order to facilitate the transition of system administrators from the command line to PowerShell.
Also, for convenience, many frequently used commands and utilities in PowerShell have synonyms ( Alias), for example cls is a synonym for the Clear-Host cmdlet, dir is a synonym for Get-ChildItem ( the full list of synonyms can be viewed by running the Get-Alias cmdlet).
To simplify the search for the desired command, PowerShell has a special cmdlet Get-Command, with which you can search by both verb and noun. All commands in Windows PowerShell are grouped into modules ( e.g. Hyper-V, NetTCPIP), which also makes it easier to find the right command.
Once the required command has been found, you can look at the instructions for working with this command, i.e. help, there is a special Get-Help cmdlet for these purposes, for example the following command will show help for the Get-Command cmdlet:
Get-Help Get-Command
Help in Windows PowerShell can be short, detailed ( parameter -Detailed), full ( parameter -Full), and you can also display only examples ( parameter - Examples). The following command will only show examples of using the Get-Command cmdlet:
Get-Help Get-Command -Examples
PowerShell help is updatable, i.e. it can be updated with the Update-Help command.
Windows PowerShell Versions
The first version of PowerShell 1.0 appeared on November 14, 2006 and was released as a separate distribution that could be installed on the following versions of Windows operating systems: Windows XP Service Pack 2, Windows Server 2003 Service Pack 1 and Windows Vista.
In Windows Server 2008, PowerShell 1.0 came as a component that also had to be installed.
Starting with Windows 7 and Windows Server 2008 R2, PowerShell comes as an integral component of the system ( those. pre-installed, no need to install it). Below is a table of correspondence between the version of PowerShell and the version of the Windows operating system ( those. what version of PowerShell is installed by default on which version of Windows):
| PowerShell version | Windows versions |
| PowerShell 2.0 | Windows 7, Windows Server 2008 R2 |
| PowerShell 3.0 | Windows 8, Windows Server 2012 |
| PowerShell 4.0 | Windows 8.1, Windows Server 2012 R2 |
| PowerShell 5.0 | Windows 10, Windows Server 2016 |
With each new version, PowerShell becomes an increasingly powerful administration tool; for comparison, the first PowerShell had about 130 cmdlets, and in PowerShell 5.0 there are already more than 600!
You can find out the current version of PowerShell using the PSVersion property of the $PSVersionTable built-in variable, for example, run the following command:
$PSVersionTable.PSVersion
Or run the cmdlet
Get-Variable -Name PSVersionTable –ValueOnly
where, the PSVersion value will be the PowerShell version.
PowerShell language
PowerShell is an object-oriented scripting programming language. It is used to write commands to control all components of the Windows operating system in Windows PowerShell, and to write scripts to automate administrative tasks in the Windows PowerShell Integrated Scripting Environment (ISE). Although the PowerShell language was created for administration tasks, it is a full-fledged scripting programming language, since it has program constructs that are present in every programming language, such as: conditions, loops, error handling, working with variables, objects, and arrays.
The PowerShell language has a uniform syntax for writing commands and a naming structure for these commands based on the principle “ Verb-Noun", which makes this language intuitive for both programmers and system administrators.
Windows PowerShell
Windows PowerShell is an environment for executing commands and scripts in PowerShell. This shell has the same capabilities as the command line, such as: storing the history of command execution, customizing the appearance of the shell, completing command execution with the Ctrl+C key combination, as well as many other features that are not in the command line shell, for example such a wonderful feature as " syntax highlighting» ( introduced in PowerShell 5.0).
There are several ways to launch PowerShell, for example:
- From the command line by typing PowerShell;
- Through the dialog box " Execute» ( keyboard shortcut Win+R), also typing PowerShell;
- In Windows 7 - Start->All Programs -> Accessories -> Windows PowerShell -> Windows PowerShell;
- In Windows 8.1 or Windows Server 2012 R2 - Start->All Programs -> System Tools -> Windows PowerShell;
- In Windows 10 or Windows Server 2016 - Start->All Programs -> Windows PowerShell Directory ( in group W) -> Windows PowerShell.
Example of running PowerShell in Windows Server 2016

Screenshot of PowerShell in Windows Server 2016

Cmdlets in PowerShell
Cmdlet (cmdlet) is a Windows PowerShell command that allows you to interact with operating system objects to manage them. These commands are part of the PowerShell language. Cmdlets are built according to the principle “ Verb-Noun", separated by a hyphen (-); in other words, we first indicate what to do, and with a hyphen we indicate what to do. For example, the Get-Help cmdlet, where Get is a verb meaning " Get", and Help is a noun " Help" in the context of PowerShell " Show – Help" PowerShell cmdlets return results as objects, which is one of the main differences from the Windows Command Prompt, in which commands return only text to the screen.
In addition to cmdlets for obtaining data (Get), there are also types of cmdlets such as:
- Add – adding data;
- Clear – clear;
- Enable – enable;
- Disable – turn off;
- New – create;
- Remove – remove;
- Set – set;
- Start - start;
- Stop – stop;
- Export – export;
- Import – import;
- And many more.
A complete list of cmdlets in Windows PowerShell can be viewed using the special Get-Command cmdlet. For example, run it with the -CommandType cmdlet parameter, as a result, a list of cmdlets will be displayed on your screen.
Get-Command -CommandType cmdlet
As you already understood, cmdlets have parameters with which we can specify the actions of the cmdlet. Parameters can be required or optional; for example, the Get-Command cmdlet has no required parameters.
The picture below shows a way to search for a cmdlet by verb ( Verb parameter). In this case, we displayed a list of cmdlets that can restart something.

Team
Get-Command -Verb Restart
To search for a cmdlet by noun, you must use the Noun parameter. For example, below we have a list of cmdlets that work with services.

Team
Get-Command -Noun Service
If you do not find the desired cmdlet by its full name, you can use a mask in the *Text* format.
Pipeline in PowerShell
One of the main features of Windows PowerShell is the ability to use a pipeline when executing commands.
Conveyor– this is the transfer of the result of a cmdlet through a vertical bar (|) to another cmdlet. At the same time, as you remember, in PowerShell cmdlets work with objects and return objects; accordingly, objects are also transferred along the pipeline.
Using a pipeline, you can perform complex tasks in a simple and convenient way without the need to write complex algorithms and scripts.
For example, let's find out the name of the largest file in the directory "C:\Windows\System32" ( simple example of a pipeline).

Team
Get-ChildItem -Path "C:\Windows\System32" -File | Sort-Object length -Descending | Select-Object -First 1
- Get-ChildItem – cmdlet for getting objects in the specified directory;
- Sort-Object is a cmdlet for sorting objects, in our case we sort by file size ( length -Descending);
- Select-Object is a cmdlet for selecting the desired properties of an object; in our case, we display standard fields and only the very first object, i.e. big file ( parameter -First 1).
All cmdlets are separated from each other by a vertical bar. The result of each cmdlet is passed as input to another cmdlet, i.e. first we get all the objects in the specified directory, then we sort the result and finally select the very first object.
Background execution of tasks
Windows PowerShell has the ability to run jobs in the background, which is a mechanism by which you can run a command ( for example, which takes a long time to complete) in the background, i.e. after launch, you return to the current session and can continue working without waiting for the command to finish. You will need this feature when you need to run a command that takes quite a long time to complete, and as you know, during this time the PowerShell session is blocked until the command completes, and you need to continue working.
You can manage all the tasks that are running in the background, for example, view the list of tasks, stop the task, delete the task, and, of course, view the result of the task.
Windows PowerShell has the following cmdlets for working with background jobs:
- Start-Job – start a background task;
- Stop-Job – stop a background task
- Get-Job – view the list of background tasks;
- Receive-Job – view the result of a background task;
- Remove-Job – remove a background task;
- Wait-Job – move a background task to the foreground in order to wait for it to finish.
To run in the background, you need to write the Start-Job command, and in curly braces () a command or set of commands that you want to run in the background.
For example, let's run some task ( show list of services) in the background, then look at the list of background jobs and display the result of our job ( those. list of services).
Run a task in the background
Start-Job (Get-Service)
We look at the list of tasks running in the background
Displaying the result of Job1
Receive-Job Job1

As you can see, we now have a task with the status “ Completed", i.e. it has already completed ( Get-Service just works quickly).
In order to see the result of the background task, i.e. Get-Service cmdlet, we executed the Receive-Job command and passed it the job name ( the identifier value is also possible). As a result, we displayed a list of services.
Remote control using PowerShell
Windows PowerShell is designed not only for local use, but also for remote command execution. This feature is necessary so that you can control remote computers from your workplace, i.e. run PowerShell commands.
There are several methods of remote control:
- Using the parameter –ComputerName (many teams have it). In other words, you pass the name of the computer on which you want to execute the command as a parameter. The method has the disadvantage of being limited to the execution of one command;
- Using sessions. Cmdlet Enter-PSSession (interactive session). In this way, you connect to a remote computer and all the commands that you type in PowerShell will be executed on the remote computer in the same way as if you typed the commands directly on the remote computer. The method also has the disadvantage that the session is limited to one computer;
- Using a cmdlet Invoke-Command. Using this method, you can run commands or scripts on one computer or on several.
For example, to connect to a remote computer ( in the example below ServerName) in an interactive session, run the following command:
Enter-PSSession ServerName
Scripts, functions, and modules in Windows PowerShell
If you have written an algorithm, most likely you will want to save it in order to use it in the future. Windows PowerShell has a scripting mechanism for this purpose.
The essence of this mechanism is as follows: you write the set of commands you need and save it as a script - this is a simple text file with the extension .PS1.
Then, to run this script, you simply run it in PowerShell. In this case, you need to either specify the full path to the script file, or go to the directory with the script and call it by name.
Important!
By default, running scripts on Windows is prohibited! To view the script execution policy, run the cmdlet Get-ExecutionPolicy. As a result, it will return the current policy, for example:
- Restricted – execution of any scripts is blocked ( default value);
- AllSigned – execution of scripts that have a digital signature is allowed;
- RemoteSigned – execution of local scripts is allowed, all downloaded scripts must have a digital signature;
- Unrestricted - execution of any scripts is allowed ( not recommended as it is unsafe!).
To enable scripts to run, you must use the cmdlet Set-ExecutionPolicy with one of the above parameters.
For example, to allow local scripts to run, run the following command and accept the changes by pressing Y.
Set-ExecutionPolicy RemoteSigned
You can pass parameters to a script, make them mandatory, or set a default value.
Windows PowerShell provides a mechanism for creating your own functions, which, like built-in cmdlets, can be used in the PowerShell shell.
To do this, you need to specify the Function keyword and then write the algorithm for operating this function in curly braces (), i.e. command set ( for example, some frequently used procedure: create a user with certain rights, clean out certain directories, and so on). Then you need to save all this into a script, but only with the extension .psm1, since this file will already be a module.
That's not all, this file must be placed in the directory where PowerShell looks for modules. There are several such directories ( special directory in the user profile, the directory where PowerShell is installed), they can be viewed in PowerShell environment variables. To do this, run the following command
Get-ChildItem Env:\PSModulePath | Format-Table -AutoSize
Once you place the module you wrote in a special directory, you can access your functions as normal PowerShell commands.
Windows PowerShell Integrated Scripting Environment (ISE)
In order to make it convenient to write scripts, functions and, accordingly, modules, Microsoft has developed a special graphical program Integrated Scripting Environment(ISE) - Integrated Scripting Environment. It is very convenient to work in this program, and it also has powerful functionality ( creation of multiple tabs with scripts, output area, built-in debugger and more).
You can run it like this:
- In Windows 7 - Start -> All Programs -> Accessories -> Windows PowerShell -> Windows PowerShell ISE;
- In Windows 10 or Windows Server 2016 - Start->All Programs -> Windows PowerShell Directory ( in group W) -> Windows PowerShell ISE.
Note! ISE will not run on a Windows Server system installed in the Server Core edition.
Screenshot of the PowerShell Integrated Scripting Environment (ISE) in Windows Server 2016

That's all for me, I hope the material was useful to you! Good luck!
PowerShell is an object-oriented software engine and scripting language with a command line interface that provides IT professionals with greater opportunities for configuring operating systems of the MS Windows family. Simply put, it is a kind of universal administration tool. This article will discuss basic techniques for writing scripts in PowerShell, which allow you to automate the management of your Windows environment in a simple way.
PowerShell offers both a pure console interface and a full development environment PowerShell ISE(Integrated Scripting Environment, built-in scripting environment) for scripts. To launch the command line interface, type powershell in the Run menu (WinKey + R). PowerShell ISE is launched using the "PowerShell ISE" command in the same menu.
ISE is more preferable as it provides more opportunities to the developer thanks to syntax highlighting, code auto-completion and other features inherent in many “big” IDEs.
Writing and running scripts
Scripts are saved as files with the extension .ps1. Even though PowerShell has long been a native part of the Windows OS, you can't run its scripts with a simple double-click. To do this, right-click on the script and select “Run in PowerShell”.
There are also system policies that restrict script execution. You can check your current policy settings by running the Get-ExecutionPolicy command. The result will be one of the following values:
- Restricted- execution of scripts is prohibited. Standard configuration;
- AllSigned- you can run scripts signed by a trusted developer; Before running the script, PowerShell will ask you for confirmation;
- RemoteSigned- you can run your own scripts or those signed by a trusted developer;
- Unrestricted- you can run any scripts.
To get started, you need to change the startup policy setting to RemoteSigned using the Set-ExecutionPolicy command:
Cmdlets
Cmdlets are commands with a predefined function, similar to conditional statements in programming languages. They have several key features:
- There are system, user and optional cmdlets;
- the result of executing the cmdlet will be an object or an array of objects;
- Cmdlets can process data and pass it to other cmdlets using pipelines;
- cmdlets are case insensitive, so there is no difference between Get-ADUser , get-aduser , and gEt-AdUsEr ;
- a symbol is used as a separator; .
Each cmdlet contains a verb and a noun separated by a hyphen. For example:
- Get-Process- display current processes running on the computer;
- Get-Service- display a list of services and their status;
- Get-Content- display the contents of the specified file, for example Get-Content C:\Windows\System32\drivers\etc\hosts .
If necessary, you can list all available cmdlets using Get-Help-Category:

You can also create your own cmdlets.
Options
Each cmdlet has several parameters that determine how it works. PowerShell ISE automatically suggests all available parameters and displays their type. For example, Get-Service-NameW* returns a list of services whose name begins with W . If you forget what parameters the cmdlet you entered has, use Get-Member . For example, Get-Process | Get-Member:

If you don't find what you need, or aren't sure how to set the parameters correctly, you can even request examples using the -Examples parameter:

Some cmdlets can also be called using aliases, for example, instead of Get-Help you can simply write Help .
When writing large scripts or team development, you can use comments. Each comment begins with a # character, and the comment block is limited to combinations of characters<# и #>at the beginning and at the end respectively.
Conveyor
PowerShell Allows you to exchange data between cmdlets using a pipeline. For example:
- GetService | SortObject -property Status - sorting running services by status;
- “Hello World!” | Out-File C:\ps\test.txt - writing text to a file.
Multiple conveyors can be used. For example, the following script lists the names of all services except stopped ones:
Get-Service | WHERE ($_.status -eq “Running”) | SELECT displayname
Conclusion
So, thanks to this tutorial, newbies have an idea of what PowerShell is all about. We also looked at options for changing the script execution policy, what a cmdlet is, how they exchange data using a pipeline, and how to get the properties of the desired object. Remember that if you have any problems, you can use the Get-Help cmdlet.
Many of the instructions on this site suggest running PowerShell, usually as an administrator, as one of the first steps. Sometimes novice users ask in the comments how to do this.
If Windows 10 is installed on your computer, then perhaps an even faster way to open PowerShell is to right-click on the “Start” button and select the desired menu item (there are two items there - for simple launch and as administrator). The same menu can be called up by pressing the Win+X keys on the keyboard.

Note: if in this menu instead of Windows PowerShell you see the command line, then you can replace it with PowerShell, if you wish, in Settings - Personalization - Taskbar, enabling the item “Replace the command line with Windows Powershell” (in the latest versions of Windows 10 option is enabled by default).
Launching PowerShell using the Run dialog box
Another simple way to launch PowerShell is to use the Run window:
- Press the Win+R keys on your keyboard.
- Enter powershell and press Enter or Ok.
At the same time, in Windows 7 you can set the option to run as administrator, and in the latest version of Windows 10, if you press Enter or Ok while holding down the Ctrl + Shift keys, the utility will also run as administrator.
Video instruction
Other ways to open PowerShell
The above lists are not all the ways to open Windows PowerShell, but I am sure that they will be quite sufficient. If not, then:

It also happens that people ask what PowerShell ISE and PowerShell x86 are, which are found, for example, when using the first method. I answer: PowerShell ISE - “PowerShell Integrated Scripting Environment.” Essentially, you can use it to execute all the same commands, but, in addition, it contains additional features that make it easier to work with PowerShell scripts (help, debugging tools, color marking, additional hotkeys, etc.). In turn, x86 versions are needed if you work with 32-bit objects or with a remote x86 system.