DIY TV antenna made from cable. How to make a digital television antenna with your own hands for the garden and at home
Despite the rapid development of satellite and cable television, reception of terrestrial television broadcasting is still relevant, for example, for places of seasonal residence. It is not at all necessary to buy a finished product for this purpose; a home UHF antenna can be assembled with your own hands. Before moving on to the consideration of designs, we will briefly explain why this particular range was chosen TV signal.
Why DMV?
There are two good reasons to choose designs of this type:
- The thing is that most channels are broadcast in this range, since the design of repeaters is simplified, and this makes it possible to install a larger number of unattended low-power transmitters and thereby expand the coverage area.
- This range is selected for digital broadcasting.
Indoor TV antenna “Rhombus”
This simple, but at the same time, reliable design was one of the most common in the heyday of on-air television broadcasting.
Rice. 1. The simplest homemade Z-antenna, known under the names: “Rhombus”, “Square” and “People’s Zigzag”As can be seen from the sketch (B Fig. 1), the device is a simplified version of the classic zigzag (Z-design). To increase sensitivity, it is recommended to equip it with capacitive inserts (“1” and “2”), as well as a reflector (“A” in Fig. 1). If the signal level is quite acceptable, this is not necessary.
The material you can use is aluminum, copper, and brass tubes or strips 10-15 mm wide. If you plan to install the structure outdoors, it is better to abandon aluminum, since it is susceptible to corrosion. Capacitive inserts are made of foil, tin or metal mesh. After installation, they are soldered along the circuit.
The cable is laid as shown in the figure, namely: it did not have sharp bends and did not leave the side insert.
UHF antenna with amplifier
In places where a powerful relay tower is not located in relative proximity, you can raise the signal level to an acceptable value using an amplifier. Below is circuit diagram device that can be used with almost any antenna.
 Rice. 2. Scheme antenna amplifier for UHF range
 List of elements:
- Resistors: R1 – 150 kOhm; R2 – 1 kOhm; R3 – 680 Ohm; R4 – 75 kOhm.
- Capacitors: C1 – 3.3 pF; C2 – 15 pF; C3 – 6800 pF; C4, C5, C6 – 100 pF.
- Transistors: VT1, VT2 – GT311D (can be replaced with: KT3101, KT3115 and KT3132).
Inductance: L1 – is a frameless coil with a diameter of 4 mm, wound with copper wire Ø 0.8 mm (2.5 turns must be made); L2 and L3 are high-frequency chokes 25 µH and 100 µH, respectively.
If the circuit is assembled correctly, we will get an amplifier with the following characteristics:
- bandwidth from 470 to 790 MHz;
- gain and noise factors – 30 and 3 dB, respectively;
- the value of the output and input resistance of the device corresponds to the RG6 cable – 75 Ohm;
- the device consumes about 12-14 mA.
Let's pay attention to the method of power supply; it is carried out directly through the cable.
This amplifier can work with the simplest designs made from improvised means.
Indoor antenna made from beer cans
Despite the unusual design, it is quite functional, since it is a classic dipole, especially since the dimensions of a standard can are perfectly suitable for the arms of a decimeter range vibrator. If the device is installed in a room, then in this case it is not even necessary to coordinate with the cable, provided that it is not longer than two meters.

Designations:
- A - two cans with a volume of 500 mg (if you take tin and not aluminum, you can solder the cable instead of using self-tapping screws).
- B – places where the cable shielding is attached.
- C – central vein.
- D – place of attachment of the central core
- E – cable coming from the TV.
The arms of this exotic dipole must be mounted on a holder made of any insulating material. As such, you can use improvised things, for example, a plastic clothes hanger, a mop bar or a piece of wooden beam of appropriate size. The distance between the shoulders is from 1 to 8 cm (selected empirically).
The main advantages of the design are fast production (10 - 20 minutes) and quite acceptable picture quality, provided there is sufficient signal power.
Making an antenna from copper wire
There is a design that is much simpler than the previous version, which only requires a piece copper wire. It's about about the narrow band loop antenna. This solution has undoubted advantages, since in addition to its main purpose, the device plays the role of a selective filter that reduces interference, which allows you to confidently receive a signal.
 Fig.4. A simple UHF loop antenna for receiving digital TV
 For this design, you need to calculate the length of the loop; to do this, you need to find out the frequency of the “digit” for your region. For example, in St. Petersburg it is broadcast on 586 and 666 MHz. The calculation formula will be as follows: L R = 300/f, where L R is the length of the loop (the result is presented in meters), and f is the average frequency range, for St. Petersburg this value will be 626 (the sum of 586 and 666 divided by 2). Now we calculate L R, 300/626 = 0.48, which means the length of the loop should be 48 centimeters.
If you take a thick RG-6 cable with braided foil, it can be used instead of copper wire to make a loop.
Now let's tell you how the structure is assembled:
- A piece of copper wire (or RG6 cable) with a length equal to L R is measured and cut.
- A loop of suitable diameter is folded, after which a cable leading to the receiver is soldered to its ends. If RG6 is used instead of copper wire, then the insulation from its ends is first removed, approximately 1-1.5 cm (the central core does not need to be cleaned, it is not involved in the process).
- The loop is installed on the stand.
- The F connector (plug) is screwed onto the cable to the receiver.
Note that despite the simplicity of the design, it is most effective for receiving “digits”, provided that the calculations are carried out correctly.
Do-it-yourself MV and UHF indoor antenna
If, in addition to UHF, there is a desire to receive MF, you can assemble a simple multiwave oven, its drawing with dimensions is presented below.

To amplify the signal, this design uses ready block SWA 9, if you have problems purchasing it, you can use a homemade device, the diagram of which was given above (see Fig. 2).
It is important to maintain the angle between the petals; going beyond the specified range significantly affects the quality of the “picture”.
Despite the fact that such a device is much simpler than a log-periodic design with a wave channel, it nevertheless shows good results if the signal is of sufficient power.
DIY figure eight antenna for digital TV
Let's consider another common design option for receiving “digits”. It is based on the classic scheme for the UHF range, which, because of its shape, is called “Figure Eight” or “Zigzag”.
 Rice. 6. Sketch and implementation of the digital eight
 Design dimensions:
- outer sides of the diamond (A) – 140 mm;
- internal sides (B) – 130 mm;
- distance to the reflector (C) – from 110 to 130 mm;
- width (D) – 300 mm;
- the pitch between the rods (E) is from 8 to 25 mm.
The cable connection location is at points 1 and 2. The material requirements are the same as for the “Rhombus” design, which was described at the beginning of the article.
Homemade antenna for DBT T2
Actually, all of the examples listed above are capable of receiving DBT T2, but for variety we will present a sketch of another design, popularly called “Butterfly”.

The material can be used as plates made of copper, brass, aluminum or duralumin. If the structure is planned to be installed outdoors, then the last two options are not suitable.
Bottom line: which option to choose?
Oddly enough, the simplest option is the most effective, so the “loop” is best suited for receiving a “digit” (Fig. 4). But, if you need to receive other channels in decimeter range, then it is better to stop at “Zigzag” (Fig. 6).
The antenna for the TV should be directed towards the nearest active repeater, in order to select the desired position, you should rotate the structure until the signal strength is satisfactory.
If, despite the presence of an amplifier and reflector, the quality of the “picture” leaves much to be desired, you can try installing the structure on a mast.

In this case, it is necessary to install lightning protection, but this is a topic for another article.
T2 digital television is actively entering our lives. Today, many homes already have antennas installed to receive such a signal. But what about those who live in the suburbs or in a rented apartment? The solution is quite simple - this is homemade antenna for T2, which can become an inexpensive and reliable alternative to the factory product.
DIY TV antennas
In order to catch digital terrestrial television, first of all, you need to have a supporting new digital format TV, and then you won’t have to buy a special set-top box.
In addition, indoor or outdoor decimeter antenna. You should not believe those who say that the device must be digital or something else. You can simply make a TV antenna with your own hands from scrap materials, resulting in a powerful device that will perfectly receive the signal.
Simple do-it-yourself decimeter antenna
Before preparing materials for the manufacture of the device, it is necessary to calculate its future length. To do this, you need to find out the frequency at which it goes digital broadcasting, and apply a special formula: divide 7500 by the frequency in Megahertz and round the result.
A decimeter TV antenna is made from a regular 75-ohm television coaxial cable and standard connector.
After all the correct actions have been carried out, the search for channels will begin. If the repeater is located in an area up to fifteen kilometers from the house, then the signal will be received well and an amplifier will not be required. If the distance is greater, then the use of an amplifier is necessary.
Do-it-yourself digital figure-of-eight antenna
In order to ensure that the signal quality is good, you can make a more complex homemade television antenna for TV.
To make it you will need to prepare:
- TV cable;
- a box;
- roulette;
- foil;
- glue;
- scotch.
The bottom of the box (for example, a shoe box) will need to be well coated with glue and completely covered with foil. In this case, it is necessary to ensure that the foil does not rise anywhere.
While the foil is sticking, you need to cut two pieces of 50 centimeters each from the cable, and strip the ends of the insulation by carefully cutting them with a knife outer shell. Having bent the braid to the side at all ends, bend the segments into a circle so that they do not close completely. The distance between them should be approximately 1 centimeter.
Secure the resulting figure eight with tape to the lid of the box. In this case, you need to make sure that the stripped ends are located next to each other. The cable on the box should hold well, so there is no need to skimp on tape. The antenna frame is ready.
Now follows prepare the main cable, which will connect to the TV.

All that remains is to mount the connector for the TV. To do this, at the remaining end TV cable you need to remove the insulation, squeeze and cut the braid, remove the foil. Then, stepping back half a centimeter from the braid, remove the internal insulation of the core.
The television connector must be screwed onto the prepared cable so that the insulated core is not visible in the wide part. After this, from the edge of the connector you should retreat half a centimeter and bite off the excess part of the core, insert the second part of the connector and screw it on.
The cable and antenna are ready. Having installed the device in a convenient place, you need to point it towards the TV transmitter, connect the cable and turn on the TV. The antenna should work well and the TV should show no interference.
Homemade antenna made from cans
An antenna that will pick up not one or two channels, but seven or eight, can be made from the simplest tin cans. To make it you will need to prepare:

First of all you should prepare the cable, removing the top layer from it at a distance of 10 centimeters from the beginning. The wiring inside the cable must be unraveled, the foil removed from under it, and one centimeter of the stripped layer cut off. You need to put a plug on the other end of the wire.
Now follows prepare the jars. Attach the cable core to the rings of one of them, and part of the unraveled wires to the other. If there are no rings, then you can screw self-tapping screws into the cans and wrap wires around them, treating the surface with a soldering iron.
After this, the jars need to be used with adhesive tape. attach to hanger. The distance between them should be 75 millimeters, the cans should be placed in one straight line.
Homemade TV antenna ready. Now you need to connect it to the TV using a plug and find a place for it where the signal will be best received.
Indoor TV antenna “Rhombus”
 This design is a diamond-shaped frame, is made quickly and easily, and the signals digital television accepts confidently and easily. For it you will need to prepare a copper or aluminum rod about 180 centimeters long.
There should be two diamonds. One will act as a reflector, and the second as a vibrator. The side of the frame should be approximately 14 centimeters, and the distance between them should be about 10 centimeters.
After the rhombus is made, between the two ends of the rod it is necessary to install a dielectric. Its size and shape can be arbitrary. The main thing is to ensure that the distance between the rods is about two centimeters.
Now the upper parts of the frames need to be connected, and a cable must be connected to the copper or brass petals attached to the antenna terminal.
If the repeater is located far away or the resulting device will be used to catch poor quality signal, then it will be possible add amplifier. The result will be an active decimeter antenna for TV, which can be used not only in the city, but also in the country.
Of course, such devices for receiving a television signal will not have an elegant design, but with their help you can enjoy your favorite programs.
1.Television UHF antenna with your own hands
1.
Ring-coaxial cable RK75, 530 mm long.
2.
Loop-coaxial cable RK75, 175 mm long.
3.
To the antenna.
Assembly:
To assemble this antenna, you don’t even have to go shopping.
To do this, you need to take an RK75 antenna cable 530 mm long (for the ring) and 175 mm long. (for loop).
Connect as shown in the figure.
Secure it to a sheet of plywood (plexiglass) using wire clamps.
Direct to telecentre.
Here is a UHF antenna that will work no worse than a purchased one.
2. Do-it-yourself UHF television antenna “Narodnaya”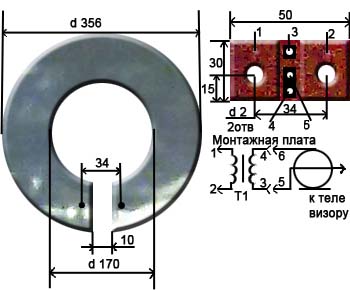
The antenna is an aluminum disk with an outer diameter of 356mm and an inner diameter of 170mm. and 1mm thick, in which a 10mm wide cut is made.
A printed circuit board made of glass lite 1mm thick is installed in place of the cut. This board has two holes for mounting with M3 screws.
TO printed circuit board attached to the antenna, solder the leads of the matching transformer T1.
For a transformer, it is best to use a ring core with an outer diameter of 6...10mm and an inner diameter of 3...7mm. and thickness 2...3mm.
The transformer windings are covered with a single-layer insulated wire with a diameter of 0.2...0.25 mm. and have the same number of turns, from 2 to 3 turns. The length of the coil bends is 20mm.
With such a transformer, reception in the meter and decimeter range is possible at a distance of 25...30 km. At a distance of up to 50 km. The antenna works satisfactorily only on decimeter channels.
Without a transformer, the distance of reliable reception is halved.
However, there is a circuit that allows you to get similar results without a transformer; for this you need to assemble the following circuit: 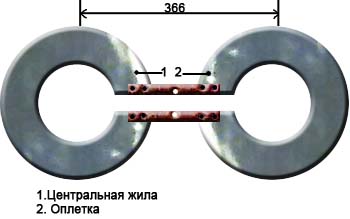
3. Television log periodic antenna(DMV) with your own hands.
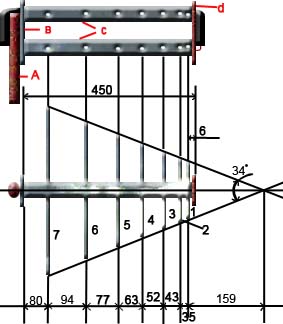

A. Mast
IN. Metal plate (dimensions 87x30x5)
WITH. metal tubes d 16…19mm
D. textolite plate (dimensions 87x30x5)
E. braid
F. coaxial cable
G. central core
7,6,5,4,3,2,1. vibrators
Assembly
1. Take two metal tubes 450 mm long and 16...19 mm in diameter.
2. Make two plates measuring 87x30x5mm. (one is made of metal, the other is made of textolite), drill holes in them, as shown in the pictures.
3. Secure the tubes in the plates (to the metal plate by soldering, and to the textolite plate using screws screwed from the ends of the plate with a diameter of 2.5 mm.
4. In metal tubes, along their length, at the distances indicated in the figure, drill holes with a diameter of 3.3 mm. and cut the M4 thread.
5. Screw 14 directors made from a rod with a diameter of 5 mm into the holes. At one end of each rod, cut an M4 thread to a length of 10mm.
The lengths of the directors, taking into account the part of the length of the threaded end, according to the vibrator number (see figure), are given in the table:
Vibrator No.…..length in mm…..number of pieces
1…………………………..107………………..2
2…………………………..129………………..2
3…………………………..155………………..2
4…………………………..186………………..2
5…………………………..225………………..2
6…………………………..272………………..2
7…………………………..330………………..2
6. Place the coaxial cable in one of the tubes and solder it according to the figure. Paint the solder ends with paint.
7. Attach the antenna to the mast.
Antenna from user Evgen:
1. Take two EMPTY jars - for channels 21 to 41, 0.5 l is better, for channels 42 - 69 - 0.33 l.
2.Secure them with any in a convenient way(insulating tape, adhesive tape, rope, glue, etc.) on a solid piece of dielectric (rail, stick, piece of plywood - it is better to paint or varnish the wood, textolite, getinaks, etc.) at a distance of 10 - 15 mm from each other friend.
3. We make 2.5 - 4 mm holes in each jar along the edges (as many screws, washers, nuts can be found) and with the help of these we attach the central core of the cable to one jar, and the braid to the other. You can attach any balancing device, but you can do without it.
The receiving distance depends on the installation location of this design (outside is better) and the power of the transmitter.
The holes are on those edges where the jars are closer to each other. And it’s more convenient to first fasten the cable (and the balancing device - if you’re lazy), and then the jars to the supporting structure.
The population receives the bulk of information through television, viewing of which requires a receiving antenna. You can buy a receiving device at any store, but this is not always possible. In this case, you can make an antenna with your own hands. Next, the main varieties and the order of their assembly will be considered.
The main advantage homemade devices is that they require a minimum of financial costs. It also happens that homemade options superior to factory ones in many respects.
The advantage is that handicrafts can be called “all-wave”; this is not done intentionally, it turns out just like that. The disadvantages of homemade devices are that they are unaesthetic appearance, although it depends on the hands of the master. A significant disadvantage is the inaccessibility of some materials.
Undoubtedly, there are more advantages, so let’s look at the main handicrafts.
Varieties
"Beer"

To make the product you will need an even number of beer cans. The most common options are made of two pieces. The installation process is quite simple and requires a minimum of tools and consumables.
Instructions:
- To begin with, take a wooden strip(a hanger will also do), which will serve as a support for the structure.
- Beer cans are attached to the rail using tape, at a distance of about 6 centimeters.
- Next, a television cable is attached to the banks. The procedure can be performed using either self-tapping screws or solder.
- The last step is to attach the base to the mast and adjust the position. More difficult option made from 6-8 cans. Such an antenna will require two bases installed vertically.
- 4 cans are attached to the installed bases, parallel to each other.
- Using a copper plate or wire, you should connect the cans, located on one rack, then perform the procedure on another.
- The next step is to install the racks into one structure, it should be taken into account that the distance between the bottoms of the cans must be at least 60 mm.
- It remains to secure the cable at the extreme points connecting plates.
Antenna with minimal costs

It should be remembered that television travels in space in the form of waves that are well perceived by metal objects. To watch several TV channels, you can use a piece of wire, one end of which is attached to the heating system, and the other into the TV to the central contact.
The principle of operation of such an antenna is based on the area of the system, and it envelops almost the entire house at different heights. The reception quality of the design is not the highest. A more interesting option requires a balcony with metal strings for laundry.
The assembly technology is completely similar to the battery system. There are places with reliable signal reception, where you can use a knitting needle, which will make it possible to view the main channels.
Regular antenna

Assembling the antenna yourself is quite simple; you will need a tube made of aluminum or brass. The latter option is more convenient, since this material practically does not oxidize.
Instructions:
- The length of the tubes should be 276 mm– it is this that ensures the reception of most channels, thickness 20 mm. The tubes should be flattened on one side, then holes should be drilled in these places.
- The next stage is preparing the base. It must be made of dielectric material, measuring 150 by 50 mm and at least 5 mm thick.
- Next, a mock-up of the antenna is laid out on a flat surface. The base is laid, the tubes are placed on top of it, the distance between the flattened ends of the tubes is 65 mm, the locations of the holes in the tubes are marked and a hole is made in the base with a drill of the same diameter.
- The next stage is the assembly of the structure. The tubes are attached to the base using bolts; it is advisable to use an additional fastening in the form of a clamp - this will ensure the strength of the structure. The bolts used for fastening are 15-20 mm long, this is necessary for fastening the loop.
- Antenna assembly completed, all that remains is to connect the cable; you cannot do this directly to the antenna. Correct connection made through a ring of wire with a resistance of 75 Ohms. The length of the loop is calculated individually depending on the length of the tube; in this situation it is 280 centimeters.
The outlet cable is already connected to the loop.
Powerful antenna

Having dealt with the classic options, you should consider antennas designed to receive the most weak signal. To create one, you will need a minimum of materials, namely a brass tube, a plate of the same material, desire and hands.
Instructions:
- The manufacture of the receiving device begins with bending two squares of the same size from the tube, mounted on a dielectric base in such a way that the distance between the corners of the squares is 10-15 mm.
- The next step is making the screen, designed to strengthen the signal power and smooth out radio interference. The screen is curved in the shape of a rectangle 11x10 centimeters, with a side height of 23 mm and a width of 6 mm.
- When connecting two components, a distance of 12 mm must be maintained. The finished product is connected to the TV using a cable with a resistance of 75 Ohms. An important fact is that this design does not allow the use of bolted connections, only solder is allowed.
When assembled correctly, the model outperforms its factory counterparts.
UHF antenna

Digital television is covering ever new territories, but for it confident reception a special module is required. Often, the device is purchased separately, but there are TVs that have a built-in module.
But one receiver is not enough; you need an antenna that receives UHF waves. The simplest option is made on a sheet of plywood.
Instructions:
- For assembly you will need a 75 Ohm TV cable 53 cm long. This segment is fixed on the sheet in the shape of a ring; it can be secured either with clamps or with glue.
- When bending the loop, make sure that there is a gap of 5-10 mm between the ends of the cable. The second element of the product is made from a similar cable, 15.5 cm long, from which a loop is made.
- The connection between the ring and the loop is as follows– the inner core of the ring is connected to the winding of both sides. The loop of the central conductor is attached to this twist, and the outer winding is connected between the edges. Central vein antenna cable is connected to the inner core of the loop, and the winding to the loop winding.
Settings
Installation of do-it-yourself products is carried out similarly to factory-made analogues. Most options require a mast to raise them to maximum height.
In most cases, a height of 2-3 meters higher than the height of the roof of the building is sufficient. Additionally, when installing, you should choose a location with the most strong signal, this is especially true for indoor devices.
Tuning is carried out by rearranging or rotating the antenna towards the tower; sometimes installation is required additional screen from the back.
DIY amplifier
 There are often situations when a properly assembled and well-tuned antenna refuses to reliably receive a signal, then you simply cannot do without a signal amplifier.
Most of these devices have a complex design, which is difficult to assemble without certain knowledge. A simpler version can be made with your own hands in 10 minutes.
You will need a magnet onto which several turns of television cable are wound. This device can be assembled either near the TV or on an antenna. The latter option is most popular in factory amplifiers.
Results

Concluding the topic, you should pay attention to the fact that the highest quality of reception can be achieved by using soldering (bolts and nuts oxidize, significantly deteriorating the signal). An important aspect is right choice cable. The most popular option is a product with a resistance of 75 Ohms, made of silicone.
Similar products have long term services, plus are not affected by climate. The way you connect the cable to your TV is important. It is recommended to use special plugs; solderless options are allowed.
Before starting to assemble the product, you need to decide on the type of product; to do this, you should find out the frequency at which the signal is broadcast, this depends on the specific area.
Equipment for digital television is what you can buy in our store. Our company operates in the market of broadcast and satellite equipment since 2003 and we already know most of our clients by sight.
For regular customers of our online store there is a system of discounts, which are calculated automatically according to the coupon number assigned to you personally.
All equipment undergoes pre-sale preparation, namely installation latest version Software for satellite and broadcast consoles. All receivers are tested for functionality.
Our company delivers equipment both in Moscow and throughout Russia. Most courier delivery companies have agreements on preferential delivery prices.
In our online store you can find almost any equipment that you may need to receive satellite and terrestrial television. We have tried to make the ordering process convenient for anyone. If you plan to order not one item, but several, then you can use the store search and pay attention to the accompanying equipment. If you want to pick up equipment for receiving satellite TV, then you should go to the tab menu " Satellite television", if for receiving terrestrial or cable TV, then " Terrestrial television" etc. If you have questions during the ordering process, you can use online chat, which is located on every page of the online store or order back call.
We hope that in the online digital TV store you will be able to spend minimal amount time to order the required equipment.